Decals can be positioned on objects in the scene using either the local decal texture mapping controls (similar to image mapping),
or by transforming the decal grip in the scene. These two methods of transformation have different advantages.
Mapping decal textures
To adjust the mapping of decal textures on objects:
- Select the decal grip for the decal you wish to adjust.
Note
If you select more than one decal grip and adjust the mapping, the decals are aligned in the scene with identical mapping
values.
- Press Ctrl+M to open the dialog box for decals.
- In the section of the dialog box, adjust the mapping type and location using the Image Map controls.
- To link the mapping of other image maps in the material to the decal texture, see
NO LABEL
.
- For information on adjusting the UV or projection (Planar, Triplanar, Cylinder) mapping of a decal texture, see Move image maps.
- To adjust the tiling of a decal texture, see Turn off texture tiling.
Quickly move the decal texture
To quickly make adjustments to the position, rotation, or scale of a decal texture:
- Select the decal grip for the decal you wish to adjust.
Note
If you select more than one decal grip and move their textures, the decals are aligned in the scene with identical mapping
properties.
- Press Shift+M to begin the tool for the selected decals.
The texture manipulator for the decal texture will appear, and the Materials Properties dialog box will open. If in ray tracing
mode, display of the bounding box may be inconsistent. To work around this, stop and restart ray tracing mode, or work in
hardware rendering mode.
The Heads Up Display (HUD) provides instructions for using the texture manipulator.
- Press ESC to stop the Move Texture, or press the button in the Material Properties window.
Adjust decal projection depth
Decals projected with the Planar mapping method also have depth control perpendicular to the projection plane. This is useful
when multiple or combined objects have a decal applied to them and the decal appears to project too far through them.
To adjust the depth of a Planar decal:
- Select the decal grip for the decal you wish to adjust.
Note
If you select more than one decal grip and adjust the mapping, the decals are aligned in the scene with identical mapping
properties.
- Press Shift+M to begin the Move Texture tool for decals (or open the window and press the button in the Decal section).
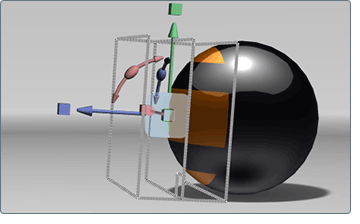
The Planar texture manipulator for the decal texture will appear:
- Click and drag on the blue box above the depth direction handle to adjust the depth. The gray outlines will indicate the overall
depth of the projection.
Transform decal grips
Decal grips can be transformed like any other object in the scene using standard transform controls. Transforming a decal
grip moves a decal relative to all objects in the scene. Decal grips are automatically transformed when the object the decal
is assigned to is transformed.
To transform a decal with its grip:
- Select the decal grip for the decal you wish to adjust.
Note
If you select more than one decal grip and transform the grips, the decals will not have their mappings aligned, but will
move relative to all objects in the scene.
- Press the H key (or ), and click and drag on the 3D handles to interactively transform the grip. See Transform objects.
- Or, press the Shift and H keys (or ) to open the relative transforms dialog box. See Transform objects relative to original values.
- Or, select to open the absolute transforms dialog box and view and edit all transform properties. See Transform objects in multiple directions with the keyboard.