You can export an image of your model as it appears in the 3D View as a .psd file. Mudbox saves an image of the 3D view and
sends it to Photoshop, where you can create new paint textures or perform touch up work with Photoshop tools, keeping the
view of your 3D model as a reference. You can then re-import the paint layer back into Mudbox and update with the changes
you made in Photoshop.
Best practices
For best results, consider the following tips before exporting an image of your Mudbox screen to Photoshop.
- Turn off the 3D grid and wireframe display options. (Disable and .)
- Turn off all viewport filters (in the Viewport Filter window.)
- Subdivide to about 100,000 to 200,000 visible polygons.
If you will click in the Save Screen Image window, you can double this figure, or , you can quadruple. If you have too many polygons, single pixel dropouts can occur when you re-import the paint layer.
- Paint on portions of the surface that are mostly normal (90 degrees) to the camera position.
Paint on surface areas that are somewhat oblique can appear smeared when you re-import the paint layer. Once the angle of
the surface relative to the camera is greater than 65 degrees off normal, the projection falls off sharply.
- Remember that this workflow supports 8 bits per channel (unlike Export a paint channel containing multiple layers or Export a single paint layer). HDR information can be lost in this process.
To export an image of your Mudbox screen to Photoshop
- (In Mudbox) Set up your model in the as you want it to appear on the paint layer in Photoshop. (Dolly, track or tumble the view as required.)
- In the Layers window, solo the diffuse paint layer you want to export with the image of the . (See Solo a paint layer.)
Soloing the layer makes it the only visible paint layer, temporarily hiding any other diffuse layers that are not required.
Note
Diffuse paint layers are the only layer type available for export and re-import using this workflow.
- Select from the main menu bar (Windows Hotkey: Alt + E) (Mac OS X Hotkey: Command + E).
The Export Screen Image to PSD window appears.
- Set the resolution you want for the exported image, then click .
You can enter a custom and for the image (in pixels), click to automatically set the and to your current screen resolution, or click or for greater resolution.
Note
If you enter custom and values, ensure that the resulting image aspect ratio matches the screen resolution exactly. Otherwise, the texture may not
align correctly with the model when re-imported. Using an exact integer multiple of the current screen size is recommended.
- In the file browser window that appears, set the directory path, enter a filename, then click .
Mudbox automatically launches Photoshop and the file appears in the Canvas view. If Photoshop doesn't launch automatically,
see Troubleshoot paint layers.
Note Mudbox materials containing high specular values or reflection maps do not display in Photoshop exactly as they appear in
Mudbox. This does not affect your paint layer work, and will appear correct again in Mudbox when you re-import the file.
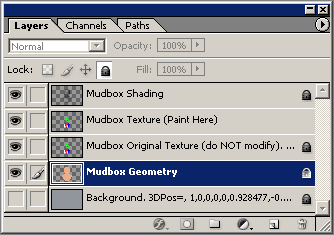
In Photoshop, the Layers window (Hotkey: F7) contains five layers exported from Mudbox (listed in order from bottom to top):
 Expand here for more information on each layer exported from Mudbox.
- Background (Locked)
Contains an image of the background and camera information. The numerical string listed after the layer name records camera position information used
to set back to its exact location when you re-import the .psd file after editing in Photoshop.
Warning
Editing the numerical string after the layer name or the image on the background layer prevents the texture from aligning
correctly when the .psd file is re-imported to Mudbox. Do not resize the in Mudbox between export and re-import of the .psd file.
- Mudbox Geometry (Locked - Do not modify.)
Contains a screen capture of your model(s) as it appeared in the . It displays a non-shaded (flat shaded) preview of the model with the assigned shading material. Mudbox uses this layer to
accurately composite your paint edits when you re-import the file.
- Mudbox Original Texture (Locked - Do not modify.)
Contains a copy of the original paint layer(s) as it appeared from the camera at screen capture. Mudbox uses this layer to
make a comparison between the original paint layers and any edits you make on the Mudbox Texture layer.
- Mudbox Texture
Where you paint or apply any paint edits. These are applied to your model after you save the .psd file and re-import to Mudbox.
Warning
Do not change this layer name. Renaming this layer prevents you from re-importing the file to Mudbox.
- Mudbox Shading (Locked - Do not modify.)
Contains a screen capture of the 3D shading of your model(s) as it appeared within the . Mudbox uses this layer to accurately composite your paint edits when the file is re-imported. It can be useful to keep this
layer visible as a reference for your paint edits in Photoshop.
- (In Photoshop) Perform any paint work or edits as required on the layer.
If you create any other paint layers in the file, merge them with the layer before saving the file and returning to work in Mudbox.
Important When editing the file in Photoshop, do not change the blend mode setting nor any of the original layer names. Changing the layer names can prevent Mudbox from aligning the camera
correctly, or determining the correct paint layer to apply as a stencil.
- Save the .psd file ().
- (In Mudbox) With the original model loaded in the , and the original paint layer selected, select (Windows Hotkey: Alt + R) (Mac OS X Hotkey: Command + R).
Note
Mudbox projects the paint onto the selected layer. You can select a different layer than the original if you want to apply
the Photoshop edits to a different layer.
- In the window that appears, select the file you saved in Photoshop and click .
Importing the PSD file causes the following to occur:
Note uses the stencil tool. If you have a stencil currently selected, it is replaced with the imported texture. When the re-import
and auto-projection are successful, the stencil remains hidden. If the auto-projection does not occur as expected, or you
receive an error message stating a problem within the PSD file the stencil may be displayed in the 3D View. It can also be
manually displayed by pressing the Q key. In these situations, refer to the
Troubleshoot paint layers topic for possible solutions.
- Save the file in Mudbox to ensure the Photoshop edits are updated in the original texture files associated with the diffuse
paint layer.
 Except where otherwise noted, this work is licensed under a Creative Commons Attribution-NonCommercial-ShareAlike 3.0 Unported License