Click the links to jump to each section of the Preferences window.
Specify the default colors in the Mudbox interface. Click a color tile to display the Color Chooser window and modify the default color settings for the item.
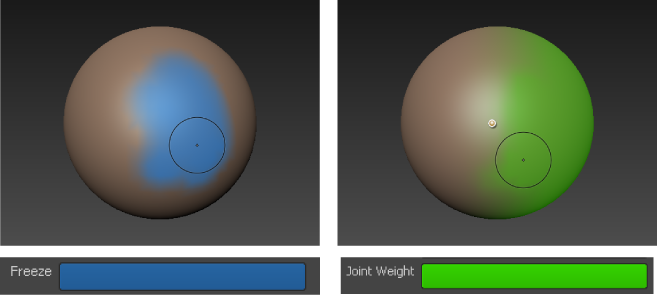
You can use these preferences to customize various items including the scene background color(s) and grid color, as well as the Weights tool and Freeze tool colors.
When on (default), Mudbox automatically loads and unloads texture tiles depending on what is visible on your screen, loading only tiles that are in front (in the view). Mudbox loads as many tiles as possible at full resolution until reaching the GPU budget maximum (set by the Paint Buffer Memory Budget preference). Remaining tiles display in blue.
When off, you must load and unload texture tiles manually by pressing the Up-arrow key (or Alt-Up Arrow) as you work.
See also Gigatexel engine in the Painting overview topic.
Available only when Use Gigatexel Engine is on. Lets you set the total percentage of your graphics card (GPU) memory that can be used by the paint buffer as it loads and unloads texture tiles.
Essentially, this preference lets you allocate the percentage of memory on the graphics card used for display quality versus the amount used for paint stroke quality.
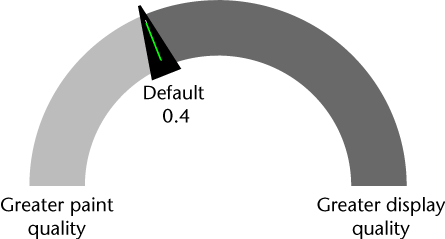
Increase the budget value for higher resolution painting, or decrease the budget value to display your model at the best possible quality. (Decreasing the memory budget reduces the paint resolution.) If you're using Mudbox for display purposes only, you can set the budget to 0.
For example, the default budget of 0.40 means up to 40% of the graphics card memory is devoted to the Gigatexel Engine (for buffering paint layers), and the remainder is used for displaying textures in the 3D View.
If you enter a value greater than 0.85 (85%), it's possible to paint at higher resolution than the 3D View can display. If you set the budget to its highest value, very little memory is available for displaying textures in the 3D View. You can still paint very fine detail, however the display of textures may be blurry.
See also Graphics memory optimization.
Additional notes for advanced users:
The correlation between the Paint Buffer Memory Budget value and the resolution of the paint buffer is not simple. The final resolution of the paint buffer depends on the budget value you set, the amount of GPU memory you have, and the number of paintable tiles in the 3D View.
For example, if you have 1000 MB of GPU memory and you set the budget to 0.5, 500 MB of memory is reserved for the paint buffer. For a mesh with a single tile and one 4k paint layer in the 3D View, the buffer resolution is 4k. For a mesh with 100 tiles and a 4k paint layer, the buffer resolution will be less than 4k. However, if you zoom in on the mesh with 100 tiles so that only 10 tiles display, the resolution of the buffer is automatically increased. With fewer tiles in the 3D View, each tile can be a higher resolution and still fit into the budget.
Specifies the highest subdivision level at which the Wireframe display option will update on a model. Setting a lower value improves the interactive performance when working with complex models. See also Change the model display.
Increases the interactive performance when tumbling dense models in the range of 4 million quads and higher. If you want your model to look as detailed as possible and are not concerned about performance, set Fast Render Scale to a value of 0.1. Higher values in the range of 1.0 - 2.0 allow the model to tumble faster but fine detail appears when you zoom in close.
When on (by default), Mudbox applies an anti-aliasing filter to smooth the appearance of any textures painted or applied to a model. Turn off if you need to view textures without this filter. Turning off can also improve performance for the Cavity Ambient Occlusion viewport filter on older graphics cards.
Lets you select from a list of your own rendering plug-ins to render the active mesh.
If you have implemented an alternative rendering plug-in (or multiple plug-ins) using the Mudbox SDK, your plug-in class name displays in this drop-down list once you copy the rendering plug-in to the Mudbox plug-ins directory. (See File environment for plug-in directory paths.)
If you haven't added any separate rendering plug-ins, the only option available is the Mudbox hardware renderer (HWRenderer).
Lets you specify the proxy server type you will use to access the community. Off by default.
A proxy server acts as a go-between for web sites and web browsers. If your proxy server is configured automatically, or a proxy server is not required, you can leave the setting Off. However, if proxy server settings are required, you can consult your system administrator and configure the following settings. Server type options include SOCKS5, and HTTP based on the different protocols in use.
This section lists the directory location for stamps, stencils, icons, image planes, log files, temporary files, settings files, data (.mud) files, and texture (paint) files. See also File environment.
Specifies the default directory location for Maya, used by the Send To Maya option. See also Send files to Maya_3dsMax_Softimage.
When on, Mudbox saves paint layers for all PTEX models in the scene as PTEX files in the <filename>-files folder associated with your .mud file. This process does slow the saving of .mud files that contain painted PTEX objects. See also Save or export paint layers.
When on (default), Mudbox also saves general data about the mesh (vertex positions, list of faces, and so on) in output PTEX files. This can be useful if other tools in your pipeline can use this type of PTEX data, for example if you will use a PTEX viewer to inspect the output file. It is recommended that you keep this option on if you plan to extract PTEX files.
When on, Mudbox automatically scans every FBX or OBJ mesh that you import to alert you to any potential problems before you spend time painting or sculpting. When off, imported files are not scanned. You can also select Mesh > Validate Meshes from the main menu bar at any time to scan all meshes in the scene.
For areas on a multi-tiled model where the associated UV texture tile is unloaded, this preference sets whether a color displays to highlight the unloaded tiles. When off, areas with unloaded tiles display the same color as the current material color, so there is no color differentiation between loaded and unloaded tiles. See also Hide and show UV tiles on a model.
Lets you set whether Alt-clicking the paint layer Visibility icon solos the paint layer ( Solos the Layer option), or solos the paint layer and displays the paint in flat color ( Solo as Diffuse option).
See also Solo a paint layer.
When you select Mesh > Create UVs, Mudbox calculates UV face sizes based on the face sizes in the mesh. This can result in adjacent faces of similar size having different UV resolutions. This drop-down lets you set a value closer to 'uniform' to bias Mudbox towards keeping the UV scale similar, even when the mesh faces vary in size. Options include: Uniform, Mostly uniform (default), Somewhat uniform, Based on mesh face size.
Controls the sample size directly beneath the paint brush cursor. In most circumstances, the default setting of 0 is sufficient.
When painting models with very narrow, thin faces or larger faces relative to the size of the brush tip, visible artifacts can appear. In these situations, try increasing the Brush Sample Area to extend outside the brush cursor to determine the brush effect. For example, a value of 1 doubles the area that is calculated.
Specifies the size of the border that is automatically extended outside the perimeter of a UV shell when painting on a model. Extending paint pixels beyond the perimeter edges reduces the appearance of seams on a painted model where separate UV shells meet.
A value of 0 specifies no edge bleed. A value of 1 specifies a one pixel border width outside the shell, while a value of 2 specifies a 2 pixel border width (based on a 1024 x 1024 resolution texture image). A value of 2 specifies a 4 pixel border when the image texture resolution is 2048 x 2048. Working range is between 0 and 10.
Lets you specify whether you want TIFF image files compressed by default when exported from Mudbox, and which compression scheme to use. Set to LZW (default) or Deflate compression, or set to None if you want no compression (for example, if the application you are exporting to does not support compression in TIFF files).
Set the following preferences for importing and exporting from Mudbox using the FBX format.
By default, the selected object is exported based on its current subdivision level and any detail contained on the sculpt layers associated with that subdivision level when exporting using FBX.
Turn this option on if you want to preserve the separate sculpt layers on the current subdivision level as individual blendshapes. This produces separate blend shape targets that can be modified in Maya or 3ds Max in a manner similar to the layer Strength slider within Mudbox.
By default, when you export a Mudbox scene using FBX, a subdirectory titled <filename> .fbx-files is created to store any existing paint layers (textures).
If the Mudbox scene has been previously saved and a -files subdirectory already exists, you can reference the -files directory instead.
Turn on to export an .fbx file that references the same -files subdirectory as the .mud scene.
By default, any paint layers that exist on the exported model (including the background color) are saved as discrete textures. If the 3D application supports it, the textures usually appear as layered textures on the model's shading material.
As some 3D applications do not support multiple layered textures within a single texture channel, turning on Flatten Paint Layers On Export is recommended. This causes the paint layers to be merged into one texture per channel during export.
Smooths out (blurs) the joint weighting for imported joints. A value of 0 does no smoothing, and the maximum smoothing (blur) is 100. Default is 10.
A maximum of four joints can influence a vertex on a model in Mudbox. When you import rigs where more than four joints are set to influence a vertex, only the four strongest joints are assigned for that vertex and the remaining joint influences are ignored. In some instances, the joint weighting can transition abruptly as a result.