Export a paint channel containing multiple layers to Photoshop


  1. (In Mudbox) In the Paint Layers window, select the paint channel containing the layers you want to export. For example, Diffuse, Gloss, Bump, and so on.
  2. Right-click the channel or one of the layers and select Export Channel to PSD (or select > Export Channel to PSD from the window menu button.)
  3. In the Export Paint Channel to PSD window that appears, select a directory, enter a filename, then click Save.

    The paint channel containing the multiple paint layers is exported as an 8 bit (RGBA) .psd file. Photoshop launches automatically, and the file appears in the Canvas view.

    Note

    If Photoshop does not launch automatically, see Troubleshoot paint layers.

    If the texture is composed of multiple UV tiles, a separate .psd file is created for each tile. The origin tile file name (U0, V0) is named similar to the file name you specify. Non-origin UV tile files have their tile position appended to their file name (for example: <layername>_unumber_vnumber appended to the file names where number specifies the starting point in UV space for that tile.

  4. (In Photoshop) Open the .psd file you exported from Mudbox (if Photoshop did not automatically launch).

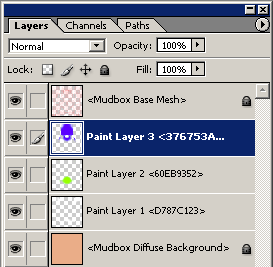
    The Layers window in Photoshop (Hotkey: F7) displays the paint layers you exported from Mudbox with two additional layers: Mudbox Base Mesh located at the top of the layer stack, and the Mudbox <channel name> Background layer at the bottom.

    • Mudbox Base Mesh (Locked): Contains an image of the UV texture coordinates (based on how they appeared on the base subdivision level for the model) that is aligned with the paint layer you selected. This layer can be turned on or off in Photoshop and is intended to be used as a visual reference for your texture creation and editing work. Otherwise, this layer is locked by default and should not be modified.
    • Paint layer name <n>: The layers in the paint channel you exported are displayed with their respective layer names. Any layer blend mode, opacity, visibility, or lock settings that were made in Mudbox are also maintained when the file is opened in Photoshop.

      If the Mudbox paint channel contained paint layers with different resolutions and file formats when exported, the images are scaled to the same resolution as the highest resolution image within the exported channel. Any images that get scaled during import are subsequently returned to their original resolution, bit depth, and file format when the paint channel is re-imported to Mudbox using Import Channel from PSD.

    • Mudbox <channel name> Background - This layer contains the name of the Mudbox paint channel that was exported and the diffuse color of the default material background color. This layer can be turned on or off in Photoshop and is intended to be used as a visual reference for your texture creation and editing work. Otherwise, this layer is locked by default and should not be modified.

      You can turn the visibility on or off for any layer as you work in Photoshop but these settings will be ignored when the file is re-imported to Mudbox.

      Note

      Do not change the layer names or the text or numerical content within the angle brackets <> when working on the file within Photoshop. Editing either the layer name or the numerical strings prevents the layers from being imported back to Mudbox.

    In general, the channel export and import workflow requires that you not delete or change the order of the original layers or make changes to the layer blend modes or opacity settings from how they were originally exported. These changes will adversely affect re-importing the file to Mudbox.

  5. Perform any paint work or edits as required on the paint layers using the tools within Photoshop ensuring that you do not change the layer order.
    Note

    You can create other paint layers in the file but they must be merged down to any of the original paint layers that existed in the file you exported from Mudbox. Otherwise, these additional layers are ignored when re-imported to Mudbox.

  6. When finished working in Photoshop, save the file by selecting File > Save.
  7. (In Mudbox) In the Paint Layers window, right-click the channel or one of its layers and select Import Channel from PSD (or select > Import Channel from PSD from the window menu button.)

    The Open browser window appears.

    When you import the .psd file into the original file in Mudbox using Import Channel from PSD it determines what edits were made on the paint layers and imports only the layers that changed since the export, scales them if required, and converts them back to their original bit depth. The contents of the Mudbox Base Mesh and Mudbox <channel name> Background layers are ignored during the re-import.

    Note

    When re-importing a paint channel containing multiple UV tiles Mudbox attempts to load one .psd file per UV tile. The origin tile (U0, V0) is loaded by selecting the specified .psd file name as usual and the associated non-origin tiles are subsequently loaded automatically. If a .psd file for a non-origin tile is missing, it is ignored and the associated UV tile is not updated in Mudbox.

  8. Save the file in Mudbox to ensure the Photoshop edits are updated in the original texture files associated with the paint layers for the paint channel.

Related topics

Mudbox and Photoshop overview

Export a single paint layer to Photoshop

Save or export paint layers

Troubleshoot paint layers