In the following procedure, you match the last clip to the previous clip to remove the jump in the animation.
See Add a clip.

The contour of the Mia:RightFoot node is highlighted in green
This node represents Mia’s right foot and is to be used as the matching object.
 .
.

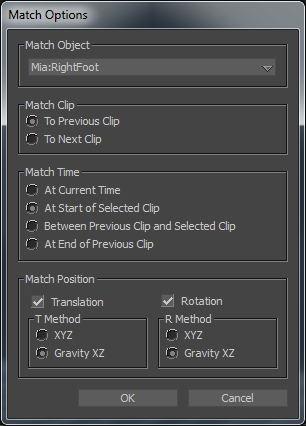
The Match Options dialog displays.
Mia runs, turns, then is thrown forward. The jump in the animation is gone.
In this tutorial, you sliced a clip of running animation in two and rotated one clip vector ghost to make the character turn while running. Then you added another clip with different animation and blended all three clips together in one seamless animation sequence.
In the next tutorial, (Sending 3ds Max Scenes to MotionBuilder), you export 3ds Max skeletons and a 3ds Max character into MotionBuilder, add a Control rig, characterize the skeletons and Character, and animate the character in MotionBuilder, and then export a Character and animation back to 3ds Max.
 Except where otherwise noted, this work is licensed under a Creative Commons Attribution-NonCommercial-ShareAlike 3.0 Unported License


