The following describes methods for selecting, deselecting, and deleting keyframes:
Shift-click the first and last keyframe to select a keyframe range. To expand a selection region, Ctrl-click additional keyframes.
In the FCurves window, selected keyframes display with tangent handles by default. The Value display shows the value of a selected property on the vertical axis, and its Time display on the horizontal axis.
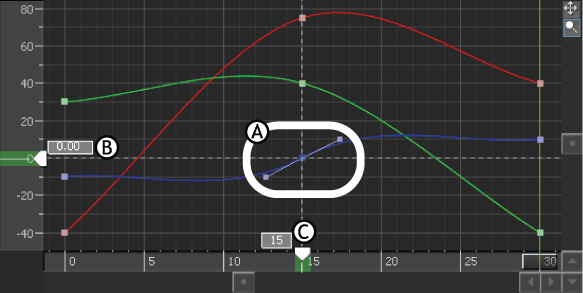
A. Selected keyframe with tangent handles B. Value (0.00) of selected keyframe displayed in the Value display C. Time (frame 15) of selected keyframe displayed in the Time display
When multiple keyframes are selected, a dotted line outlines the selection area (as seen in the following figure), and four values display, two on the Vertical axis, and two on the Horizontal axis.

Selected region displays as a gray box
Double-click an empty space beside the keyframe, either on the Action timeline or in the FCurves pane.
To deselect a keyframe region:
Spacebar-click or double-click an empty space on the Action timeline or on another keyframe.
To delete a keyframe or keyframe region, right-click a selected keyframe or keyframe region and choose Delete from the contextual menu or press the Delete key.
As you can see in the FCurves window, deleting a keyframe removes its associated slope on the function curve and joins the slope between the preceding and following keyframes.
To cut, copy, and paste keyframes:
Right-click the keyframe selection and choose the appropriate option from the Transport contextual menu or use the appropriate keyboard shortcut (see Transport Controls contextual menu).
To navigate between keyframes:
Use the Back and Forward buttons in the Key Controls window, or the left and right arrows on the keyboard to move between keyframes on the Action timeline.
To offset keyframe selections:
Drag the region or its Time display to a location, or double-click the first Time display, type the frame you want the keyframe to move to, and press Enter. To cancel the offset, click outside of the Time display before pressing Enter.
If the Move Ripple option is activated, keyframes surrounding the region are pushed relative to the offset.
To stretch or shrink keyframe regions:
Drag the region’s first or last keyframe or Time display to a location on the Action timeline, or double-click the region’s last Time display and enter the precise frame to which you want the region to stretch, then press Enter.
To cancel the stretch, click outside of the Time display before pressing Enter.
If Stretch Ripple is activated, keyframes surrounding the region are offset according to the stretch.


