The Transport Controls contextual menu lets you set various options when working with the Action timeline. To open this menu, right-click the Action timeline.
The options active in the contextual menu may change depending on where you click and what is selected. This section describes all the options in the Transport Controls contextual menu, which consist of the following options:
Removes a selected visual keyframe and stores it in memory. To cut a keyframe selection, right-click the key or region on the Action timeline and select Cut from the Transport contextual menu. You can also use the keyboard shortcut Ctrl-X to cut selected keyframes.
Cutting a keyframe region makes the keyframes that follow the cut move back to fill empty space.
For example, if you have three keyframes that are set at frame 0, 15, and 30, cutting the keyframe region between frame 0 and 15 causes the third keyframe (originally located at frame 30) to move back to frame 15.
Copies a keyframe selection and stores it in memory for insertion into another location. To copy a keyframe or keyframe region, right-click the key or region on the Action timeline and select Copy from the contextual menu. You can also use the keyboard shortcut Ctrl-C to copy selected keyframes.
Inserts a copied or cut selection into another location. To paste a selection, right-click the Action timeline or a keyframe or keyframe region, and select Paste from the contextual menu. You can also use the keyboard shortcut Ctrl-V to paste the copied or cut selection.
Pasting a keyframe on a keyframe region deletes all keys within the region, and replaces the first key of the region with the pasted keyframe. When you paste a keyframe region on a keyframe, the region’s first key replaces the original keyframe.
If nothing is selected on the Action timeline when pasting, the selection is pasted at the current time code. To offset keyframes that follow the paste according to the size of the pasted region, activate Paste Ripple.
Copy Previous Key On Selected IK Objects
For keyframes on IK effectors, copies the Translation values, Rotation values, or both from the previous keyframe to the selected keyframe or keyframe region. See also Cutting, copying, and pasting keyframes.

Transport Controls A. Previous keyframe B. Selected keyframes C. Next keyframe
Copy Next Key On Selected IK Objects
For keyframes on IK effectors, copies the Translation values, Rotation values, or both from the next keyframe to the selected keyframe or keyframe region. See Cutting, copying, and pasting keyframes.
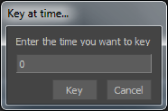
The Key at Time option opens a Key at Time dialog box, which lets you set one or more keyframes for the selected properties at any point in time, regardless of the current time.
You can also access the Key at Time dialog box by right-clicking the Key button in the Key Controls window, or by pressing Ctrl-Shift-K.
Key at Time dialog box
Deletes keyframe selections. Keyframes following a deleted keyframe selection do not move back to fill empty space.
To delete a selected keyframe or keyframe region, right-click the keyframe or region, and select Delete from the contextual menu. You can also press Delete on the keyboard.
Choose the Select All option to select all the keyframes on the Action timeline. Selecting more than one keyframe creates a keyframe region.
Changing the interpolation of a selected keyframe affects the shape of the spline between the visual keyframe’s associated keys and the next set of keys that follow the selected keyframe. Changing the interpolation of selected keyframes in a region affects the shape of the spline between all keys within the region and the next set of keys that follow the region.
To change the interpolation of a keyframe or keyframe region, right-click the keyframe or region, select Interpolation from the Transport contextual menu, then select an option in the Interpolation menu.
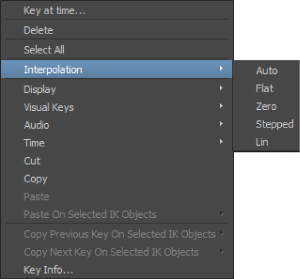
Interpolation menu
Each option changes the interpolation differently, as described in the following table:
| Option | Function |
|---|---|
| Auto | Resets selected keyframes so that they use cubic curves. The tangents of the keyframes are recalculated automatically, based on the surrounding keyframes. Tangents are no longer broken or flattened |
| Flat | Flattens the tangent handles of selected keyframes. |
| Zero | Sets the associated keyframe values to 0, and flattens their tangents. |
| Stepped | Maintains a keyframe’s value for each subsequent frame until the next keyframe. There is no slope between keyframes. |
| Linear (Lin) | Joins keyframes using a straight line, in which the slope between keyframes is constant. |
See Interpolation for more information.
The Display menu contains options for the display of visual keyframes, audio, and the Timeline indicator.

Display menu
The following table describes the Display menu options:
| Option | Function |
|---|---|
| Visual Keys | Shows or hides visual keyframes on the Action timeline. Keyframes are shown by default. |
| Audio | Shows or hides audio waveforms on the Action timeline. Audio waveforms are shown by default. |
| Small Cursor | Makes the Timeline indicator smaller and more transparent. This display lets you see keyframes under the Timeline indicator more clearly (see the following figure). |

Timeline indicator A. Large cursor B. Small cursor
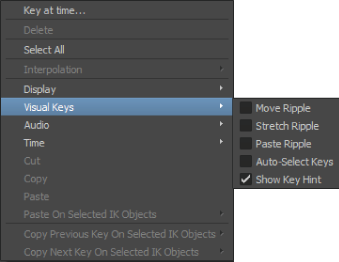
The Visual Keys menu lets you set options for visual keyframes on the Action timeline.
Visual Keys menu
The following table describes the Visual Keys options:
| Option | Function |
|---|---|
| Move Ripple | Pushes deselected keys horizontally when offsetting a keyframe or keyframe region. Disable to keep deselected keys anchored when offsetting (default). |
| Stretch Ripple | Moves deselected keys horizontally according to the stretch when stretching a keyframe region. Disable to keep deselected keys anchored when stretching (default). |
| Paste Ripple | Moves deselected keys horizontally when pasting keyframe regions. Disable to keep deselected keys anchored when pasting (default). |
| Auto-Select Keys | When activated, visual keyframes closest to the current time code are automatically selected. |
| Show Key Hint | When activated, keys on the transport controls show a different color according to on what property they are set, for example, full body, body part or selection, extension. |
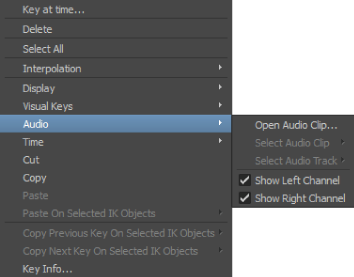
The Audio menu lets you select from various audio options for use with .wav files on the Action timeline.
Audio menu
The following table describes the Audio menu options:
| Option | Function |
|---|---|
| Open Audio Clip | Opens a file browser, letting you select a .wav audio file to add to the Action timeline. |
| Select Audio Clip | Lets you select from previously loaded audio clips. |
| Select Audio Track | Lets you select from available audio tracks that are in the Story window. |
| Show Left Channel | Shows the left audio channel. Disable to hide the left channel. Both left and right audio channels are active by default. |
| Show Right Channel | Shows the right audio channel. Disable to hide the right channel. |
The Time menu lets you select from various time-related options.
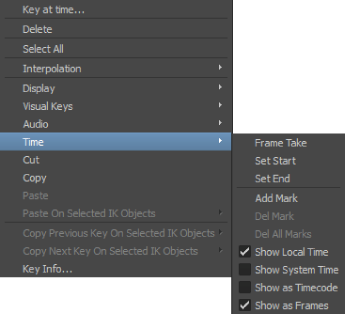
Time menu
The following table describes the Time menu options:
| Option | Function |
|---|---|
| Frame Take | Frames the start and end of the animation on the current take. You can also use the keyboard shortcut Ctrl-Shift-A. |
| Set Start | Sets the start time of the current take to the position of the Timeline indicator. The Take display updates automatically. |
| Set End | Sets the end time of the current take to the position of the Timeline indicator. The Take display updates automatically. |
| Add Mark | Adds a mark on the Action timeline. Double-click a mark to open the Mark dialog box. The Mark dialog box lets you assign a name, change a mark’s location on the timeline, or activate a loop. See Mark options. |
| Del Mark | Deletes the mark on which you right-click. |
| Del All Marks | Deletes all marks from the Action timeline. |
| Show Local Time | Displays the local time code (default). This shows the current time of each take. |
| Show System Time | Displays the time as a reference time code, which provides a reference point for the local time code. The reference time code is based on the clock time of your computer. |
| Show as Timecode | Changes the display to time code everywhere in MotionBuilder. |
| Show as Frames | Changes the display to frames everywhere in MotionBuilder. |
When you right-click a keyframe, the Key Info option displays in the contextual menu and lets you open a Key Info window. The Key Info window displays information about the keyframe you clicked.
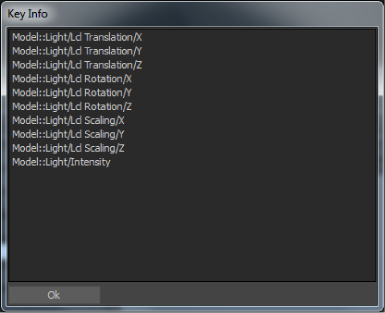
Key Info window
The Timing Controls Play speed field displays the speed at which your takes play in MotionBuilder. By slowing down the play speed, you can analyze model and camera movements more easily. You can also speed up play or draw every frame.
You can select from the following options in the Play speed pull-down menu:
| Speed | Description |
|---|---|
| 1/10x | Plays one-tenth slower than real time. |
| 1/5x | Plays one-fifth slower than real time. |
| 1/4x | Plays one-fourth slower than real time. |
| 1/3x | Plays one-third slower than real time. |
| 1/2x | Plays one-half slower than real time. |
| 1x | Plays in real time. |
| All FR | Plays all frames without skipping any frames. The ALL FR option does not play in real time. The play speed is relative to your computer’s speed. |
| 2x | Plays two times faster than real time. |
| 3x | Plays three times faster than real time. |
| 4x | Plays four times faster than real time. |
| 5x | Plays five times faster than real time. |
| 10x | Plays ten times faster than real time. |
See Timing Controls for more information on setting play speeds.
The Timing Controls Time Format menu displays the frame rate by which the timeline is divided. You can select frames-per-second (fps), NTSC, or PAL formats.
By default, the time format displays using a 24 fps time code. You can select other frame rates using the Time Format menu, as follows:

| Time Format in fps | Description |
|---|---|
| 1000 | Displays time with 100 frames in a second. |
| 120 | Displays time with 120 frames in a second. This format is useful when working with motion capture data. |
| 100 | Displays time with 100 frames in a second. |
| 96 | Displays time with 96 frames in a second. |
| 72 | Displays time with 72 frames in a second. |
| 60 | Displays time with 60 frames in a second. |
| 59.94 | Displays time with 59.94 frames in a second. |
| 50 | Displays time with 50 frames in a second. |
| 48 | Displays time with 48 frames in a second. |
| 30 | Displays time with 30 frames in a second. |
| NTSC Drop | Displays time with 30 drop frames in NTSC format. |
| NTSC Full | Displays time with 30 frames in NTSC format. |
| PAL | Displays time with 25 frames in a second, in PAL format. |
| 24 | Displays time with 24 frames in a second (film format, default format). |
| 23.976 | Displays time with 23.976 frames in a second (video format). |
| Custom | Lets you select a custom frame rate. See Selecting a time format for more information. |
When you record data, the data is sampled at a real-time sample rate (in seconds). This means that keyframes can be set between traditional video frames. MotionBuilder sets keyframes between frames to achieve realistic motion.
When you add keyframe animation, keyframes are set at the current time. This can be at a traditional video frame or between frames. The principle behind setting keyframes between frames is the same as capturing data: it results in more realistic data and lets you switch takes between different time formats without affecting the animation.
Changing time formats only changes the unit of measurement that measures the passage of time in MotionBuilder. For example, if you have one second of capture data and you change the time format from 30 fps to 120 fps, you still have one second of capture data.
See Timing Controls for more information.
The Timing Controls Snap menu displays the snap method your take uses. Snapping occurs when keyframes or the Timeline indicator move to specific frames, instead of moving between frames. The following table describes the options in the Snap menu:
| Option | Function |
|---|---|
| No Snap | No snapping is applied. You can drag keyframes and keyframe regions to a time between frames. |
| Snap on Frames | Snaps to an exact frame when the take stops playing. When editing visual keyframes on the Action timeline, the edited keyframes snap onto exact frames. When offsetting keyframe regions, all keyframes in the region snap to frame. |
| Play on Frames | Plays on exact frames in real time, and does not show any animation in between frames. |
| Snap and Play on Frames | Plays on exact frames, and snaps to an exact frame when the take stops playing and when you edit keyframes. |
See Timing Controls for more information.
The Mark dialog box appears when you double-click a mark set on the timeline. See Time menu for about setting marks.
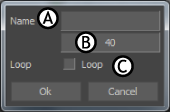
The Mark dialog box A. Name field B. Time code field C. Loop option
The following table describes the settings in the Mark dialog box:
| Setting | Function |
|---|---|
| Name | Lets you enter a name for the current mark. |
| Timecode | Lets you enter a time code for the current mark by typing or dragging in the field. |
| Loop | Loops between the current and previous mark. If there is no previous mark, the Action timeline loops from the beginning of the take to the current mark. When Loop is disabled, the take stops playing at the mark. |
| Ok | Applies the changes in the Mark dialog box to the current mark. |
| Cancel | Closes the dialog box without applying changes. |


