The Actor Controls window provides options for adjusting your Actor. You can scale, rotate, and translate the detachable segments of an Actor to reach the markers specified by the Marker set, to add offsets, or to compensate for the lack of a T-stance.
The Actor Controls window also lets you manipulate your Actor using Inverse Kinematics (IK). Using IK prevents unwanted dislocation of the parts of an Actor while manipulating and adjusting the Actor.
To open the Actor Controls window, choose Window > Actor/Character Controls from the menu bar.

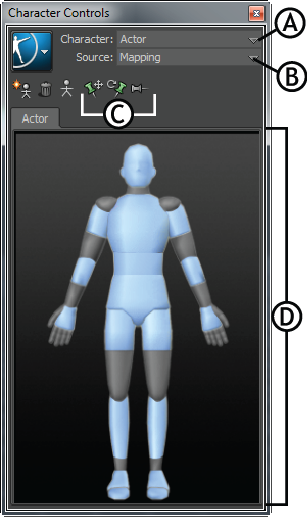
Actor Controls window A. Character drop-down list B. Source drop-down list C. Effector pinning buttons D. Actor representation
Displays the name of the current Actor to which all options apply. When switching from an Actor to a character using this menu, the options in the Actor Controls window are replaced and become contextual to the current character.
Select an Actor in the Actor Controls window by making a selection from the Character drop-down list.
The Actor is divided into cells that represent the joints of the Actor. Selecting a cell lets you manipulate that part of the Actor using Inverse Kinematics.
Cells in the Actor representation can have the following states:
You can access the Actor menu from  > Edit > Actor. This menu includes the following options:
| Option | Function |
|---|---|
| Lock | Activate Lock to lock the current position and rotation of the selected Actor and its Marker set. The Lock option in the Edit menu and in the Actor settings are identical. |
| IK Manip | Activate IK Manip to manipulate your Actor using Inverse Kinematics. Disable IK Manip to manipulate individual body segments on the Actor. |
| Symmetry Edit | Activate Symmetry Edit to simultaneously scale and translate an Actor’s limbs. Disable Symmetry Edit to independently change the size or length of a limb. |
| Stance Pose | Activate Stance Pose to position the Actor in its default stance position. You can use this pose to reset and modify the Actor’s position. Stance Pose only resets rotational offsets. These offsets remain if you translate or scale the model. |
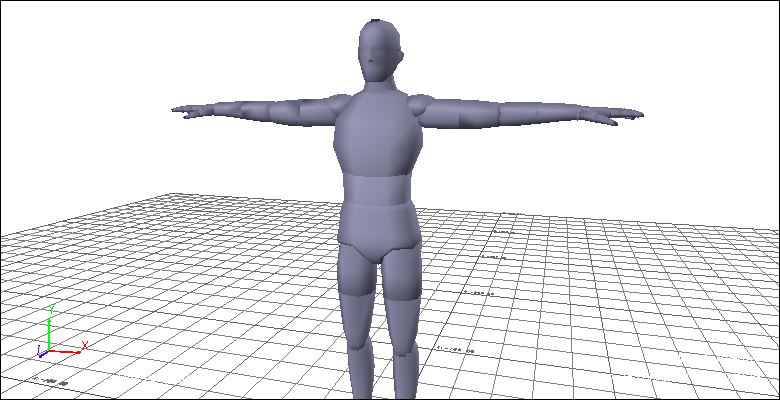
Actor Stance Pose
| Option | Function |
|---|---|
| Collapse | Activate Collapse to rejoin any detached limb segments of an Actor without resetting the Actor’s size or stance. This may be necessary in certain situations. For example, when adding position offsets to an Actor or when translating source markers further than their initial definition, some limbs may detach to reach all the markers defined by its Marker set. |
| Reset Size | Select Reset Size to reset the scale of the selected Actor to its default size. If a scaling offset affects the position of a segment, Reset Size resets the scale of the Actor, but leaves the segment at its new location. |
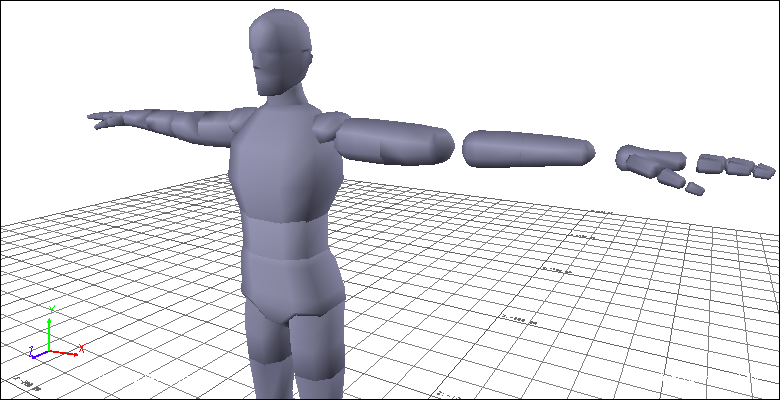
Reset Size resets the scale of the left arm but keeps the position of the left hand, detaching segments of the arm
| Option | Function |
|---|---|
| Find Size | Select Find Size when the Actor is in a T-stance to calculate and size each segment of the Actor based on the selected Marker set and source markers. |
| Reset Pivot Points | Select Reset Pivot Points to return all Actor pivot points to their original positions. |
| Reset All | Select Reset All to reset the Stance Pose, Collapse, and Reset Size options simultaneously. This option returns the Actor to its default stance position, reconnects any detached limb segments, and resets the scale of the Actor to the default size. |
| Edit Properties | Select Edit Properties to open the Properties window and display all the properties associated with the selected Actor. These properties let you change, activate, and disable various Actor properties. The Name, Active, Snap, Lock, and Marker Set properties also appear in the Actor Settings. For more information see Actor settings. |
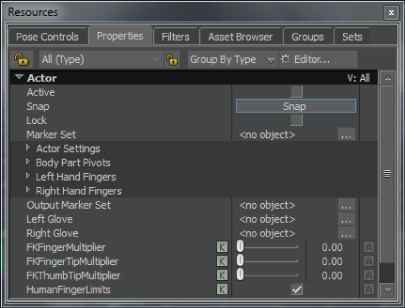
Actor properties display in the Properties window
| Option | Function |
|---|---|
| Switch to Character | The Switch to Character option switches focus to the character that is constraining the current Actor. Selecting this option switches from the Actor Controls to the Character Controls, and all the options become contextual to the active character. This option is unavailable if there is no constraining character. |
The Show/Hide menu in the Character Controls menu button includes the following options:
| Option | Function |
|---|---|
| Actor (All) | Shows or hides the entire Actor. By default, the Actor’s body, bones, Marker set, source markers, and pivot points display. To hide the Actor, disable Actor (All). |
| Actor Body | Shows (default) or hides the body of the Actor. To hide the Actor’s body, disable Actor Body. |
| Actor Skeleton | Actor Skeleton shows a set of connecting lines representing the bones of the Actor. To show only the bones, activate Actor Skeleton and disable Actor Body. |
| Marker Set | Hides or shows the markers that belong to the defined Marker set. The Marker set displays as white markers around the Actor’s body. To hide the Marker set, disable this option. |
| Source Markers | Shows (default) or hides the markers containing motion data. To hide the source markers, disable this option. When the Marker set and the Source markers are both active, the markers belonging to the Marker set display inside the source markers by default. |
| Pivot Points | Hides or shows the pivot points for the Actor. To hide the pivot point markers, disable this option. By default, the pivot points display as orange crosses. To change the way pivot points display, use the Actor Settings properties in the Properties window. You can also adjust the position of the pivot points using the Body Part Pivots properties. See Edit Properties. |
The Mapping option in the Source drop-down list activates and snaps the Actor to its Marker set. This option is the same as the Active option in the Actor settings.
When the Mapping option is active, you can manipulate the Actor in the Viewer window.
When manipulating an Actor in IK Manip mode, the Pinning buttons help control the body movement of the Actor.
You can activate, disable, and temporarily release pinning on cells that represent the Actor body parts. Pinning on certain body parts restricts the body movement of the Actor, and determines how other body parts move relative to the pinned body part.
These options behave the same for Actors as they do for characters. The only difference is that for Actors, IK Manip mode is used only for positioning the Actor.
| Option | Function |
|---|---|
| T and R | The T (Translation) and R (Rotation) options let you activate or disable pinning on body parts in translation or rotation. An Actor’s hands are pinned in translation, and its feet are pinned in translation and rotation by default. This pinning constrains the Actor’s body parts until they are unpinned. Activate pinning on one body part by selecting the cell in the Actor representation for the body part you want to pin, then activating T or R. Activate pinning on multiple body parts by Ctrl-clicking cells in the Actor representation, and then activating T or R. Remove pinning by selecting the cell in the Actor representation, and disabling T or R. You can also use the Release option and keyboard shortcuts to toggle pinning on selected cells. |
| Release | The Release option lets you temporarily remove the translation or rotation pinning related to a selected body part and those down the chain. This lets you manipulate your Actor without constraining the selected body part. Activate Release or press and hold the Q key to temporarily unpin effectors while manipulating your Actor. Disable the Release option to return the pinning to its previous state. |


