This legacy workflow is for exporting a 3ds Max skeleton to versions of 3ds Max 2011 and earlier. If you do not have the 2012 versions of MotionBuilder and 3ds Max, you do not have access to the Send to option which is detailed in the tutorials.
If you have access to the current version of 3ds Max, or have downloaded a trial version from the Autodesk web site at: www.autodesk.com/3dsmax, use the Export import & characterize a 3dsMax skeleton in MotionBuilder tutorial included in this Help.
Exporting 3ds Max skeletons to MotionBuilder
In the following procedure, you export conventional 3ds Max bone system skeleton data to FBX format for animation in MotionBuilder.
To learn how to export skeletons created with the 3ds Max biped creation option, see Create and export a 3ds Max biped to MotionBuilder.
To export a skeleton in FBX format:
The FBX Export plug-in opens. This is where you specify how to convert the 3ds Max scene information.

FBX Export dialog box
Since you are only exporting a skeleton that has no animation, there is no need to export animation.

Animation option disabled in FBX Export

Embed Media option disabled in FBX Export
You only need to embed media if you export a mesh with the character. That way, any texture maps associated with the character are saved with the FBX file. In most cases, you would export a mesh, properly skinned on a skeleton. But in this case, you are only exporting a skeleton, so you do not need this option.

Up Axis selected in Axis Conversion rollout
This setting assigns the exported character a Y-up axis, the orientation used by objects in MotionBuilder. The Y-up setting is required since objects created in 3ds Max use a Z-up orientation.
Once a skeleton is exported to the FBX file format, you can also bring it into other Autodesk software products, such as Autodesk Maya.
The 3ds Max bone system skeleton loads into MotionBuilder.

3ds Max skeleton displayed in the Viewer window
To characterize your skeleton:

FBX Export dialog box
The following dialog box reminds you that the character must be in a “T” stance and face in the positive Z axis (the equivalent of the negative Y axis that you converted when exporting the .max file into the FBX file format).
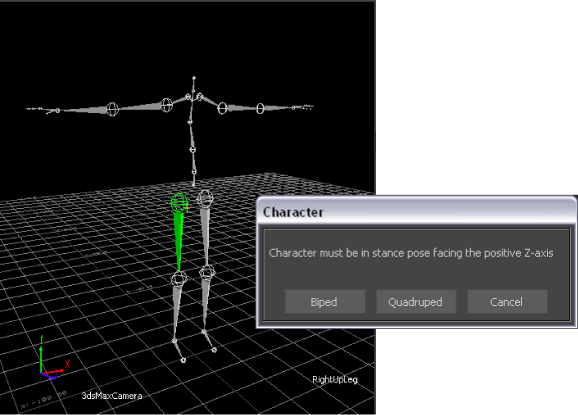
Character stance dialog box
The skeleton is now characterized, which means that it is ready to accept a Control rig you can animate.

Character Controls Source menu
You must use the Control Rig Input setting if you intend to keyframe your character.
The Create Control Rig dialog box appears.


Character Controls A. Ctrl Rig In option activated
This setting activates the Control rig and the Character Controls Character representation. The Character representation is an image of a human form meant to represent the biped skeleton. It contains all the effectors you need to animate the Control rig, as shown in the following figure.

Skeleton with IK/FK Control rig
Your character is now rigged and ready to receive animation.

Character controls A. Activate Full Body.

Character representation A. Right Wrist effector selected
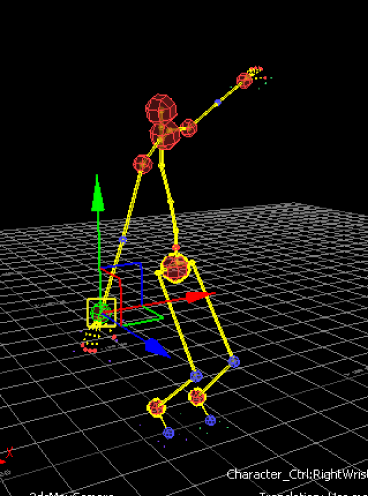
As you move the hand, the arm extends and the rest of the body follows in a natural movement. You can now transform the characterized skeleton.


