Export and characterize a 3ds Max skeleton in MotionBuilder


In the following procedure, you export a conventional 3ds Max bone system skeleton and use the 3ds Max Send To feature to open it in MotionBuilder for animation.

NoteThis tutorial uses the MotionBuilder and 3ds Max 2012 single-step interoperability workflows, using the Send To menu option. If you do not have the 2012 versions of these products, refer to the Exporting 3ds Max skeletons to MotionBuilder topic in the MotionBuilder documentation.

To export a skeleton in FBX format:

  1. Launch 3ds Max.
  2. From the Application menu, select Open > Open.
  3. In the Open File dialog box, navigate to the MotionBuilder root directory and in the Tutorials folder, open the skeletons.max scene file.
    Note

    If the File Load: Units Mismatch dialog appears, select Adopt the File’s Unit Scale and click Ok.

    The skeletons.max file opens, displaying two skeletons. The skeleton (A) to the left is created with the conventional 3ds Max bone system, and the skeleton (B) to the right is created with the 3ds Max Biped creation option.

    Two 3ds Max skeletons A. Conventional 3ds Max bone system skeleton B. 3ds Max Biped skeleton

    The skeletons are positioned in a “T” stance, the pose used by animators for skinning.

    Note

    Always place your characters in the “T” stance before exporting to MotionBuilder.

    To learn how to export skeletons created with the 3ds Max biped creation option, see Create and export a 3ds Max biped to MotionBuilder.

  4. Region-select all of skeleton A.

    Biped oriented in a T-stance

    The skeleton will characterize perfectly because its bones are named according to MotionBuilder conventions, and is in a T-stance. Read more about MotionBuilder naming conventions in the MotionBuilder Help > Animating Characters > Character setup > Skeletons > Bone naming conventions section.

  5. From the Application menu, select Send to > Send to MotionBuilder > Send as New Scene. MotionBuilder launches.
    NoteIf you do not have the 2012 versions of MotionBuilder and 3ds Max, you do not have access to the Send to option. Refer to the MotionBuilder documentation.
  6. In the FBX Plug-in Import Options dialog, leave the default settings unchanged and click Open.

    The 3ds Max bone system skeleton loads into MotionBuilder.

    3ds Max skeleton displayed in the Viewer window

    To characterize your skeleton:

    1. In the MotionBuilder Asset browser, expand Templates > Characters and drag a Character asset onto one of the skeleton bones.

      The bone lights up when the asset makes contact with it.

    2. Click Characterize in the menu that appears.

      The following dialog box reminds you that the character must be in a “T” stance and face in the positive Z axis (the equivalent of the negative Y axis that you converted when exporting the .max file into the FBX file format).
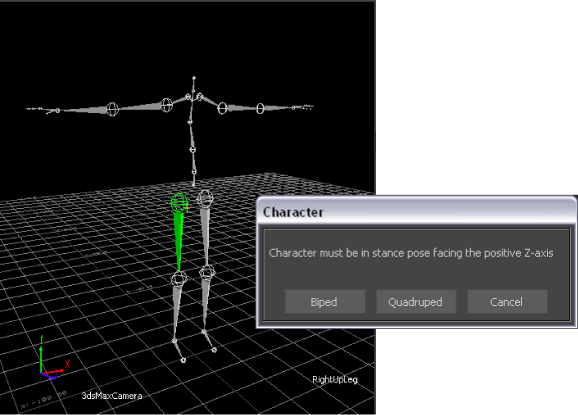
    3. Click Biped in the Character dialog box that appears to indicate the type of rigging to apply to the character.

      Character stance dialog box

      The skeleton is now characterized, which means that it is ready to accept a Control rig you can animate.

    4. In the MotionBuilder menubar, select Window > Characterization Tool. The Characterization Tool lets you verify that are no problems with the Control rig you matched to the skeleton.
    5. From the Character Controls menu, select Source > Control Rig. (You can also select Edit > Control rig, but setting the rig as a Source makes the skeleton is the active character in the scene.)

      Character Controls Source menu

      You must use the Control Rig Input setting if you intend to keyframe your character.

      The Create Control Rig dialog box appears.

    6. Click FK/IK.

      FK/IK is the method commonly used to animate characters.

    7. Make sure the Ctrl Rig In option is active in the Character Controls window, if it isn't already.

      Character Controls A. Ctrl Rig In option activated

      This setting activates the Control rig and the Character Controls Character representation. The Character representation is an image of a human form meant to represent the biped skeleton. It contains all the effectors you need to animate the Control rig, as shown in the following figure.

      Skeleton with IK/FK Control rig

      Your character is now rigged and ready to receive animation.
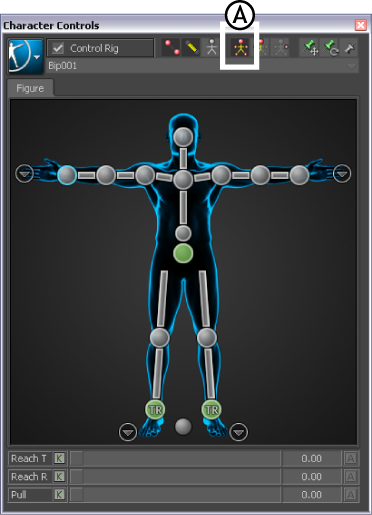
    8. Activate the Full Body option. This lets you move the body using the entire Control rig.

      Character controls A. Activate Full Body.

    9. On the Character representation, select the Right Wrist effector.

      Character representation A. Right Wrist effector selected
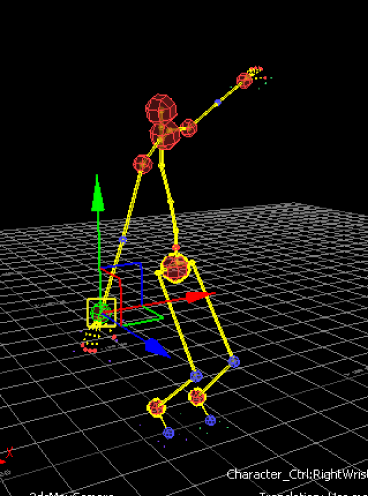
    10. Click in the Viewer window and press T.

      The transformation handles appear.

    11. Translate (or move) the hand down as shown in the following figure.

      Notice as you move the hand, the arm extends and the rest of the body follows in a natural movement. You can now transform the characterized skeleton.

      NoteIf you wish to see the result of this procedure, open the bone_skeleton_characterized.FBX file.