For more information about mental ray for Maya nodes (shaders), see mental ray for Maya custom shaders.
In addition, the mia_material and mia_material_x shaders also pipe themselves into the Shadow Shader attribute of the shader node.
All mental ray for Maya materials include Hardware Texturing attributes, allowing you to preview them in the scene view. For a description of the Hardware Texturing attributes, see Hardware Texturing.
For a full description of each node's attributes, see the mental ray Manual.
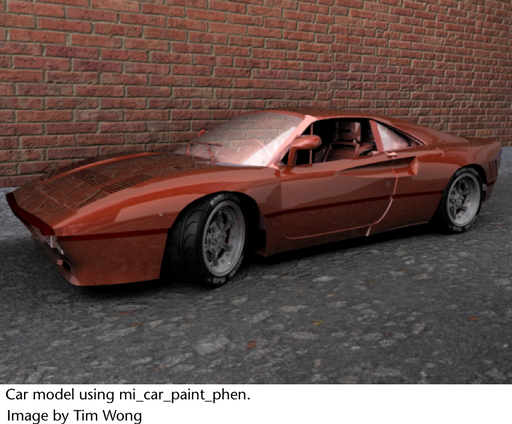
Use this shader to fully achieve the look of car paint. This shader combines the functionality of the mi_metallic_paint, mib_glossy_reflection, and mi_bump_flakes shaders into one.
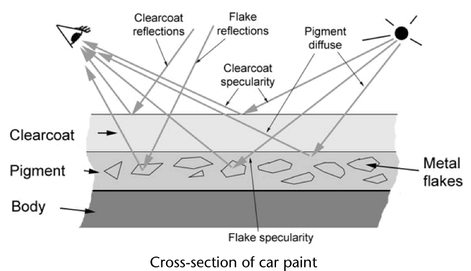
The diagram below illustrates the qualities that the car paint phenomenon shader simulates.
The car paint phenomenon shader also includes the following:
You can easily convert the mi_car_paint_phen shader to the mi_car_paint_phen_x or mi_car_paint_phen_x_passes shader. In the Attribute Editor of the mi_car_paint_phen shader, expand the Upgrade Shader section, and click on the Upgrade shader to mi_car_paint_phen_x or Upgrade shader to mi_car_paint_phen_x_passes button. See mi_car_paint_phen_x shaderandmi_metallic_paint_x_passes, mia_material_x_passes, misss_fast_shader_x_passes, mi_car_paint_phen_x_passes shaders for more information.
This shader is similar to the mi_car_paint_phen shader, except that it returns multiple outputs in the form of a mental ray struct return.
A mi_car_paint_phen_x_passes shader is also available for use the multi-render passes feature. See mi_metallic_paint_x_passes, mia_material_x_passes, misss_fast_shader_x_passes, mi_car_paint_phen_x_passes shaders for more information.
Use this shader to simulate a high-gloss, smooth paint finish like car paint. This shader simulates the thin pigment layer of car paint, and the tiny metallic particles (flakes) that are suspended within the pigment layer. To achieve the glossy reflections of a clearcoat, and the glittering effect of flakes, combine this shader with the mib_glossy_reflection shader and the mib_bump_flakes shader (see Textures).
You can easily convert the mi_metallic_paint shader to the mi_metallic_paint_x or mi_metallic_paint_x_passes shader. In the Attribute Editor of the mi_metallic_paint shader, expand the Upgrade Shader section, and click on the Upgrade shader to mi_metallic_paint_x or Upgrade shader to mi_metallic_paint_x_passes button. See mi_metallic_paint_x and mi_metallic_paint_x_passes, mia_material_x_passes, misss_fast_shader_x_passes, mi_car_paint_phen_x_passes shaders for more information.
This shade is similar to the mi_metallic_paint shader, except that it returns multiple outputs in the form of a mental ray struct return.
A mi_metallic_paint_x_passes shader is also available for use the multi-render passes feature. See mi_metallic_paint_x_passes, mia_material_x_passes, misss_fast_shader_x_passes, mi_car_paint_phen_x_passes shaders for more information.
Use this shader to simulate materials used in architectural and product design renderings. You can use this shader to create a physically accurate representation of hard-surface materials such as metal, wood and glass. This shader is optimally tuned for fast glossy reflections and refractions and high-quality glass.
This shader provides many features:
While no energy is created in the material, this shader works like a traditional surface shader with respect to direct lighting, not applying physically accurate constant form factors by default.
You can easily convert the mia_material shader to the mia_material_x or mia_material_x_passes shader. In the Attribute Editor of the mia_material shader, expand the Upgrade Shader section, and click on the Upgrade shader to mia_material_x or Upgrade shader to mia_material_x_passes button. See mia_material_x and mi_metallic_paint_x_passes, mia_material_x_passes, misss_fast_shader_x_passes, mi_car_paint_phen_x_passes shaders for more information.
Beginning Maya 2008, you can also use this shader to simulate materials used in architectural and product design renderings.
The mia_material_x shader is an improvement to the mia_material shader. In addition to the functionality found in mia_material,this shader also has these additional features:
A mia_material_x_passes shader is also available for use with the multi-render passes feature. See mi_metallic_paint_x_passes, mia_material_x_passes, misss_fast_shader_x_passes, mi_car_paint_phen_x_passes shaders for more information.
This has a fine-tuned sheen-like specular highlight that produces sub-pixel anti-aliasing, which helps to render high-quality thin strips, such as hair.
These are fast, non-physical subsurface scattering shaders.
The physically correct subsurface scattering shaders provide physically accurate results by using true volumetric computations. They work better in scenes where photon tracing is required. The non-physical subsurface scattering shaders do not provide physically accurate results, but instead provide quick, consistent, and visually pleasing results. The non-physical subsurface scattering shaders provide a way to efficiently render human skin, especially for shallow (near surface) scattering.
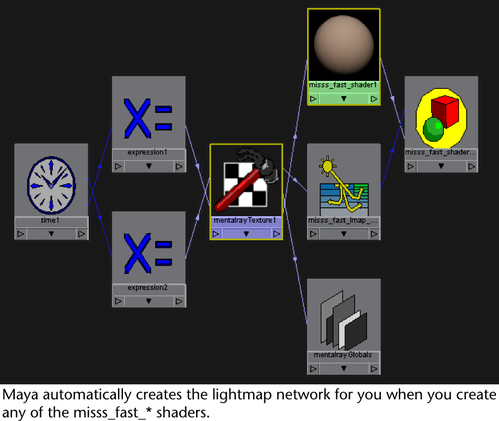
When you create any of the misss_fast_shader, misss_fast_simple_maya, misss_fast_skin_maya nodes via the Hypershade, Maya automatically creates the lightmap network for you. To complete the network, you only have to select the image file for the lightmap texture node.
This shade is similar to the misss_fast_shader, except that it returns multiple outputs in the form of a mental ray struct return.
A misss_fast_shader_x_passes shader is also available for use with the multi-render passes feature. See mi_metallic_paint_x_passes, mia_material_x_passes, misss_fast_shader_x_passes, mi_car_paint_phen_x_passes shaders for more information.
You can easily convert the misss_fast_shader shader to the misss_fast_shader_x or misss_fast_shader_x_passes shader. In the Attribute Editor of the misss_fast_shader shader, expand the Upgrade Shader section, and click on the Upgrade shader to misss_fast_shader_x or Upgrade shader to misss_fast_shader_x_passes button. See misss_fast_shader_x and mi_metallic_paint_x_passes, mia_material_x_passes, misss_fast_shader_x_passes, mi_car_paint_phen_x_passes shaders for more information.
Use these shaders in conjunction with the multi-render passes feature. These shaders have multiple output attributes that can be written to the multi-render passes. For example, you can write the diffuse attributes for the mia_material_x_passes shader to the Diffuse render pass that you created using the Render Settings window: Passes tab.
The mi_metallic_paint_x, mia_material_x, misss_fast_shader_x and mi_car_paint_phen_x shaders have the same interface as their passes counterparts, with the same input and output attributes.
Not all passes are supported by each shader. The passes that each shader supports depend on its interface and are listed below:
Alternatively, you can also use the mi_metallic_paint_x, mia_material_x and misss_fast_shader_x shaders with the multi-render passes feature. However, you must add the writeToColorBuffer, writeToDepthBuffer, writeToVectorBuffer, and writeToLabelBuffer shaders to your shading network to write data to the framebuffer. See writeToColorBuffer, writeToDepthBuffer, writeToVectorBuffer, and writeToLabelBuffer for more information.
Shadow shaders determine the appearance of shadows cast from an object. This is similar to the Shadow Color attribute on Maya light sources.
Shadow shaders can only be attached to the appropriate input in the Shading Group. Shadow shaders are special in that their result color is also an input color, which means that the output cannot be attached to another shader parameters because such attachments are one-way, output-to-parameter only.
They are referenced when a shadow ray hits an occluding object; the shadow shader of the occluding object controls how much light is transmitted.
In a Phenomenon, shadow shaders can only be attached to a material inside the Phenomenon, or to the Phenomenon root if the Phenomenon is attached to a material's shadow shader.
Volume shaders can be assigned to particular objects by connecting to the object’s Shading Group.
This controls the appearance of fog or other volumetric effects inside those objects. In mental ray for Maya you can also specify a global volume shader to control the appearance of fog outside of the objects in the scene (corresponds to Maya’s Environment Fog). In mental ray for Maya, the global volume shader is assigned by connecting to the Volume Shader attribute in the mental ray section of the camera’s Attribute Editor.
The ray marcher casts light rays from points on a given ray, and approximates the volumetric contribution from light sources sending light through the volume.
Instead of using shader interface functions like mi_sample_light, it calls a shader given as an input parameter of type shader. Ray marching consists of calling the shader for regular points between the start point and end point of the ray, and adaptively subdividing each of these intervals until a given subdivision limit is reached if the color returned by two adjacent samples is smaller than a given contrast threshold. The total weighted sum is returned.
A simple volume shader that simulates volume in a linear direction by receiving samples from the ray marcher.
This is an advanced volume shader for simulating volume, such as fog, clouds, silty water, and similar media by scattering, absorbing, transmitting as the light travels through the volume.
The volume shader parti_volume can simulate homogeneous (uniform density) and nonhomogeneous participating media with isotropic (diffuse) or anisotropic scattering. parti_volume and parti_volume_photon use a two-lobed scattering model, which means that light scatters both forward and back in the incoming light direction.
These shaders (not supplied with Maya) can be used to add new details to a surface prior to rendering.
Photon shaders control the reflection, transmission (refraction), and absorption of light for caustics and global illumination.
Advanced users can use these materials to simulate physically correct lighting situations.
dgs_material_photon is the photon shader that matches dgs_material. It has the same parameters; however, it respects photons and uses global illumination to illuminate objects.
dielectric_material_photon is the photon shader that matches dielectric_material. It has the same parameters; however, it respects photons and uses global illumination to illuminate objects.
Use texture shaders to apply image files on materials, generate procedural textures, or determine texture placement.
All textures in this section are File Texture based.
For use in a shading network for rendering color per vertex in mental ray for Maya. You can store shading and lighting information on mesh vertices (rather than shading networks), simplifying your scene and making it more efficient to render.
For more information, see Render color per vertex in mental ray for Maya.
Use this shader to create the effect of tiny metallic particles suspended in a pigment layer. This is most commonly used for car paint, so that the flakes reflect light and can be seen glittering on a sunny day. Use the mib_bump_flakes shader with the mib_glossy_reflection, and mib_metallic_paint shader (see Materials).
This shader inverses the effect of the mia_exposure_photographic shader.
Use this shader to visually represent the shape of your light source in your scene. For example, the actual tube in a fluorescent tube or the actual bulb in a light bulb, while still using traditional CG light to illuminate the scene.
The shader creates a surface for an existing light; the surface appears bright but does not emit additional light into the scene.
Use this shader to avoid the hard CG look where the edges of objects appear geometrically sharp. In the real world, edges are usually slightly rounded or filletted in some way. This shader creates an illusion of rounded edges at render time by perturbing the normal vector. This shader is not displacing or modifying the geometry, but is merely a shading effect (like bump mapping) and should be applied where bump maps are normally used (for example, in the Bump Mapping field of a shader). This shader is best used for straight edges and simple geometry rather than advanced highly curved geometry.
The mia_roundcorners shader can be used with any Maya shader that has bump mapping. You can also chain other bump textures to the Bump_vector attribute of the mia_roundcorners shader to layer the bump effect for your shader.
Use this shader to calculate how ambient light affects the scene. Use it to add more realism in a more efficient way than traditional global illumination.
The output_mode option defines the returned color for the mib_amb_occlusion node.
Use this shader to accelerate rendering when you want the look of global illumination or final gathering lit by an environment. A bent normal is the average unoccluded direction vector from a surface point. For a completely unoccluded surface, the bent normal is the same as the normal vector. For an occluded surface, the bent normal points in the direction with the least amount of occluding geometry.
Apply a File Texture with mib_bump_basis on the normal vector by evaluating the texture at multiple points to compute U and V gradients that are multiplied with the basis vectors, combined with the original normal, normalized, and written back.
Use this shader to create a bump effect that is driven by a file texture. Unlike the mib_bump_map shader, you can set a Scale and Color value. This shader is useful for creating a bump effect with mental ray custom shaders, by creating a shading network as follows:
A material shader is connected to mib_bump_map2.color
A mentalrayTexture node is connected to mib_bump_map2.texture
mib_bump_map2.message is connected to a SG.miMaterialShader node
This shader is an alternative version to mib_amb_occlusion with similar functionality, but it fully utilizes the ambient occlusion facilities built into mental ray.
This is the same as mib_bump_map, but the normals return to the original values after the bump mapping is complete.
Divide the unit cube into eight subcubes, each with a separate RGBA color. Use it to generate stripes and 2D or 3D checkerboards.
Looks up of texture image using elliptical filtering. Use it to reduce flickering (moire patterns) or aliasing on a specific surface that has a texture.
Use this shader to look up a texture image. Unlike the mib_texture_lookup shader, you can set a Factor value that controls the strength of the texture effect.
Accepts a texture vertex and scales, rotates, translates, crops, and joins textures. The order of operations is transform first, then repeat, alternate, torus (wrapping), and finally min/max crop.
An angle is used to rotate the surface orientation around the surface normal. An orthogonal vector pair is returned that, together with the normal which both are orthogonal to, define the rotated orientation. This is especially useful for anisotropic reflection.
Create a turbulent scalar pattern in a unit cube. One, two, or all three texture vector components may be computed in polar coordinates, causing spherical mapping.
Return a texture vector derived from orthographic projections of the 3D point in space (XY, XZ, YZ), non-orthographic projections (spherical or cylindrical); or return a numbered texture vector from the texture vector list. Optionally, this shader can base its calculations on object, camera, world, or screen space.
These are shaders that catch rays leaving the scene, similar to Environment textures.
These shaders return colors from color textures that have been mapped to finite or infinite distances. Use them for background or foreground plates. Environments must be used for environment shaders; overlays must be used for lens shaders; and textures must be used for texture or material shaders on a plane or other objects in the scene.
They can be used either globally or on an object-specific basis.
The CIE sky model is a standard model utilized in lighting analysis. It is a colorless (grayscale) model, and is hence not suitable for making production quality images, but it has the advantage of following a standardized (known) luminance distribution.
The shader shares many parameters with the mia_physicalsky shader. This includes parameters: on, rgb_unit_conversion, sun_direction and y_is_up.
The following parameters are unique to the mia_ciesky shader:
This shader can be used to blur the environment in a way that looks very similar to shooting an extremely large amount of glossy reflection rays into it. Use this shader to increase the quality and performance of renderings that primarily reflect the environment instead of reflecting other objects, for example, renderings that are surrounded by an HDRI environment map for reflections. This shader is best used for open scenes instead of enclosed scenes.
Light shaders specify the amount of light that a light source contributes to a particular surface point, taking into account the intensity and directional properties of the light source.
When a light shader is connected to a native Maya light source, all the settings on the Maya light source (color, intensity, shadows, and so on) are ignored, with the exception of the position and orientation (the light shader takes settings from the native Maya light source).
This shader takes all the guesswork out of balancing the photon energy with the light intensity by performing a numerical integration of the chosen intensity distribution to calculate the proper photon energy, as well as taking care of adapting the photon density to the distribution. This is all done automatically.
To use this shader, simply use the same instance of the shader as both light and photon shader on a light source. The light must have an origin (in other words, the shader does not work on an infinite light source). The light must be set to emit photons, and must be given a non-zero energy value (although the actual value will be overriden by the shader, a non-zero energy value is required; otherwise mental ray for Maya will not emit any photons at all for the light). The exponent should always be 2. If the light is a spotlight, a spread value should be used.
Use this shader to produce a physically accurate rendering of daylight. Use this shader in conjunction with the mia_physicalsky shader. For more information, see Simulating the sun and sky.
For a full description of this shader, see the mental ray for Maya architectural shaders document.
When using the Lighting/Shading > Batch Bake (mental ray) option to bake the mia_physicalsun and mia_physicalsky effects to texture, the baked result appears different than the render. The reason for this difference is because the mia_physicalsun and mia_physicalsky produces HDR values and the render created by Maya applies tonemapping to create 8-bit color data. In other words, the color in the final render is very different from the raw color data. Baking, however, does not have any tonemapping applied. If you bake to floating point file format the result is the raw data. If you bake to something that does not support floating point, the colour values are clamped at 1.0. In either case, the color shown in the baked image and the color shown in the render are going to look different.
Use this shader to create a portal that allows light to pour in from a bright exterior to a darker interior. In mental ray for Maya rendering, difficulties may arise when final gather and/or photons are used in a scene where there is no direct lighting and all light is indirect light - any over-smoothing due to interpolation cannot be drowned out by other lights and is clearly visible.
This shader can be used in combination with the mia_physicalsky shader.
Use this shader to have occlusion calculated by final gathering, using the scalar occlusion value (a gray scale value). This provides some flexibility because the occlusion is calculated by final gathering, when final gathering is turned on. However, when final gathering is turned off, the occlusion is calculated by the mib_amb_occlusion node.
Infinite (directional) lights cast parallel rays in the light direction. The origin is infinitely far away (and left unspecified), and there is no decay.
Uses a vendor-supplied light profiles (IES or Eulumdat) This supplies a full description of the physical behavior of the specific light.
The spot light is similar to the point light, except that it also supports angle attenuation based on the light direction. It takes the light direction and the spread from the light definition.
Use these shaders to bake surface shading effects to image texture files on disk.
The lightmap illumination sampling shader is a simple color shader that samples the surface light influx density. It gathers direct illumination and (optionally) indirect illumination. Assign it not to a material, but instead to the input parameter of the mib_lightmap_write node.
This is the main lightmap shader. It gathers geometric information and texture coordinates on the triangle vertices and then writes a triangular region of texture for each triangle. For each pixel of the texture that the triangle covers, a sampling function is called and the results are written to the shader. The lightmap shader is attached to the appropriate input in the Shading Group.
These shaders determine how rays of light bend as they leave the camera, and can be used to simulate various lens effects such as depth of field.
Currently the UI only supports connection of a single lens shader to the camera. In general, the mental ray render core supports a series of lens shaders that are executed in succession.
This shader provides tone mapping with controls that are commonly found on cameras. While the mia_exposure_simple shader simply adds a knee compression, this shader converts real photometric luminances into an image.
Both the mia_exposure_simple shader and mia_exposure_photographic shader can be used as lens shaders or as output shaders.
Use this shader to convert an image from a high range to a standard one to accommodate the limitations of display devices. This shader adds an interpolation curve with a “knee” to “squash” overbrights into a more manageable range. Apply this shader either as a lens shader or as an output shader. The former is encouraged and tone-maps the image “on the fly” as it is being rendered. The latter tone maps the image as a post process.
For a full description of this shader, see the mental ray for Maya architectural shaders document.
This shader is similar to the physical_lens_dof shader (and simulates depth of field), but with more control over the actual appearance and quality of the blur.
Use this shader to produce a physically accurate rendering of daylight. Use this shader in conjunction with the mia_physicalsun shader. For more information, see Simulating the sun and sky.
When using the Lighting/Shading > Batch Bake (mental ray) option to bake the mia_physicalsun and mia_physicalsky effects to texture, the baked result appears different than the render. The reason for this difference is because the mia_physicalsun and mia_physicalsky produces HDR values and the render created by Maya applies tonemapping to create 8-bit color data. In other words, the color in the final render is very different from the raw color data. Baking, however, does not have any tonemapping applied. If you bake to floating point file format the result is the raw data. If you bake to something that does not support floating point, the colour values are clamped at 1.0. In either case, the color shown in the baked image and the color shown in the render are going to look different.
This lens shader maps color components lying between a floor and a ceiling value to the unit interval. Values below and above those limits are clamped to 0 and 1, respectively.
The stencil lens shader may be used to block out portions of an image by overlaying a stencil texture.
Use this to insert background plates, like image planes.
Place the background plate in the background of the scene so that it matches the size of your image resolution. Depending on which shader you’re using, you can do the following:
These shaders can be used to introduce new pieces of geometry into the scene at render time.
Geometry shaders are connected to transform nodes, which are used to determine the position and orientation of the geometry.
This shader is provided to read static or animated geometry like polygon or subdivision meshes and NURBS surfaces from Alembic files, including support for loading them on demand only during rendering.
This shader returns a copy of the input object, which must be of freeform-surface type. It loops over all faces and adds a Bézier texture surface of degree 1 to each face as the last texture surface. The parameters and control points of the texture surfaces so that the texture coordinates of the triangle vertices are the uv coordinates of the triangle vertex positions.
This is a sample geometry shader to be used with mib_geo_add_uv_texsurf.
It generates a polygonal cone centered on the Z axis with the apex at Z=0 and the base at Z= -1. The cone has a radius of 1 at the bottom and a height of 1. The cone bottom disc is subdivided into u_subdiv subdivisions, the cone side in v_subdiv subdivisions in the Z axis direction.
This is a sample geometry shader to be used with mib_geo_add_uv_texsurf.
It generates an axis-aligned unit cube with volume 1 centered on the origin.
This is a sample geometry shader to be used with mib_geo_add_uv_texsurf.
It generates a polygonal cylinder centered on the Z axis with the bottom at Z=-1 and the top at Z=0. The cylinder has a radius of 1 and a height of 1. The two cylinder discs are subdivided in u_subdiv subdivisions, the sides in v_subdiv subdivisions in the Z axis direction.
This constructs an instance of one of a geometry shader that translates, scales, and rotates the geometry, and returns a group with the instance of the source geometry as its only member. If the result was nonzero because the base shader is part of a list, a new group is not created; instead the instance is added to the result group.
Same as mib_geo_instance, but accepts a material array, which is converted into a material list in the new instance if the array has more than one member. Material lists are useful if the instanced object is tagged, meaning its polygons or surfaces carry integers that index into the material array.
Generates a polygonal sphere with a given number of U and V subdivisions, centered on the origin. The sphere is subdivided with v_subdiv subdivisions in the Z axis (longitude) and u_subdiv subdivisions in the XY plane (latitude).
Contour store shaders decide what kind of information to store at an image sample location. This information allows the contour contrast shader to decide whether two samples are different enough to place a contour line between them.
These shaders can be used to generate cartoon-like renderings. After the contour contrast shaders decide where contours should be drawn, contour shaders decide on the contour color and width (and optionally motion, normal, material tag, and label).
This is a combination of the depthfade, layerthinner, and widthfromlight contour shaders.
The width of the contour fades into the background (from near_width to far_width), and the color fades from near_color to far_color. The contour width and color changes with a ramp function between distances near_z and far_z. For each layer the ray has passed through, a factor is multiplied onto the width. If no factor is specified, the width will not depend on the layer. If a light source is specified, the width also depends on the surface normal relative to the light source direction.
This shader draws contours whose width depends on the curvature (the difference in surface orientation).
If two normals are in nearly opposite directions, there is a contour of width close to max_width between them. When the angle between them decreases, the width of the contour decreases down to nearly min_width. (The width will never reach min_width completely, since the contour contrast function will not create any contours where the surface curvature is less than ndelta degrees, and ndelta cannot be set to zero without getting contours in the interior of all objects.)
At the edge of an object, where the depth difference is large, the maximum contour width is used. The minimum width would theoretically occur at 0 degrees and the maximum width at 180 degrees.
Contours are drawn whose color and width are linearly interpolated between two values as specified with the near and far parameter sets.
This shader draws a contour whose color matches the color of the object being contoured, only with a different brightness (usually much darker).
This shader draws contours with a color and width that depends linearly on the frame number. Two frame numbers, colors, and widths are specified. If the frame number is less than the first frame number, the first color and width is used. If the frame number is higher than the last frame number, the last color and width are used. If the frame number is in between, a linear interpolation of the two colors and widths are used.
With this contour shader, the width of a contour will change depending on how many levels of materials are on top of it. If the material is on top, its contour will be of a width specified by a parameter. For each material on top of it, its width will decrease by a factor that is also controllable with a parameter.
This shader takes the maximum (in each color band) of the two material colors on each side of the contour.
This shader only puts contours at the silhouette of objects, even if the contour contrast function has decided that there might also be contours internally on objects.
A simple contour of constant color and width is applied when contour_shader_simple is used.
With the contour_shader_widthfromcolor contour shader, a material gets contours whose thickness depends on material color. The thickness depends on the maximum of the red, green, and blue color bands (the maximum is clamped to 1 if it is larger than 1). When the color is bright no contour is visible, and when the color gets darker the contour gets wide. The minimum width is used at bright colors and the maximum width is used at black.
Contours are drawn whose width depends on the angle between the surface normal and the direction to a light source. The thickness increases gradually from min_width when the surface is directly facing the light direction to max_width when the surface is facing exactly opposite the light direction.
This shader is a variation of the contour_shader__widthfromlight. It accepts a direction explicitly, instead of a light that implicitly provides the direction.
Contour output shaders are called after the regular image has been computed.
This generates a contour image with a given background color in the color frame buffer, discarding the rendered color image. See also Hide Source in the Contours section of the Features tab of the Render Settings: mental ray tabs.
Another variation of refraction, with the addition of specularity (Snell's law). This shader does only the refraction part of a dielectric material; highlights are left to other illumination nodes.
Casts a transparency ray of a given intensity and merges the result with an input color.
Casts a reflection ray of a given color and merges the result with an input color. Use it to add a reflection effect to a base shader that provides illumination, possibly in conjunction with refractions or transparency added by other base shaders. If no reflection ray can be cast (because the trace depth has been exceeded, or the reflection ray caused a shader to be called that failed, or the notrace parameter is set), sample the environment if there is one.
Casts a refraction ray of a given color with an index of refraction and merges the result with an input color. The indices of refraction can be computed with another base shader, such as mib_refraction_index, which is also stored back into the appropriate state variables. Use this to add a refraction effect to a base shader that provides illumination.
Decide whether the ray is entering or leaving the object it has hit, based on a scan of parent rays (not based on the normal vector). The index of refraction ratio (outgoing divided by incoming) is returned. As a side effect, both incoming and outgoing indices of refraction are stored in the state (ior_in and ior, respectively), and the current volume shader becomes the refraction volume if the ray is entering.
Convert a color to RGBA grayscale, either by extracting the alpha component, by averaging RGB, or by weighting RGB according to a physiological color model that emphasizes green and deemphasizes red. The resulting grayscale value can also be used as a scalar. The returned R, G, B, and A components all have the same value.
Given a scalar or a color, perform a lookup and interpolation of a multicolor map. The map is a set (not array) of up to 8 colors. The actual number of colors is specified by a parameter.
Accepts a base color and up to 8 inputs (the exact number is determined by a parameter), each of which consists of an input color, a weight scalar, and a mode. The inputs are evaluated in sequence, each operating on the result of the previous one (the first begins with the base color, which defaults to transparent black).
These shaders provide a solution to a common problem with large number of scene elements that use the same material or shading graph just with slightly different parameters per element. Instead of creating a copy of the whole material for each scene element just to adjust a single parameter, a single material is shared between all elements that has its input parameters driven dynamically by attributes defined on the current scene element.
Use these shaders with multi-render passes. For more information regarding passes, see Multi-render passes.
Add the writeToColorBuffer, writeToDepthBuffer, writeToVectorBuffer, and writeToLabelBuffer shaders to your shading network to write data to the framebuffer. Select the appropriate shader depending on your input and framebuffer type. For example, writeToColorBuffer receives color as input and writes to framebuffers that are of type custom color.
For more information regarding these shaders, see mental ray render pass utility shaders.
This shader can simulate mirrors, glossy paint or plastic, anisotropic glossy materials such as brushed metal, diffuse materials such as paper, translucent materials such as frosted glass, and any combination of these.
This shader is a physically based material shader that can be used to simulate dielectric media such as glass, water, and other liquids.
The shader uses Fresnel's formulas for dielectric interfaces. This means that most light is transmitted through the surface for perpendicular incident directions while most light is reflected by the surface for grazing incident angles, simulating the behavior of real dielectric materials.
The shader also uses Beer's law for absorption of light that passes through a medium. This means that the light is subject to an exponential falloff as it is transmitted between two surfaces with dielectric material.
Two types of dielectric interfaces are supported: dielectric-air simulates the interface between a dielectric material and air (such as glass-air), and dielectric-dielectric simulates the interface between two dielectric materials (such as glass-water). To achieve physically correct simulations it is important to use the correct surface interfaces.
Use this shader to create glossy and blurred reflections on the surface of a base material. This can be any type of material shader. This shader offers multi-sampled glossiness, distance-bounded reflections, and Fresnal effects.
Use this shader to create glossy and blurred refractions on the surface of a base material. This shader is made up of three layers; a top material, back material, and a deep material that define the characteristics of the refraction from the exterior, interior, and within the surface.
Perform Blinn illumination, which is a like Cook-Torrance illumination (see mib_illum_cooktorr) but without the color shift with angles. It only requires one index of refraction.
Perform Cook-Torrance illumination, given ambient, diffuse, and specular RGB colors, a roughness, index of refraction for three wavelengths, and a light list. With this, you can produce silk-type highlights.
Cook-Torrance illumination has an off-specular peak and a color shift with angles.
Perform Lambertian illumination, given ambient and diffuse RGB colors (alpha is ignored).
Perform Phong illumination, given ambient, diffuse, and specular RGB colors, a specular exponent.
Perform Ward illumination, given ambient, diffuse, and glossy RGB colors, two shinyness parameters, two direction vectors (from a texture). Useful to produce anisotropic effects. See also mib_illum_ward_deriv.
 Except where otherwise noted, this work is licensed under a Creative Commons Attribution-NonCommercial-ShareAlike 3.0 Unported License