


The simplest way to create a pony tail is to use a single clump. To best shape the clump, a different hair system could be used for the pony tail than from the rest of the hair. You could paint a single hair at the desired location of the pony tail. In the hair system, make the Clump Width relatively large and adjust the Clump Width Scale to shape the pony tail. The base of the clump may be much wider and then quickly narrowing to simulate the look of hairs being pulled into the tie at the base of the pony tail. After the tie point, the clump would then widen out a little. You can increase Stretch Resistance and Bend Resistance so that the base of the pony tail is very stiff, but then becomes sharply less stiff shortly after the tie point. One problem with this method is that clump bases do not follow the curvature of the head, so for a wide clump base some hairs may not sit on the head. Slightly insetting the Start curve position into the head can help compensate for this. The hairs coming from a very large area of the head into a pony tail are better handled by an additional hair system or set of follicles. You could potentially merge these into a tie object at the clump base, hiding the transition to the single clump used for the ponytail.
A very slight amount of Clump Curl may help with the ponytail shape. You might also need to increase the number of Hairs Per Clump to a high value (200 or more) to get enough density in the pony tail. Multi Streaks can help get the required density without impacting render times too much.
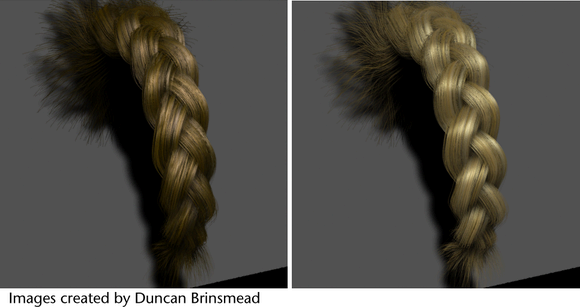
Hair clumps have built in braiding; just turn on the Braid attribute on a follicle and the clump will be internally a single braid composed of three strands. You can paint this attribute, or select the follicles to become braids and turn Braid on in the Channel Box. The shaping of a braid is similar to a single clump ponytail. In general, make the base wide to simulate hair pulling off the scalp into the braid. The Clump Width should taper quickly at first and then generally continue to taper until near the braid end. If desired, the tuft of hair at the end of the braid can then fluff out by increasing the Clump Width slightly at the very end. Unlike ponytails, braids do not have a uniform profile or cross-section - they are flatter. In general, the natural orientation is with the flat side horizontal. You can adjust the Clump Twist on the hair system so that most of the braids have the right orientation. Any odd clumps that still have the wrong twist can then be adjusted using the follicle's Clump Twist Offset. In order to fully resolve the curling in the braid, you might need to increase the hair system Sub Segments value to a large value, especially if the clump is skinny (the number of braids is proportional to the Clump Width).
With both ponytails and braids proper self shadowing of the hair is critical to achieve the tube-shaped look of the clump. Keep in mind that the clump is not like a modeled tube, which uses the angle of the surface with the light to determine shading. Instead, hairs on the side of the clump away from the light will be as bright as those on the light-facing side unless they receive shadows cast from other hairs. For Paint Effects rendering, depth map shadows must be used with Use Mid Dist turned off. The Bias on the light should be carefully adjusted and it can also help to make the Filter size high (3 or more). (For more information about light and shadow attributes, see Shadow attributes and Shadow in Maya.)
You can also create a pony tail by combining many individual hair clumps. There are a few techniques you can use to pull hairs together:
After you have position the hair together you need to pin it together so it doesn't fall apart during the simulation. To do this, create a Component to Component constraint to constrain vertices near the base of the pony tail. In the dynamicConstraintShape Attribute Editor, set the Connection Method to Within Max Distance. If you want the ponytail bound stiffly to a point on the character's head, create a Transform constraint for the hair and then group the constraint to the head geometry.
You can also start by modeling input curves into braided shapes. You can preserve the shapes by turning on Self Collide and increase the Friction value. Use Component to Component constraints on vertices in the braided regions with the Connection Method set to Within Max Distance.
 Except where otherwise noted, this work is licensed under a Creative Commons Attribution-NonCommercial-ShareAlike 3.0 Unported License