These are descriptions of the attributes in the hairSystemShape node (also hairSystem node). When modifying these attributes they affect the entire hair system.
When on, the hair system behaves as a Nucleus object and is solved by the Nucleus solver. As a Nucleus object, hair objects can interact with other Nucleus objects as well as self-collide. When off, the hair system solves using the Maya classic hair solver and does not behave as a Nucleus object.
When Use Nucleus Solver is off, Nucleus-related attributes are not available on the hairSystemShape node Attribute Editor.
This section contains attributes to control the hair clumps and overall hair shape.
This determines how much the rotation of the overall clump follows the primary hair axis. Short straight hair may work better with this value near zero, as the end of wide clumps will blend better when they twist. With this value at 1.0 the cross section of the hair clump will always be perpendicular to the tube direction, which can work well for long relatively thin clumps. When this value is zero the cross section is always perpendicular to the surface normal at the start of the hair clump.
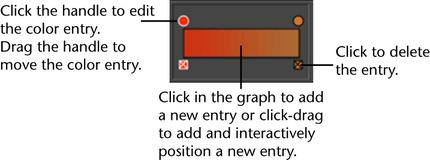
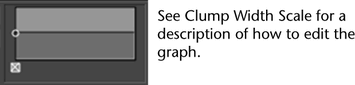
Using a ramp (graph) you can define a varied width for hair clumps. Clump Width Scale affects the width from root to tip of the hair clump. The left of the graph is the root and the right is the tip. You might want the hairs within the clump to come to a tip at the end of the clump, in which case the right value should be smaller than the left. This attribute multiplies the Clump Width parameter value, so a value of 1.0 will leave the Clump Width unchanged. If the Clump Width attribute is zero then this parameter will have no effect.

Using a ramp (graph) you can define a varied width for the overall hair shape. Hair Width Scale affects the width from root to tip of the hairs. The left of the graph is the root and the right is the tip. This attribute multiplies the Hair Width parameter value, so a value of 1.0 will leave the Hair Width unchanged, but if the Hair Width attribute is zero then this parameter will have no effect.
Using a ramp (graph) you can define a varied curl for hair clumps. Clump Curl controls the rate of curling about the primary axis of each hair clump. The left of the graph is the root and the right is the tip. The mid value of the ramp (0.5) represents no twist while values greater than that will result in positive twisting and smaller values will cause twisting in the reverse direction.
The higher the Clump Interpolation value, the more distributed the hairs in your hair clumps appear. This is useful when you want to create a smooth continuous head of hair with less obvious clumping.
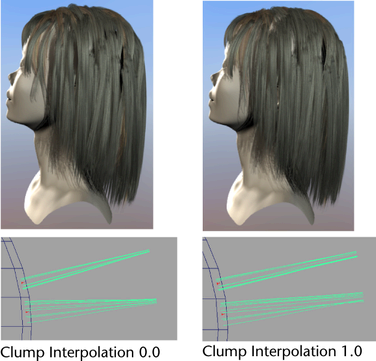
This attribute has an overall effect on all the hair clumps of your current hair system. The effects of this attribute are more apparent with higher Clump Widths than with lower Clump Widths. Clump Interpolation is 0.0 by default.
This value determines how far apart clumps can be and still interpolate with each other. Interpolation Range is multiplied by your current hair system’s Clump Width to define the maximum distance hair clumps are allowed to lie from each other for them to be included in the clump interpolation.
For example, an Interpolation Range of 8 specifies that the hair solution will look for clumps that are within a distance of 8 times the Clump Width value. All hair clumps that lie outside this range are not included in the clump interpolation.
This is useful when you want to vary the widths of your hair clumps to make your hair follicles look more natural. Interpolation Range is 8.0 by default.
Specifies the strength of collisions between the nHair object and other Nucleus objects. At the default value of 1, the object fully collides with itself or other Nucleus objects. Collide Strength values between 0 and 1 dampen the full collision, while 0 turns off the object's collisions (which is the same as turning off the object's Collide attribute).
If hairs become trapped during collision, lowering Collide Strength may make the simulation more stable and produce better results.
Assigns the current nHair object to a specific collision layer. Collision Layers determine how Nucleus objects that share the same Maya Nucleus solver interact.
Nucleus objects on the same collision layer collide normally. However, when Nucleus objects are on different layers, the objects on lower value layers have priority over objects on higher value layers. So a Nucleus object on collision layer 0.0 pushes an object on collision layer 1.0, which in turn pushes the object on collision layer 2.0. This collision priority occurs in the range set by the Collision Layer Range attribute on the nucleus node.
When the collision layer difference for two objects is 1.0 or more, the lower layer is essentially rigid relative to the higher layer. For collision layer differences less than one, the relative push (or mass) becomes more equal.
See also Collision Layer attribute for the nClothShape node.
Specifies a value added to the Clump Width before resolving collisions. This value is relative to the Clump Width.
Use Collide Width Offset to help resolve interpenetrations and correct hair behavior when passive hairs move outside the boundaries of the active clumps. If the hairs collide too far from an object, use negative values to allow a some interpenetration of clumps.
Specifies what Maya Nucleus solver information is displayed in the scene view for the current nHAir system. Solver Display can help you better diagnose and troubleshoot any problems you may be having with your hair simulations.
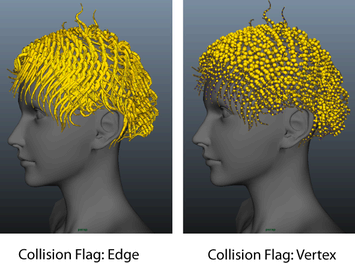
When on, the collision volumes for the current nHair system display in the scene view. Collision Thickness helps you visualize the individual hair clump's thickness and it is useful when adjusting hair collisions with other Nucleus objects. The appearance of the current nHair collision volumes is determined by its Collision Flag. See Collision Flag.
Stickiness specifies the tendency of hairs stick to each other or other Nucleus objects during collision.
For additional information about Stickiness and Friction see the nClothShape node Friction and Stickiness attributes.
When Self Collide is on, Static Cling specifies the amount of local attraction between self-colliding hairs. This simulates a static cling effect and creates additional friction on hairs.
Using Static Cling dampens the motion of hair masses and can be useful for achieving natural motion of a large amounts of hair. Negative Static Cling values cause hairs to repel each other.
When on, the lengths of your output hair curves are fixed at the lengths of your start hair curves. No Stretch keeps the lengths of your output hair curves constant and it prevents them from stretching. This lets you create realistic, flexible, non-stretchy hair without having to increase the number of Iterations for your hair solver.
When using No Stretch, your hair curves should always be constrained at their follicle bases. No Stretch is off by default.
This is the current time used for the hair solution. By default, it is given an incoming connection from the main time node. This can be replaced with some other connection (such as, from an expression or param curve) and then the solving is done based on that time value. There must be some incoming connection in order for the Hair System object to play back.
Adds bend links between the vertices of hairs that are not closest to each other or are not near neighbor hairs. These links help with bend and twist resistance of hairs that have many vertices. Extra Bend Links can create unnatural looking hair effects where hair is stiffer at large scales than at small scales.
Specifies a multiplier for the hair rest length, allowing hair to expand or contract more in the rest position. To avoid sudden snapping at the start of the simulation, create a key at the first frame with a Rest Length Scale value of 1.0. Increase or decrease the value gradually with subsequent key frames.
Stiffness Scale affects the stiffness from root to tip of the hair. The left of the graph is the root and the right is the tip. Typically the root of a hair is thicker and therefore stiffer than the tip. This attribute multiplies the Stiffness parameter value, so a value of 1.0 will leave the Stiffness unchanged, but if the Stiffness attribute is zero then this parameter will have no effect.
Determines the amount of attraction of the current hair position to the start position. This attribute is useful, for example, where you want to have stiff hair, or hair that moves with a character. Also, if you put keyframed animation on your start curves, you can use the Start Curve Attract attribute to blend between the simulation and the start curve animation.
Normally you would leave the Start Curve Attract value at zero for long flowing hair. However, for short hair it can be difficult to make hair stiff enough. Use a value greater than zero when the hair needs to be very stiff, yet at the same time have some dynamic properties. At a value of 1.0 the hair position will be the start curve position (relative to the transformed follicle position); only collisions and forces will still deflect the hair. Without Start Curve Attract this scenario could otherwise require a very high iteration count and damp value, especially if there are many CVs per hair.
When Start Curve Attract is set to a value of 1.0, there is 100% attraction to the start curve position. You can control which parts of the curve are attracted to the start curve by using the Stiffness Scale attribute. If you have animated start curves then this would produce behavior that is similar to when the Simulation Method is set to Static. However, dynamic fields are still added on top of the solve.
For colliding hair, this attribute may dampen out excess hair motion without requiring the Damp attribute, and with an Iteration value of as little as 1.
Drag fields with Inherit Velocity set to 1 (see Fields > Drag) can be parented to a head and applied to the hair. At high Drag values, the hair will move exactly with the head. In many respects the effect of this is superior to the Start Curve Attract attribute, although it depends on the exact effect you are after.
Damps the effect of Start Curve Attract, decreasing the velocity of hair as it moves towards its start curves’ positions. This is useful when you want to lessen the springiness (caused by higher Start Curve Attract values) of hair, or when you want to apply dynamic fields on top of animated hair. When Attraction Damp is 1, the motion of hair moving towards its start curves is fully damped, leaving only its Start Positions and field forces to dynamically influence its motion.
The Attraction Scale ramp attenuates the Start Curve Attract attribute value along the length of the hair clumps in your hair system.
You can use the ramp graph to define a varied stiffness from root to tip for the hair clumps in your hair system. The left-side of the ramp graph represents the roots of the hair clumps in your hair system and the right-side represents the tips. For example, if you want the roots of your hair clumps to be less stiff than their tips, then the value on the right-side of the ramp graph should be smaller than the value on the leftside.
The Attraction Scale ramp values are multipliers of the Start Curve Attract attribute value on the hair system. So an Attraction Scale of 1.0 does not affect the Start Curve Attract, and a Start Curve Attract of 0.0 is not effected by Attraction Scale.
Specifies the amount of drag along the hair direction. When set to 0, hair has no resistance to moving tangentially or along the direction of its shape. When Tangential Drag is set to 1, Drag is even in all directions. For high Drag levels with low Tangential Drag, the hair behaves in a oscillating motion like a snake moving through water.
This damps the movement of your hair curves relative to the movement of their follicles. The Motion Drag value determines how much your hair curves move with their follicles and to what extent the shape of your hair can be influenced by other forces. This lets you damp your hair’s excess movement, such as bobbing and wiggling, without having to increase Iterations.
For example, if you set Motion Drag to 1.0, then your hair will move with its follicles, appearing to drag the surrounding air with it.
You can also influence the effects of Motion Drag with the Stiffness Scale attribute. For example, you can use the Stiffness Scale ramp drop-off to create more Motion Drag at the roots of your hair than the ends. Motion Drag is 0.0 by default.
When on, follicle animation evaluation is disabled on playback. This is an optimization setting that improves playback performance when simulating animated follicles.
When caching a simulation with Disable Follicle Anim on, set Cacheable Attributes to Dynamic State. This ensures that the effects of Twist Resistance are saved to the nCache file.
This section contains attributes to control the turbulence properties of the hair system.
Specifies the simulation data that will be saved to a server or local hard drive when the current nHair object is nCached.
This section contains attributes to control the hair shading or color.
The base color for hairs. The final color used is determined after the Hair Color Scale and randomization parameters are applied. Also individual hair clumps may override the Hair Color.
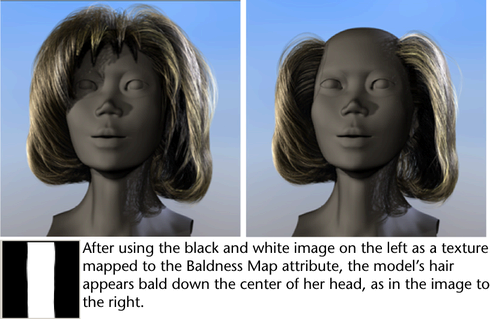
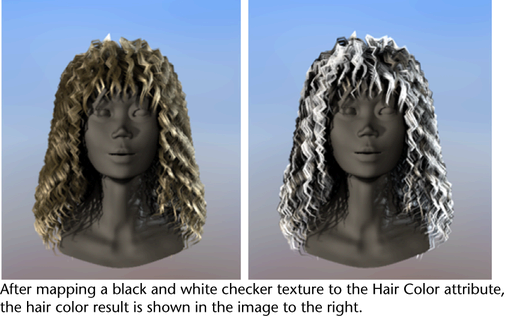
Use the Hair Color map button next to this attribute to map a texture to the hair color to create different hair shading looks. The following image uses a black and white checker texture mapped to the Hair Color attribute.
This section contains attributes to control the displacement properties of the hair.
Random is good for fuzzy, kinky hair, while the other, smoother noise methods can provide natural shaping and substructure to hair clumps.
The amount of secondary high frequency noise added when the smooth (Surface UV, Clump UV) Noise Methods are used. It can add subtle detail on top of smooth undulations from the base noise. If non-zero, a second noise offset calculation is performed, so this can make evaluation of the hair slightly slower than the smooth noise with no detail noise.
Determines how sub-clumps are defined in UV.
The sub-clumps are laid out relative to the overall surface UV space. Some follicles may therefore share a clump with a neighboring follicle. The density of sub-clumps will be affected by the parametric density of the surface the hair system is attached to. The total number of clumps across a surface will be the Num UClumps multiplied by the Num VClumps.
The number of sub-clumps for each clump will be the Num UClumps multiplied by the Num VClumps. All follicles, regardless of clump width, will have the same number of sub-clumps and the width of the sub-clumps will be related to the clump width. With Surface UV the smaller clumps will have fewer sub-clumps and the clump width will be relative to the parametric density of the surface.
Using a ramp (graph) you can vary the amount of displacement applied from root to tip of the hair clump, affecting Curl, Noise and Sub Clumping.
The left of the graph is the root and the right is the tip. If the left side is zero then the effect will be added gradually—the root position of the hair will not be changed.
This section contains attributes to control the Multi Streaks shading for Paint Effects strokes. These attributes only apply if your hair output includes Paint Effects (see Create your own hair on surfaces).
Multi Streaks is the number of added sub hairs for each hair in a clump. These hairs will share the same shape and shading as the base hair they are derived from. They are created at render time and are simple duplicates, and therefore do not take up any shape computation. This allows you to have a great number of (Paint Effects) tubes and yet render them in a reasonable amount of time.
Render times can be much faster if you share the same illumination for each hair in a Multi Streak. If the Multi Streak spread is relatively large or self shadowing between hairs within a Multi Streak group is desired then Light Each Hair should be turned on. Also turning this on could avoid popping artifacts in situations with moving hard-edged shadows.
This section contains attributes that control how Hair is reflected and refracted in other objects.
 Except where otherwise noted, this work is licensed under a Creative Commons Attribution-NonCommercial-ShareAlike 3.0 Unported License