This topic describes the clip states that can affect your resulting animation in Trax.
When a clip is disabled, its animation or deformations are suppressed during playback.
Enabling and disabling an animation clip is just like muting or unmuting a track. In the Trax Editor, disabled clips are dark blue.
To enable/disable an animation or geometry cache clip,  -click a clip and select Enable Clip from the context-sensitive menu that appears. See Trax context-sensitive menu.

When a clip is active, manipulating and keying the objects whose curves are in that clip from the scene view automatically places all those keys in the active clip. Also, all of an active clip’s keys appear in the Time Slider.
An active clip turns purple to indicate that you can key into it from outside the Trax Editor.

You can activate or deactivate clips by turning on or off Activate Keys from the context-sensitive menu or Modify > Activate/Deactivate Keys menu in the Trax Editor. See Context-sensitive menu and Key into a clip.
You can blend the common attributes of two animation clips of a character set. This creates a region of mixed animation between the motion of each clip called a blend. Blends provide smooth transitions between one animation clip and another. See Create and edit blends. You can control how much influence each clip has in a blend by manipulating the animBlend node’s Weight attribute.
When you apply a blend to clips, a visual cue appears on (if clips are overlapping) or between (if there is a gap in time between the clips) the blended clips. Also, the parts of clips that overlap in blends are colored differently than the rest of the clips.
Blends between animation clips are indicated by green arrows and the regions of overlap between blended clips are green.
If clips that participate in a blend do not overlap in time, then only a green arrow appears connecting the blended clips. The green arrow is drawn from the end of the first clip in the blend to the beginning of the second clip in the blend.

Time warps let you change the timing of an animation clip without modifying the clip's animation curves. See Create and edit time warps.
When you create a time warp for a clip, a visual cue appears on the respective clip to indicate that it is influenced by a time warp curve. This visual cue appears as a green colored bar at the top of the clip.

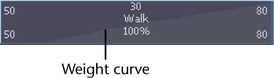
Weight is an animation and geometry cache clip attribute. You can change a clip’s weighting to increase or decrease its influence on its character’s overall animation or its object’s overall deformations. See Edit a clip’s weighting and Weight.
When you animate the weight of a clip, a new visual representation of the Weight attribute’s curve appears on the clip.
Absolute channels do not accumulate motion. This means that when the offset of a clip channel is absolute, then that channel does not add the motion of the equivalent channel in the previous clip to its own animation. This is useful when you want to create a sequence of cycled animation.
For example, if you want to create a walk cycle, the cycle should have relative translation channels (so that your character doesn’t jump back to its initial position at the end of each cycle) and absolute rotation channels.
Relative channels accumulate motion. This means that when the offset of a clip channel is relative, then that channel adds the motion on the equivalent channel in the previous clip to its own animation.
For example, suppose you’ve created two clips that play sequentially in the Time Slider. The first clip is a character walking away from the origin along the X-axis, the second clip is the character running away from the origin along the X-axis.
If the clip’s translation channels are relative, the character walks away from the origin and then starts running from the position where the walking clip ends and the running clip begins. If the clip’s translation channels are absolute, then character walks away from the origin and when the walking clip ends and the running clip begins, the character moves instantly to the origin and starts running from that position.
 Except where otherwise noted, this work is licensed under a Creative Commons Attribution-NonCommercial-ShareAlike 3.0 Unported License


