


The Move Weights tool lets you easily move weights from one influence to another, without having to manually reset or change the weight value.
To move weights for selected vertices
 ).
).
 in the Paint Skin Weights Tool.
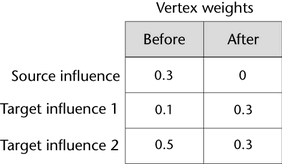
The weights of the selected vertices are moved to the target influence(s) you selected, and the skin points are now influenced only by those influences.
For example, the following table illustrates the weight value changes for a selected vertex as you move weights from a source influence to two target influences.
 Except where otherwise noted, this work is licensed under a Creative Commons Attribution-NonCommercial-ShareAlike 3.0 Unported License