There may be situations where you need to remove nodes from a particular namespace and subsequently remove the reserved namespace from the scene. These situations might be as follows:
When removing namespaces, you have the option to merge referenced or imported object namespaces with a namespace that exists in the parent scene. When duplicate namespaces occur, the namespaces are merged and duplicate object names are incrementally suffixed with a number.
You can remove namespaces using the Namespace Editor or by using MEL commands.
The namespace for the object/node appears highlighted in the Channel Box and Outliner. For example, an object’s name with an assigned namespace can appear as follows:
spaceJunk:pSphere1
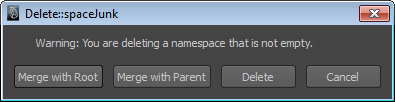
If the namespace you want to remove contains nodes, the Delete: namespace window appears.
The next two procedures show you how to remove nodes from an existing namespace in a scene using the namespace MEL command. You can remove the namespace and its contents, or remove that namespace and merge its contents with a root or parent namespace.
To remove a specified namespace for all nodes in a scene
The namespace for the object/node appears in the Channel Box, Outliner, or other editor when it is selected. An object’s name with an assigned namespace would appear as follows:
spaceJunk:pSphere1
namespace -mergeNamespaceWithRoot -removeNamespace "spaceJunk";
namespace -mergeNamespaceWithParent -removeNamespace "spaceJunk";
namespace -mv “spaceJunk” “:” -f
Any nodes that had the spaceJunk namespace now have no namespace specified. That is, the : specifies the default namespace and the -f flag forces the command even if it produces naming conflicts. As a result, nodes with identical names will be assigned an incremental number.
To remove a reserved namespace from a file
namespace -rm “spaceJunk”
 Except where otherwise noted, this work is licensed under a Creative Commons Attribution-NonCommercial-ShareAlike 3.0 Unported License


