Many of these menu items appear and behave in a similar fashion to the main Edit menu in the scene view. However, as the Dope Sheet works directly with animation curves and attributes, there are no hierarchy options available within the settings windows for the edit functions.
Cut removes existing keys from a selected attribute and places a copy of that information on the keys clipboard. If a curve segment is selected in the graph view, this area will be removed when you choose Edit > Cut. If no curve segment is selected, Cut will operate on the item selected in the Outliner portion of the Dope Sheet. See Edit > Keys > Cut Keys.
Copy copies existing keys from a selected attribute and places that information on the keys clipboard. If you select a curve segment in the graph view, this area will be removed when you choose Edit > Copy. If no curve segment is selected, Copy will operate on the item selected in the Outliner portion of the Dope Sheet. See Edit > Keys > Copy Keys.
Paste adds keys from the keys clipboard to an attribute. Pasted keys can be merged with existing keys, inserted at a time (displacing existing keys), or used to replace keys at a time. See Edit > Keys > Paste Keys.
Delete removes existing keys from a selected attribute. It works the same as Cut except it does not place a copy of the removed keys on the keys clipboard. See Edit > Keys > Delete Keys.
Scale operates on a selected range of keys, expanding or compressing the animation to correspond to a new time range. Note that Scale will operate on the entire range of keys if an attribute is selected in the Dope Sheet outliner and a curve segment is not selected. See Edit > Keys > Scale Keys.
Use Snap to force selected keys to snap in time to the nearest whole time units. Use Select Unsnapped to check for keys not at whole time units. See Edit > Keys > Snap Keys.
See Select Curve Nodes.

See Change Curve Color.
See Remove Curve Color.
This menu controls the layout of the Dope Sheet view area.
This option loads the Dope Sheet Summary into the Dope Sheet outliner. See Dope Sheet outliner for more information about summary objects.
The Curves menu items are functions for processing animation curves.
In Maya, animation curves are extrapolated outside the first and last keys of the curve. Curves before the first key and after the last key will be flat (no change in value over time) unless you set the pre and post tangent controls to anything other than constant. You can use these options to automatically generate specific types of repeating animation. For definitions of the pre and post infinity curve types, see Pre and Post Infinity.
This operation calculates a new animation curve for an attribute using the input nodes that contribute to its properties. See Bake Channel Options window. Bake Channel is useful to:
Lets you change the rotation interpolation type of existing curves.
You can change the rotation interpolation type only on rotation channels that have keyframes on all three channels (rotateX, rotateY, rotateZ). In addition, because the rotateX, rotateY and rotateZ channels always share the same interpolation type, changing interpolation for a single channel such as rotateX, will automatically change rotateY and rotateZ as well.
Use this operation to remove keys that are not necessary to describe the shape of an animation curve. Excess keys may accumulate on an animation curve as a result of adding keys manually or performing operations such as a Bake Channel. You may need to remove keys from an animation curve to reduce the complexity of the graph view. You might also need to provide larger spans for adjusting curve tangents.
See Simplify Curve.
You can resample dense data curves with the Curve > Resample Curves option in the Graph Editor or Dope Sheet. Resampling creates a periodic frame rate by placing keys at uniform intervals.
To resample a curve, you select a sampling filter, which is an algorithm defining how the keys in the curve are resampled. Tangent and curve values are ignored. The filter converts animation curves with keys at either uniform or non-uniform intervals to curves with keys at a uniform interval that you specify. See Resample Curve Options.
Weighted tangents represent the amount of influence a tangent has on an animation curve segment. By turning on Free Tangent Weight, it is possible to simultaneously edit the influence and angle of the tangent quickly and intuitively. Users of desktop illustration packages will recognize the familiar Bezier-style behavior when in this mode.
Mutes the selected keys. Keys that are muted do not contribute to the animation on their channels.
When keys are muted, the following occurs:
 appears next to the names of the muted keys channels in the Dope Sheet Outliner.
Mute channels have the same number of keys as the muted keys animation channels, and their keys are positioned the same as those on the muted keys animation channels.
Unmutes the selected keys. Keys that are not muted contribute to the animation on their channels. Unmuting keys disables their
Mute channels (indicated by the red x symbol  next to the names of the muted keys channels in the Dope Sheet Outliner) but does not remove them.
To remove Mute channels, see Mute keys in the Dope Sheet or Graph Editor.
Tangents describe the entry and exit of curve segments from a key. This menu operates on the shape of curve segments around selected keys. Note that these settings affect only existing animation curves segments’ tangents. See Graph Editor Tangents menu.
Specifying a spline tangent creates an animation curve that is smooth between the key before and the key after the selected key. The tangents of the curve are co-linear (both at the same angle). This ensures that the animation curve smoothly enters and exits the key. When animating fluid movement, a spline tangent is an excellent place to start. You use a minimum number of keys to achieve your look.
Specifying a linear tangent creates an animation curve as a straight line joining two keys. If the in tangent type is linear, the curve segment before the key is a straight line. If the out-tangent type is linear, the curve segment after the key is a straight line. When animating the color of a heating element on a stove, you would use linear to achieve that gradual change in color from charcoal gray to burning hot red.
Specifying a clamped tangent creates an animation curve that has the characteristics of linear and spline curves.
The keys’ tangents will be splines unless the value of two adjacent keys are very close. In this case, the out tangent of the first key and the in tangent of the second key will be interpolated as linear.
When animating a skeleton in a walk-cycle, you may notice a slipping of the pelvic and foot joint position. This occurs because the value of the keys on the curve are either the same or close to (within tolerance of) the value of the other. Maya assigns a default spline tangent to describe what occurs between these keys. This is why you get the joint positions slipping.
By setting the tangent type to clamped for these keys, the slipping is corrected and the tangents becomes a combination of linear and spline.
In the Maya environment preferences, Clamped is the default tangent type.
Specifying a stepped tangent creates an animation curve whose out tangent is a flat curve.
The curve segment is flat (horizontal), so the value changes at the key without gradation.
The light from a strobe light turns on and off. To create a strobe-like effect, you would use a step tangent.
 To get a quick preview of your animation as if all keys have Stepped tangents, right-click the Time Slider and toggle the Enable Stepped Preview option. When Enable Stepped Preview is on, playing back your animation lets you quickly view the position of objects as they hit each keyframe. Curves return
to their original tangent types when you turn off Enable Stepped Preview.
To get a quick preview of your animation as if all keys have Stepped tangents, right-click the Time Slider and toggle the Enable Stepped Preview option. When Enable Stepped Preview is on, playing back your animation lets you quickly view the position of objects as they hit each keyframe. Curves return
to their original tangent types when you turn off Enable Stepped Preview.
Specifying a fixed tangent allows a key’s tangents to remain unchanged as the key is edited.
When animating a ball, you may find the ball isn’t falling from a desired height, yet its impact with the floor and everything else is perfect. Using a fixed tangent lets you change the height of the ball while retaining the tangent’s angle. This is somewhat different from Edit > Keys > Bake Simulation.
This process is useful when you want to:
Plateau tangents ease animation curves in and out of their keyframes like spline tangents, but also flatten curve segments that occur between equal-valued keyframes like clamped tangents. The plateau tangent normally behaves like a spline tangent, but ensures that the minimum and maximum values along a curve are all at keyframes.
Plateau tangents are useful when you want the positions of your keyframes to be exact, because they ensure the maximum and minimum values (‘hills and valleys’) of the curve do not extend past their keyframes. For example, picture an animation of a ball rolling off a table, falling to the floor, and then rolling on the floor. With spline tangents, the ball falls through the floor, then comes back up to the floor. With plateau tangents, the ball will not fall through the floor. The tangents guarantee that your animation will not wander beyond the values you keyframed.
To do this, if a spline tangent would produce a minimum or maximum between two keyframes, the plateau tangent flattens the keyframes in question. Keyframes at local minimum and maximum points along the curve are also flattened. Finally, the first and last keyframe along a curve are always flattened if they have plateau tangents.
Auto tangents clamp curve values between frames to a maximum or minimum point based on the adjacent keyframe values. Auto tangents are the default type for new keys (set as the Default in tangent and Default out tangent in your Animation (Settings) preferences).
Specifying Auto tangents creates an animation curve where the first and last keyframes have flat tangents, and keyframes in between do not overshoot the neighboring keyframe value. This type of curve prevents issues with interpenetration of closely animated objects that can occur with other tangent types, such as Spline.
Lets you specify a type of tangent for the In Tangent only. The In Tangent defines the type of curve segment that comes before a key.
Lets you specify a type of tangent for the Out Tangent only. The Out Tangent defines the type of curve segment that comes after a key.
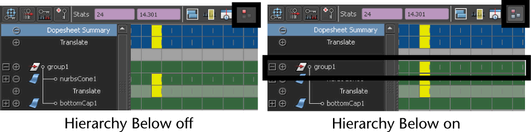
Use Hierarchy Below to toggle the display of objects acting as summary objects for objects beneath them.
For example, in the following diagram, a cone with a Translate X channel is under a group with no animation on it. With Hierarchy Below on, the group1 node acts as a summary group and displays the animation information of its child node (the cone). With Hierarchy Below off, only the summary objects (Dopesheet Summary, Scene Summary) display summary information.
When List > Auto Load Selected Objects is on, the objects that appear in the Dope Sheet outliner will change every time you make a selection to show the currently selected objects. If List > Auto Load Selected Objects is off, it locks the objects currently in the Dope Sheet outliner so you can continue to edit their animation curves even if you make a new selection in a scene view.
You can use this item only when List > Auto Load Selected Objects is off. When Auto Load Selected Objects is off, the objects appearing in the Dope Sheet outliner may be out of sync with what is currently selected in a scene view. To load the currently selected objects, select List > Load Selected Objects.
This menu is the same as its counterpart in the Outliner.


