Show in Contents

Add to Favorites

Home: Autodesk Mudbox Online Help

Learning resources

Getting Started

About Mudbox

QuickStart tutorial
Overview
The
QuickStart tutorial is structured in a step-by-step format to help
you get started with the basic features of Mudbox.
NoteDepending on your
experience with other 3D applications, the QuickStart tutorial may
take between 10 and 15 minutes to complete.
NoteBeyond the QuickStart
tutorial you can refer to the user guides and reference sections
of the Mudbox Help for more detailed information.
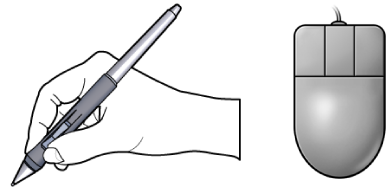
Configure your Wacom tablet
or mouse
It is recommended that
you use a Wacom® pen tablet in order to take full advantage of the
sculpting functionality in Mudbox. If you do not have a tablet you
can alternately sculpt a mesh in Mudbox using a standard three-button
mouse.
Mudbox uses a similar
three-button configuration for camera actions as Maya®. You'll need
to configure the upper and lower side switches on your Wacom pen
so they act in a similar manner as the right and middle buttons
on the mouse. For more information see
Tablet setup.
If you are not using
a tablet and stylus, a three-button mouse must be used with Mudbox
to provide the functionality necessary to control Mudbox. For information
on configuring a three-button mouse, see
Mouse setup.
Launch Mudbox
Do one of the following:
- (Windows) Double-click the
Mudbox icon on your desktop.
- (Windows) From
the Windows Start menu, select: Programs
> Autodesk > Mudbox 2009 > Mudbox 2009.
- (Mac OS X) Click
the Mudbox icon in the Dock.
- (Mac OS X) From
the Finder menu, select Go
> Applications, double-click the Autodesk folder
to display its contents, then double-click the Mudbox application icon.
Load a model
Mudbox works with polygonal
models as the underlying surface type. Polygonal meshes are a surface
type that are widely used in the development of 3D content for animated
effects in film, interactive video games, digital prototyping for
industrial design, and for creating virtual 3D content for the internet.
For more information on polygonal models, see
Sculpting overview.
In this lesson, you sculpt
a polygonal sphere you create in Mudbox. Mudbox includes a variety
of pre-made 3D model templates you can use as the basis for your
sculpted models. These simple pre-made polygonal meshes have UV
texture coordinates which are required for texture painting and
texture extraction.
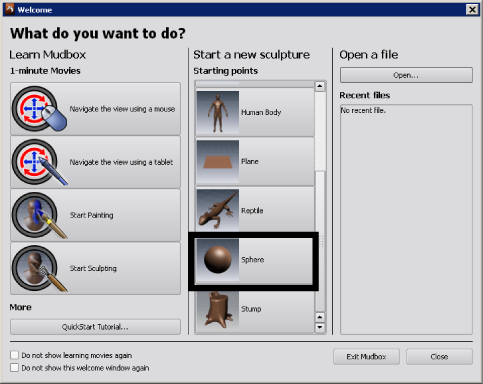
Whenever you launch Mudbox,
the Welcome window appears. This
lets you easily view the learning movies, select a sculpt template
or a file from disk.
- In the Start A New Sculpture section
of the Welcome window, select the Sphere sculpt
template.
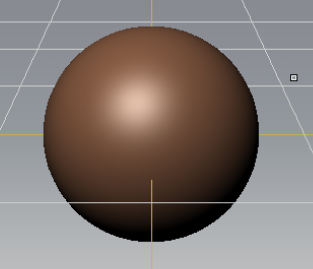
A polygonal sphere appears
in the 3D View.
NoteYou can open or import
your own polygonal meshes from other 3D applications using either
the
File > Open or
File
> Import. Files must be in .obj format. For more information
see
Import and export.
Navigate the 3D View
In Mudbox, you must be
able to view and sculpt your model from many viewpoints within the 3D
View. Navigating the camera within the 3D
View is the first skill you must master. Mudbox uses
a three-button configuration for camera actions similar to Autodesk®
Maya®.
To:
|
Keyboard shortcut: (Windows)
|
Keyboard shortcut: (Mac OS X)
|
Action/Results
|
Rotate the camera
|
Alt + Left button
|
Option + Left button Command + Left button
|
Press
the Alt key then drag in the 3D View while pressing the left button
on the mouse/stylus. The camera rotates about its center of interest.
|
Track the camera
|
Alt + Middle button
|
Option + Middle button Command + Middle button
|
Press the Alt key then
drag in the 3D View while pressing the middle button on the mouse/stylus.
The camera moves in a sideways motion.
|
Dolly the camera
|
Alt + Right button
|
Option + Right button Command + Right button
|
Press the Alt key then
drag in the 3D View while pressing the right button on the mouse/stylus.
The camera moves toward its center of interest.
You can also dolly using
the scroll wheel if your mouse has this feature.
|
Focus on a location
|
F
|
F
|
Place your cursor over
the model and press the F key. The location
beneath the cursor becomes the camera's center of interest.
|
Frame All
|
A
|
A
|
Repositions the camera
so that all visible geometry is within the camera's field of view.
|
- Using the hotkeys described above, tumble,
track, and dolly the camera in relation to the sphere so you become
familiar with these features.
Increase the resolution
of a model
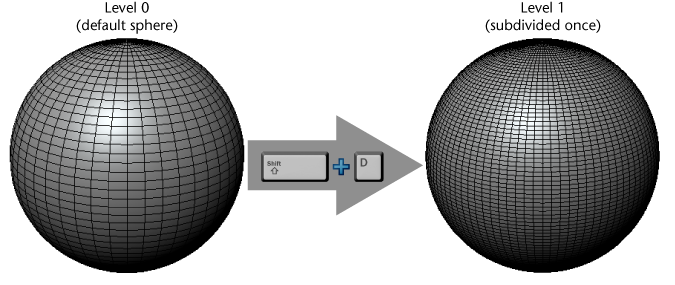
Adding more polygonal
faces to a model, also referred to as increasing its resolution,
is accomplished by subdividing it. Subdividing lets you sculpt more
detail than would otherwise be possible. Adding a subdivision level
divides each four-sided polygon face on the model into four smaller faces,
and so on.
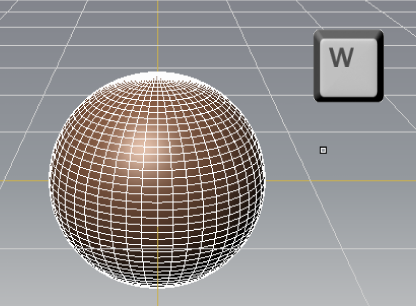
- To see the individual polygon faces on
the model, press the W key. (Pressing W a
second time turns the wireframe display off).
- From the main menu, select Mesh
> Add New Subdivision Level to increase the resolution
of the sphere.
NoteYou can also add
a new subdivision level by pressing the hotkeys Shift
+ D.
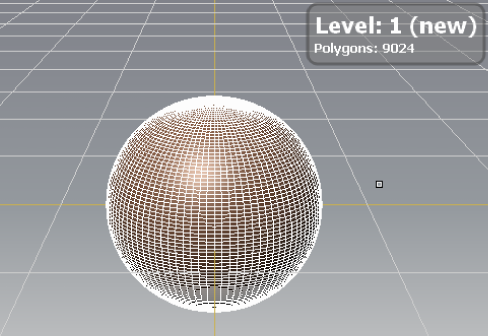
Additional polygonal
faces appear on the model. The Heads-up Display momentarily
appears in the upper right corner of the 3D View to
provide information including the current subdivision level as well
as the number of polygons for that subdivision level. The new subdivision
level is called Level 1.
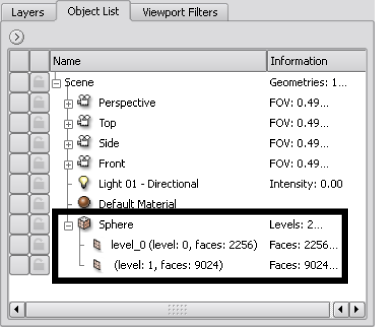
You can also determine
how many levels the Sphere currently has, as well as information
about those levels by viewing the Object List.
- To view the Object List,
click the tab titled Object List located in the
upper-right of the Mudbox user interface.
- Click the + symbol
beside the Sphere name to expand the list.
The Sphere has two subdivision
levels: 0 and 1. The active subdivision level is level: 1. (Adjust
the column width of the Name column
in the Object List if you cannot see
this information clearly).
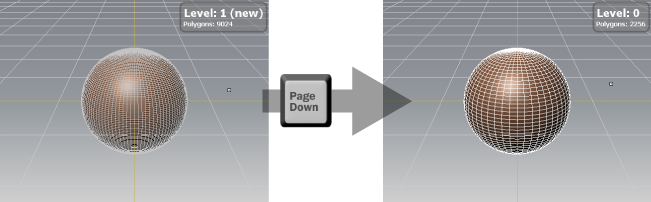
NoteBy default, only
one subdivision level can be sculpted on at a time. To sculpt on
level_0 again you must step down from level_1 to level_0 (the lower
resolution version of the mesh).
- Press the Page Down key
to step down to display the original base level of the model. The
current subdivision level momentarily appears in the Heads-up
display.
The following hotkeys
are useful for navigating the subdivision levels.
To:
|
Keyboard shortcut: (Windows)
|
Keyboard shortcut: (Mac OS X)
|
Action/Results
|
| Add a new subdivision level |
Shift + D |
Shift + D |
Subdivides the active mesh and an additional subdivision
level is added to mesh. (Ensure that the mesh you want to subdivide
is selected or that the cursor is on top of the mesh before you subdivide)
|
| Step up one subdivision level |
Page Up |
Page Up |
Displays the next densest level on the selected model. |
| Step down one subdivision level |
Page Down |
Page Down |
Displays the next coarsest level on the selected model. |
Sculpt a model
In Mudbox you sculpt
your model using sculpting tools you select from the tool trays
located below the 3D View.
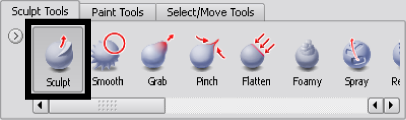
- Click the tab titled Sculpt
Tools then in the Sculpt Tools tray,
click the Sculpt tool.
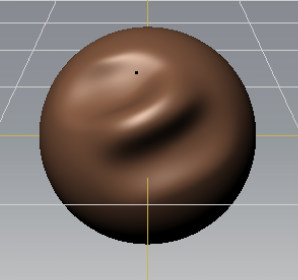
- In the 3D View,
position the cursor over the sphere, press the left button, and
then drag the cursor across the surface of the sphere for one short
stroke.
Your sculpt stroke moves
the affected vertices on the model slightly outwards on the model.
NoteYou can undo a sculpt
stroke by immediately pressing the hotkeys Ctrl
+ Z.
- Press the Ctrl key,
while performing another sculpt stroke on the sphere.
This time the affected
vertices are moved inwards in relation to the polygonal mesh.
NoteClicking the Sculpt tool
icon in the tray displays its properties in the Properties window
on the right side of the user interface. You can change a tool's Size and Strength in the Properties window,
or use the hotkeys described in the table below.
Tool Property
|
Keyboard shortcut: (Windows)
|
Keyboard shortcut: (Mac OS X)
|
Action/Results
|
| Size |
B |
B |
Press the B key then click the left button while dragging
the stylus/mouse. The circle surrounding the cursor changes size, depending
on the direction you drag your stylus/mouse, to indicate the region
of influence of the sculpting tool.
|
| Strength |
M |
B |
Press the M key then click the left button while dragging
the stylus/mouse. The vertical line above the cursor changes length, depending
on the direction you drag your stylus/mouse, to indicate the change
in tool strength.
|
Sculpt using layers
You can store sculpted
detail on one or more sculpt layers. Sculpt layers store edits to
the mesh and let you create and edit sculpted features, keep the
edits separate from one another, and let you blend sculpted detail between
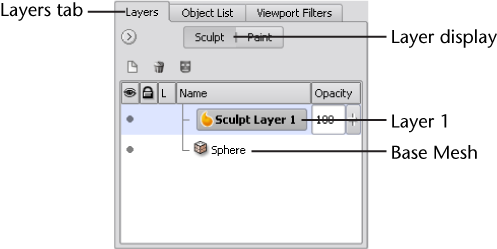
layers. You view and manage layers using the Layers window.
- Click Layers tab
in the upper-right corner of the Mudbox user-interface to display
the Layers window.
- To create a new sculpt layer, first set
the Layer display button at the top of the Layers window
to Sculpt, then click the Layers window
menu (
 ) and
select New Layer from the list (or
click the New Layer icon).
) and
select New Layer from the list (or
click the New Layer icon).
A new layer titled Sculpt
Layer 1 is created and becomes the active layer. Everything you
sculpt from now on will be stored separately on this layer until
you select another layer or change subdivision levels.
- In the 3D View,
sculpt on the sphere while Sculpt Layer 1 is selected.
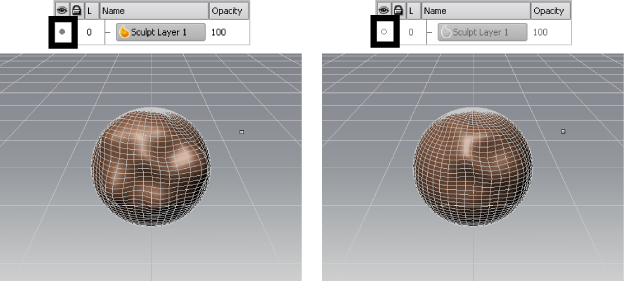
- To sculpt on the original base layer
(Sphere), click the Sphere layer in the Layers window
to select it.
- Turn off the display of Sculpt Layer
1 by clicking the visibility icon (circular dot) beside it.
The details you sculpted
on Sculpt Layer 1 disappear when the layer is invisible.
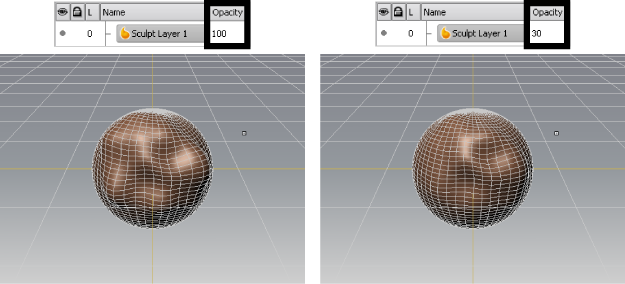
NoteYou can set the
Opacity value (located
to the right of the layer name) so it fades out the sculpting on
a layer by setting its value to zero. The
Opacity value
also works as a multiplier; you can either amplify or invert the
sculpted information on the layer by entering values over 100 or
by entering negative values. You can also click the
Opacity slider
to adjust the opacity value.
NoteEach sculpt layer
has its own mask channel which can be painted to add or remove sculpting
detail on that layer. For more information, see
Mask sculpting on a layer.
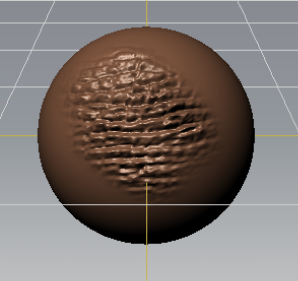
Sculpt using stencils
Stencils let you use
images to sculpt interesting detail onto a model. In Mudbox, a stencil
functions in a similar manner as its real world counterparts. Black
values in the stencil image protect the mesh and white areas of the
stencil image allow the sculpt tool to pass through and affect the mesh.
- From the main menu, select File
> New Scene, then click Don’t Save in
the New Scene window.
You’ll create a new sphere
for your work with stencils in the following steps.
- Select Create > Mesh >
Sphere.
A new polygonal sphere
appears in the 3D View.
- In the 3D View,
position the cursor over the sphere, and press Shift + D twice in
order to subdivide it a couple more times so you can add the finer
detail that this stencil can provide.
Some stencil effects
do not appear correctly unless the model has been subdivided to
a high enough subdivision level.
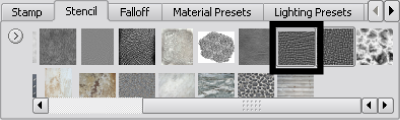
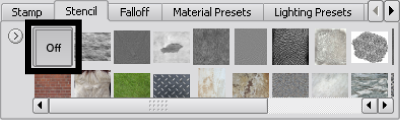
- In the Stencil tray,
click the stencil thumbnail image titled bw_skin08.jpg to select
it. (Placing the cursor over a thumbnail image displays its name).
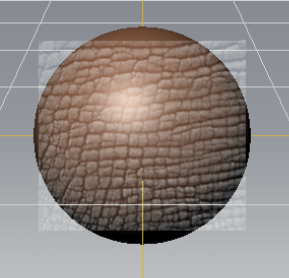
The stencil image appears
in the center of the 3D View.
- Ensure the sphere is positioned directly
behind the stencil image in the 3D View.
If you need to reposition
the stencil in the 3D View, use the following
hotkeys.
To:
|
Keyboard shortcut: (Windows)
|
Keyboard shortcut: (Mac OS X)
|
Action/Results
|
| Rotate a stencil |
S + left button |
S + left button |
Press the S key while pressing the left button on your
stylus/mouse, then drag in the 3D View to rotate
the stencil about its center pivot point.
|
| Move a stencil |
S + middle button |
S + middle button |
Press the S key while pressing the middle button on your
stylus/mouse, then drag in the 3D View to move
the stencil.
|
| Scale a stencil |
S + right button |
S + right button |
Press the S key while pressing the right button on your
stylus/mouse, then drag in the 3D View to scale
the stencil larger or smaller.
|
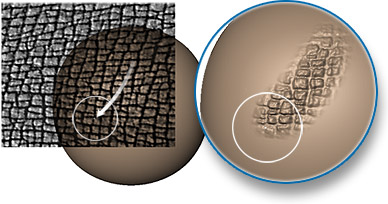
- With the Sculpt tool
still selected, stroke across the stencil image and onto the sphere.
The stencil disappears
when you stroke to let you see the region you're affecting on the
model.
-
- Click the Off icon
in the Stencil tray to turn off the
stencil before proceeding to the next section.
TipSelecting either
the stencil's icon in the Stencil tray
or the stencil object in the Object List displays
its properties in the Properties window.
Paint a model
The 3D
Paint feature lets you apply digital paint to your models
in Mudbox.
Two paint modes are available:
- 3D Paint:
Paint is applied directly to the 3D model.
- Stencil Projection:
Paint is projected onto the model through a 2D stencil image you
specify and the color properties of the stencil image are applied
to the model as you stroke over it in the 3D View.
Using these two paint
modes in combination with the tool properties and other bitmap images
provides the possibility for an unlimited variety of brush tips.
In this lesson, you’ll
learn the basics of both techniques to apply paint to the sphere.
- From the main menu, select File
> New Scene, then click Don’t Save in
the New Scene window.
You’ll create a new sphere
for painting in the following steps.
- Select Create > Mesh >
Sphere.
A new polygonal sphere
appears in the 3D View.
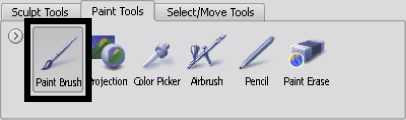
- Select thePaint Tools tray,
then select the Paint Brush.
- Stroke across the model to begin painting.
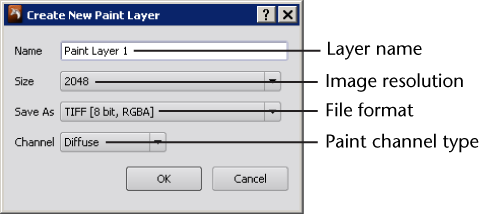
The Create
New Paint Layer window appears before any paint is applied.
NoteThe first time you
paint on a model, the Create New Paint Layer window
appears. It is necessary to have at least one paint layer to paint
on a model. The paint layer stores your paint as a bitmap image.
The default layer settings are sufficient for this lesson.
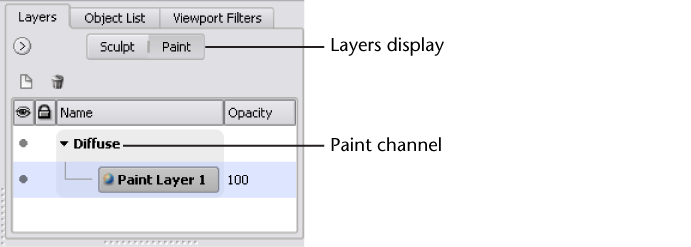
A paint layer titled
Paint Layer 1 is created and you can now paint on the model. Note
that the Layers window has updated to
display Paint layers. For more information
on paint layer options see
Create a new paint layer.
NoteThe paint layer appears
in the same Layers window location as the
sculpt layer you created in the previous section. The Layers window
displays both sculpt and paint layers (but not simultaneously) and
is controlled by the layer display button at the top of the Layers window.
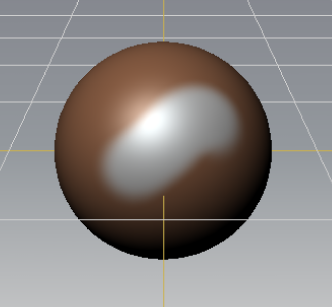
- Stroke on the model in the area you want
to apply paint.
The default paint color
is white.
- To change the paint color, click the Color box
in the Paint Brush properties window.
The Paint
Tool Color window appears.
TipYou can also sample
color from the 3D View by pressing I and clicking in the 3D View.
For more information, see
Copy color from a model.
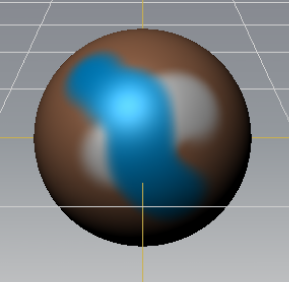
- In the Paint Tool Color window,
select a preset color from the array of color tiles or create a
custom color by clicking in the color palette on the right, then
click OK.
- Paint on the sphere.
-
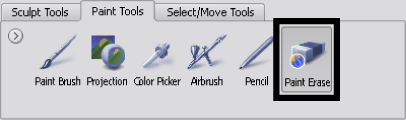
- To erase paint, select the Paint
Erase tool located on the Paint Tools tray then
stroke across the model on any areas you’ve previously painted.
You can also undo a stroke by pressing Ctrl + Z immediately
after your stroke.
Paint using stencils
You can load images or
textures into the 3D View and project a portion
or all of the image onto your model.
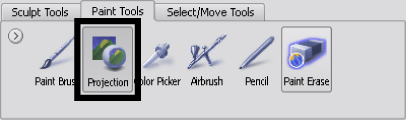
- In the Paint Tools tray,
select the Projection brush.
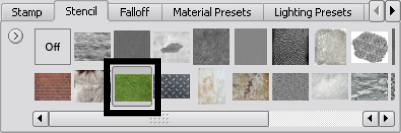
- In the Stencils tray,
select the image title rgb_grass.jpg to load it as a
stencil image for projection.
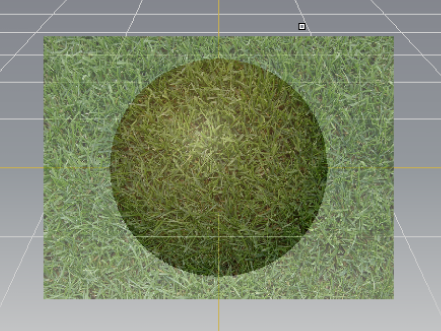
The grass image appears
as a stencil at the center of the 3D View.
If the grass image fills the entire 3D View,
scale it smaller. Press the S key while
pressing the left, middle, or right button and drag the mouse/stylus
to scale the stencil smaller. For more information, see
Move, rotate, or scale a stencil.
- In the 3D View,
dolly, track, or tumble the view so the sphere is positioned where
you want it to receive paint in relation to the stencil image.
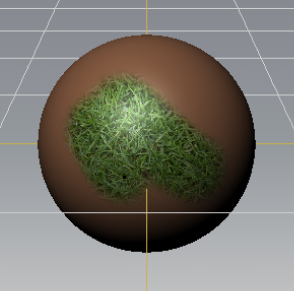
- Stroke on the stencil to begin painting
using the Projection brush.
The grass stencil disappears
as you stroke and paint is projected onto the model based on the
stencil image in the locations you stroke. The stencil reappears
after each stroke.
NoteYou can adjust the
transparency of the stencil’s display in the 3D
View by adjusting its Visibility property
in the Advanced section of the Stencil
Properties window. Adjusting this property does not affect
how paint is applied to the model.
NoteThe
Create
New Paint Layer window doesn’t appear this time around
since a paint layer already exists. In this lesson you apply the
stencil paint to the existing paint layer. In your own work, you
may want to create a new layer to keep the different images you paint
separate. For more information on creating a new layer see
Create a new paint layer.
Save your work
- Select File > Save Scene to save
your first digital sculpture.
The file is stored as
a .mud format file, the native Mudbox file format. Any images you
created while painting are stored in a directory with the same name
as your .mud file (for example, test.mud and test-files). For more information on
how to save and export your work, see
Save your work.
- To exit Mudbox, do the following:
- (Windows) Select File
> Exit.
- (Mac OS X) Select Mudbox
> Quit Mudbox.
NoteEach time you exit
Mudbox, any changes you’ve made to the configuration of the Mudbox
interface are automatically saved in a UI.sav and Settings.sav file
to record your user settings.