Chapter 3, Importing Media
| Supported Media Formats | Using the Image Import Tool | ||
Chapter 3, Importing Media |
|||
While you are working, you can import media at any time using the Import Browser or the floating Import Browser. You can browse the network and import media on a shared folder using the UNC path or the Python script. You can also drag and drop the media directly from the floating Import Browser into a Schematic view or the Player. To share your imported compositions, you should use the Import button on the Import Browser to create a Toxik compositions folder or another folder that you use to store your media.
Select File > Import or press Ctrl + I to display the Import Browser.
 "Show full-size image")
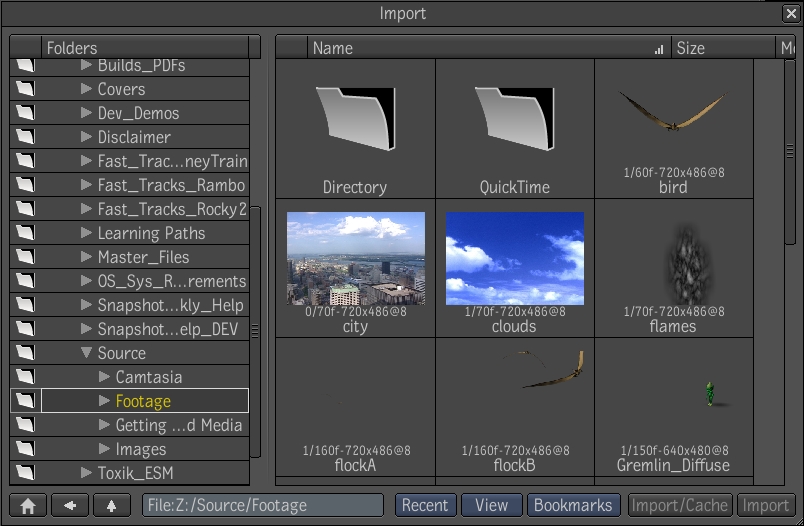
Navigate to the folder that contains the media you want to import.
 "Show full-size image")
Select the media files you want to import. You can either import, drag and drop, or use the UNC path to import the media.
Note: You can import multiple media files in the same folder, in a single operation. However, when you do this, you cannot set the import options for each file individually. To select multiple files, click the first file to import, then Ctrl + click each additional file to add it to the selection. Shift + click a file to select it and all files between it and the last file selected.
Middle-click or press the tilde key (~) to display the Gate UI. Swipe east and select the Views tab. Drag an Import Browser to a view.
In the Import Browser view, navigate to the folder that contains the media you want to import.
If necessary, view individual media files by selecting them and reviewing the Information tab that appears in the Tool UI.
Note: You can import an image sequence by entering the UNC path in the Path field.

 "Show full-size image")
You can also play the media in the mini-Player at the bottom-left of the Tool UI, or click the Full Screen button in the mini-Player to play it in the full screen Player (press F to exit the full screen Player).
 "Show full-size image")
|
Select the media files to import. You can select the Options tab in the Tool UI and set a color conversion to be performed during import. The options available depend on the image format of the media file you selected--see Log to Lin Workflows, Image and File I/O and Channel Assignments.
Note: Values are not clamped when you import media in log format, so no image data is lost. All tools can work with all of the data contained in log format images.
Note: You can import multiple media files in the same folder, in a single operation. However, when you do this, you cannot set the import options for each file individually. To select multiple files, click the first file to import, then Ctrl + click each additional file to add it to the selection. Shift + click a file to select it and all files between it and the last file selected.
The following displays the color conversion options for Cineon and DPX image formats.
 "Show full-size image")
|
The following displays the color conversion options for image formats other than Cineon or DPX.
 "Show full-size image")
|
Select Rec. 709 to convert to the Rec. 709 video capture board standard or sRGB to convert to the sRGB standard. Select None to disable the conversion.
The destination folder is either the default Footage folder, or the one specified in the Import tab of the Project Preferences window--see Setting Project Preferences.
Drag the file directly into the Footage folder or click Import. You can create other folders to store the compositions that you create when you import. Dragging the file or using the Import button imports the media quickly and is useful when you do not need to immediately work with the media on the machine on which you are performing the import.
Things to Remember
You can define the folder into which the media is imported by specifying it in the Project Preferences window. If necessary, you can also modify the Python script or command line used to cache media when you perform an Import/Cache.

The Information tab in the Tool UI appears when you use the fixed Import Browser view. The first and second columns contain properties that belong to a sequence of image files. The third and fourth columns are the properties of the resulting footage composition.
Path--Location of selected file. If you select more than one file, the path of the last selected file is displayed.
Type --Displays the type of file that is selected--see Footage Role.
Created--Date the file was created.
Modified--Date the file was last modified.
Owner--owner of the file on the file system. The creator of the file?
Size--The size of the selected file in megabytes.
Details--Information on the selected file, including channels, depth, pixel ratio and whether it is tiled, and so on.
Duration--The length of the selected file in frames.
Start--The start frame of the selected file.
End--The end frame of the selected file.
Poster--The thumbnail of the selected file that is displayed in the Library and Import Browsers (in Proxy view) and in the mini-Player of the Information tab.
Format--The destination format of the selected file--see Specifying the Destination Format.
Resolution-- The resolution of the selected file.
Toxik guesses the image ratio, pixel ratio, and rate of the media you select from the Import view. The image's resolution is compared with a list of common combinations of pixel aspect and resolution. The aspect ratio is related to the image ratio; changing it affects the image ratio.
Image Ratio-- The image resolution of the selected media, taking into account the pixel ratio.
Pixel Ratio--The pixel ratio of the selected media. You can set the pixel aspect ratio.
Rate -- The frame rate of the selected media. You can set the rate.
Source--Indicates the source from which your composition was originally created. In Toxik, this property depends on the actual source; you can edit the source at any time. There are four different sources.
| The composition was created | Source Initial Value |
| In Toxik (new) | Toxik |
| From an import operation (not from DND) | File |
| From Wiretap - IFFFS | The value of the tape name property |
| From Wiretap - generic | Wiretap |
Note: When you publish to Wiretap/IFFFS, the value of Source is written out to the Tape Name property of the IFFFS clip.
Channels--The channels in the selected file.
Depth--The bit depth of the selected file; you can modify the depth.
Repeat-- The repeat mode when you play a composition.
Mark In--Set a mark in frame, the first frame to start import.
Mark Out--Set a mark out frame, the last frame to import.
Comp Start--When you create a footage composition, the start time is set after the number of the first frame of the sequence. Sometimes you will want the start time to be unconditionally set to a different number, which you can do with the Comp Start editable value field.
Unpremultiply--see Unpremultiply in Import Mode.
Motion Vectors--see Importing 2D Motion Vectors.