Chapter 8, Multilayer Compositing and 3D Effects
| Working with Materials | Working with Cameras | ||
Chapter 8, Multilayer Compositing and 3D Effects |
|||
 Setting Basic Lighting Properties
Determining How a Light Affects Shading
Adding a Projector Texture to a Light
Light is a basic geometric 3D scene element. Each light in a scene contributes to how a scene is illuminated. Lights affect the way all object's surfaces appear in the rendered scene. You can dramatically change the nature and mood of your compositions by modifying lights and their properties.
Note: You can animate lighting parameters using keyframes and by applying expressions--see Chapter 21, Animation and Chapter 24, Expressions.

You can add one or more lights to your scene and set their properties to achieve a variety of lighting effects. There are two ways to add lights to a scene: the Lights tab in the Reaction node or the Tools tab.
When you add a light to Reaction, you must be in the Reaction Group Schematic to view the light(s) in your scene. The light you add is positioned at 0, 0, 0, so you may need to zoom out to view the light icon.
You can also set the light type and parameters, as well as parent a light to an axis, and animate its properties.
Note: The light icon is visible only if you have selected Icons in the Render tab of Reaction.
Select the Lights tab.
Under the Light list, click Add.
A light is added to the Group Schematic and the Lights list.
To view the light, double-click the Reaction node in the Schematic view.
The Group Schematic appears.
Do one of the following to display the Group Schematic:
Double-click the Reaction node in the Schematic view.
Right-click the Reaction node and select Edit Group.
From the Tools tab, select the Light tool from the Reaction folder and drag it to Schematic.
When you add a light to your scene, an Omni light is added by default. You can change the light type and its properties, and add as many lights to your scene as needed.
You can define physical properties for your light, depending on the type of light you selected. There are three types of lights available.
Omni -- Simulates a point light source that casts rays in all directions from the position of the light. Similar to a light bulb, where the light rays emanate in all directions from the bulb.
Spotlight -- Casts rays in a cone, or four-sided pyramid, simulating a real spotlight. This is useful for lighting a specific object or area and creating sharp-edged shadows.
Directional -- Casts rays in a single direction, from a geometric area and is useful for creating soft-edged shadows with both an umbra (a full shadow where an object blocks all rays from a light) and a penumbra (a partial shadow where an object blocks some of the rays).
Select the Lights tab.
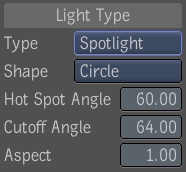
Under Light Type, select the Spotlight light type.
 "Show full-size image")
Set the Spotlight properties.
| Properties | Description |
| Shape | The shape of the light can be a circle or rectangle. |
| Hot Spot Angle | The angle where the solid cone of full intensity light ends and a gradual fading begins. |
| Cutoff Angle | The angle at which the light ends. |
| Aspect | The aspect ratio of the spotlight shape. |
Select the Lights tab.
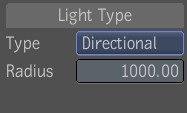
Under Light Type, select the Directional light type.
 "Show full-size image")
Adjust the Radius field to set the radius of the light. This value is also used to delimit the size of the shadow map.
You can set basic lighting properties for all light types.
On the Lights tab, under Basics, enter values to define the light.
| Properties | Description |
| Color | Sets the color for the light. Click the color pot to display the color picker, choose a color, and click Set--see Working with the Color Picker. |
| Intensity | Sets the amount of light emitted by the source light. |
| Decay | Sets the light's intensity to diminish gradually using a linear or quadratic function. |
| 1/2 Distance | Represents the distance at which the light's intensity is reduced by half. |
| Time Dilation | Modifies the motion blur that affects lights animated in your scene. You can set the Time Dilation factor to give the light the appearance of moving at a different speed than is set for Motion Blur in the Render tab. |
You can enable shadows and set their properties and parameters to achieve the results that you want.
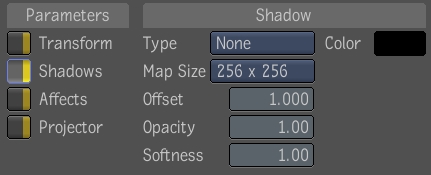
On the Lights tab, under Parameters, select Shadows.
 "Show full-size image")
| Property | Description |
| Type | Sets the type of shadow created. There are four types:
|
| Map Size | Select the map size. The default is 256 x 256. |
| Offset | Experiment with self-shadowing effects. The default value is 1.00 and is intended to reduce self-shadowing artifacts. |
| Opacity | Set the transparency of the shadows. By default shadows are opaque. |
| Softness | Set the softness for the shadow. |
| Color | Click the color pot to display the color picker, choose a color, and click Set--see Working with the Color Picker. |
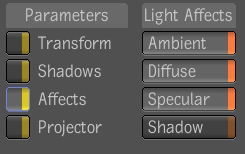
You can choose the shading properties a light affects. By default, a light affects the ambient, diffuse, and specular components of shading.
On the Lights tab, under Parameters, select the Affects option.
Under Light Affects, select the shading properties you want the light to affect.
 "Show full-size image")
A projector texture is created when you connect an image to a light node in the Reaction Group Schematic. The Projector Texture is applied in the same way as a material texture.
On the Lights tab, under Parameters, select Projector.
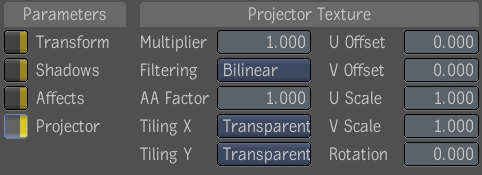
 "Show full-size image")
| Property | Description |
| Multiplier | Uniformly scales the brightness of the image texture up or down. This is useful for setting the amount that a given texture affects the object's overall look. The default value is 1, but you can overdrive the brightness to achieve specific effects. |
| Filtering | Sets the quality of the texture image. When a texture is stretched onto an object, it may, depending on the camera position,
lose some of its crispness. The rendered can compensate for this, but it may slow the process. Filtering options include:
|
| AA Factor | Lets you adjust the trade-off between anti-aliasing and blurriness. |
| Tiling X, Tiling Y | Set the repeat mode. Choose from; Transparent, Edge, Repeat, and Mirror. |
| U Offset,V Offset | Translates the texture in U and/or V. |
| U Scale, V Scale | Lets you specify the number of times a texture is repeated over a surface. You can use a non-integer value, such as 2.35. |
| Rotation | Rotates the texture over a surface. |