Chapter 8, Multilayer Compositing and 3D Effects
| Working with Maya Pre-Comps | Working with Geometric Surfaces | ||
Chapter 8, Multilayer Compositing and 3D Effects |
|||
 Modifying Motion Blur on Individual Layers
Setting Layer Visibility Properties
When you create a layer, it is automatically added to the top of the Layer Editor. The source name is displayed along with the name of the node to which it is connected. Also, each layer is numbered, so you can easily identify it. After creating layers, you can use the arrow buttons in the Layer Editor to quickly reorder layers. From the tool UI, you can interactively apply 2D and 3D transformations, as well as set global layer properties and visibility options. And because layers are discrete objects, you can also parent layers to axis objects in the Group Schematic.
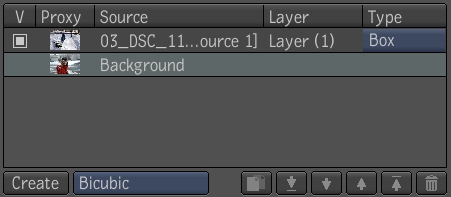
 "Show full-size image")

Renaming sources and layers lets you quickly identify a layer and its source in the Group Schematic. You can rename sources and layers in the Layer Editor or the Tool Options at the right of the tool UI.
In the Layer Editor, click the name of a source or layer.
Press F2 and type in a new name.
You can select a layer in several ways: through the Layer Editor, from the Group Schematic, or by clicking a layer in the Player.
Do one of the following:
In the Layer Editor, click to select a layer.
In the Schematic view, double-click the Reaction node to open the Group Schematic. Click a Layer node.
In the Player, select a layer.
The selected layer is shown with the manipulator icon that represents the three axes.
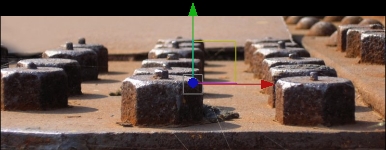
 "Show full-size image")
Note: To view the manipulator icon, make sure you have selected Manipulators in the Player Options.
Duplicating a layer gives you an identical layer that includes the source, material, and surface type.
Select a layer from the Layer Editor and do one of the following:
At the bottom of the Layer Editor, click the Duplicate Layer button.
Right-click a layer and select Duplicate Layer.
You can reorder layers interactively using the arrow buttons in the Layer Editor. Layers are composited in the order in which they appear in the list.
Select a layer from the Layer Editor.
Use the arrow buttons at the bottom of the Layer Editor to reorder the layer.

 "Show full-size image")
You can modify the motion blur applied to your composition on individual layers, so that each layer appears to be moving at a different speed than other layers--see Adding Motion Blur and Depth of Field to a Scene.
Select a layer from the Layer Editor.
Enter a value in the Time Dilation field. A higher value speeds up the blur effect for the layer; a lower value slows it down.
You can set layer visibility properties to specify how the layer is rendered or "seen" by the camera.
Select any of the following in the Reaction tab.
| Thumbnails: | Size (in pixels): |
| Visible to Camera | The layer is visible to the camera. If you hide the layer from the camera, the layer may still cast a shadow and can be seen by a light. |
| Cast Shadow | The layer can cast shadows. |
| Receive Shadow | The layer receives shadows cast by itself and by other layers in the composition. |
| Front Face | The front faces of the layer will be rendered. |
| Back Face | The back faces of the layer will be rendered. |
| Time Dilation | Modifies the motion blur that affects layers animated in the scene. You can give the layer the appearance of moving at a different speed than is set for Motion Blur in the Render tab. |