Chapter 8, Multilayer Compositing and 3D Effects
| Compositing Workflow | Working with Maya Pre-Comps | ||
Chapter 8, Multilayer Compositing and 3D Effects |
|||
 Building a Composition Using the Layer Editor
Adding a Reaction Tool and Setting the Composition Background
Whether you want to quickly perform straightforward 2D compositing or create 3D effects, the first thing you'll do is set your composition background to define the rendering plane, then you'll create layers in Reaction.
Note: You do not have to connect an image generator to set the background; you can work on an empty background. You'll see that when you build a composition using the Layer Editor; the background appears automatically when you add a Reaction tool to your composition.

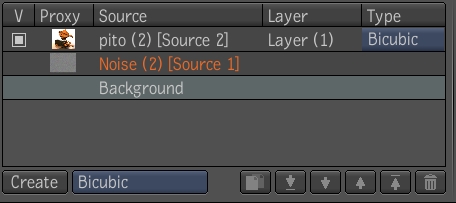
The Layer Editor is designed to work with Reaction and lets you quickly build and edit your composition while maintaining a clear view of the layers in your Reaction composition. As in the Schematic view, you can work with the Gate UI to create layers and perform other tasks. Then you can set the layer priority, create, and access tools that affect the selected layer--see Layer Editor.
 "Show full-size image")
Before you do anything in Reaction, be sure to verify that your Player settings are set properly.
With the cursor over the Player, press the tilde key (~) or middle-click to display the Gate UI. Swipe south to display the Player Options.

 "Show full-size image")
Under Display, select Tool Output to view the results of your Reaction composition in the Player.
Note: When you are working with a default Compositing task group preset, Tool Output is enabled.
Hint: You can set a context point for the Player to display the Reaction output. This is useful when you are working with more than one player, or you are editing a composition with Reaction using the Layer Editor and you always want to see your Reaction output--see Setting Context Points.
Under Guides, select Manipulators to view transformation and object icons. Manipulators is enabled by default.
Under Reaction, select a plane (XY, XZ, or YZ) for the grid, adjust the size of the grid and the distance between grid lines. The grid helps you place elements in 3D space.
Note: To work with grids, you must select the Interactivity option (under Reaction).
Under Reaction, select a Highlight option for displaying objects:
Coverage: Display the pixels of selected layers that contribute to the final composition. Adjust the transparency of the pixels by entering a value in the Threshold field.
Object: Displays an object's geometry with a colored outline.
Under Reaction, select Interactivity to use the hardware renderer and achieve dynamic results while you work. The results you see when working with the hardware renderer may differ slightly from the results achieved using the software renderer.
Note: If you are planning to quickly composite a series of 2D layers without manipulating or transforming layers or adding 3D effects, you do not need to enable Interactivity.
Note: To work with lights and cameras, you must also select Icons (under Rendering) in the Render tab of the Reaction tool.
When you perform multilayer compositing in Toxik, you typically create a new composition, then add a Reaction tool to start building from scratch. However, you can also connect Reaction to any composition or tool output in an existing dependency graph in the Schematic view. This automatically sets the background for the composition.
 "Show full-size image")
Note: You can add, connect, and delete a Reaction tool as you would any other tool.
In the Tools tab, drag the Reaction tool to the Player, Layer Editor, or Schematic.
If you dropped Reaction on a Player or an empty Layer Editor view, the composition drop gate appears. You can link Reaction to the composition Output node, or add it to the current composition without connecting it to anything.

 "Show full-size image")
In the Tools tab, drag the Reaction tool to Schematic.
The background for the Reaction node is set.
Before you composite or add effects to a composition in Reaction, you typically set the background. The background is the rendering plane for your composition and sets the format. If you connect a Reaction tool to an image or to a tool output in an existing dependency graph, the background is set automatically. You can change the background at any time.
In the Tools tab, drag the Reaction tool to the Layer Editor.
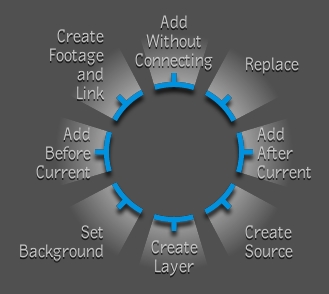
The composition drop gate appears. Depending on your dependency graph, you will see some or all of the following choices:

 "Show full-size image")
Decide where to add Reaction in your dependency graph.
The background is set accordingly, and appears in the Layer Editor.
Drop the Reaction tool onto an existing tool or image output connection in the Schematic view.
Connect a media or tool node output to the background input connector.
Select the desired Reaction tool in the Schematic or Layer Editor.
In the Schematic view, the Reaction tool is highlighted.
Select the composition to use as the background and drag it to the Schematic, Layer Editor, or Player.
The Reaction drop gate appears.
Swipe through Set Background.
 "Show full-size image")
Note: You cannot delete a background input connector.
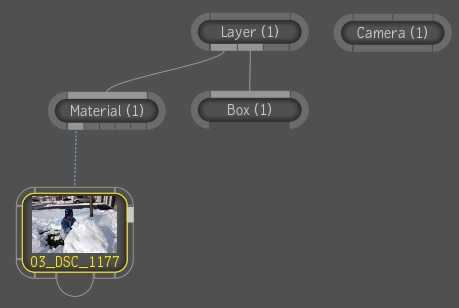
You can composite as many layers as you want using Reaction, but first you must create the layers. A layer in Reaction is composed of a source input that you assign to a geometrical support, or 3D geometry, and a material node that is automatically generated--see Working with Geometric Surfaces.
Note: To view the Material and geometrical support nodes that are generated with a layer, you must be in the Group Schematic.
 "Show full-size image")
If you want to perform basic multilayer compositing, where you work with bilinear geometric surfaces only, you can quickly create a layer in a single step in the Layer Editor or Schematic by using the Reaction drop gate. To substitute a 3D geometric surface as your layer support, you can then simply choose a different geometric surface. After creating the sources and layers, you can publish a 2D composition if you are satisfied with the results.
In the Schematic view, select the Reaction node.
Select images or footage from the Library Browser or desktop, and drop (or stick) them onto the Schematic, Layer Editor, or Player.
The composition drop gate appears.
Swipe through Create Layer.
The sources and layers are added in the order in which you selected the images/footage (from first to last) and labeled accordingly in the Layer Editor.
Do one of the following:
At the bottom of the Layer Editor, select a surface geometry type and click Create.
A layer with the surface you chose and a source are created.
In the Schematic view, right-click the Reaction node and select Add Layer.
A layer and a source are created. By default, the Bilinear surface is assigned to the layer.
In the Schematic view, right-click the Reaction tool and select Add Source.

 "Show full-size image")
A source input connector appears in the Schematic view. You can connect media or a tool node to it.
In the Layer Editor, right-click a layer and select Add Linked Layer.
A layer is created and linked with its source.
Select the Reaction tool in the Schematic view or select the desired Reaction in the Layer Editor.
Select one or more compositions from the Library Browser or Desktop and drop (or stick) them onto the Layer Editor, Schematic, or Player.
The drop gate appears.
Swipe through Create Source.
The sources are added in the order in which you selected the compositions (from first to last) and are labeled accordingly in the Layer Editor.
In the Layer Editor, right-click a source and select Create Layer Using Source.
A layer is created in the Layer Editor.
Note: You can immediately change the surface geometry of the layer using options in the Type column of the Layer Editor.
Note: You can add more than one layer to a source if you want to create multiple layers using the same source image. If you have applied effects to the source image, they will be propagated to the layers to which they are linked.