Show in Contents

Add to Favorites

Home: Flint

Creating a Fade-in or Fade-out

Creating Dissolves on the Desktop

Mixing Source Clips

Creating Complex Dissolves
with the Dissolve Editor
Use
the Dissolve Editor to create complex dissolves. For example, instead
of having a gradual fade-in of the incoming clip, you can make your
clip fade in, fade out, then fade in again.
NoteThe curve in the
Dissolve Editor can be used only on video dissolves.
To create a complex dissolve:
- Click Dissolve in the Editing menu and
select the two source clips in the Desktop reels.
An “E” (for
Editor) appears on the Dissolve button.
- Click Dissolve.
The “E” on
the Dissolve button is highlighted.
- Select the destination reel.
The Dissolve Editor appears.
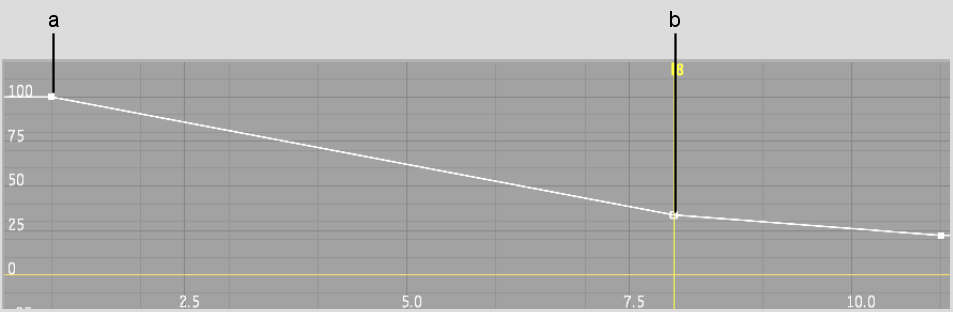
The graph plots the frame
number of the result clip (on the horizontal axis) against the mix
percentage (on the vertical axis). The default linear curve represents
a gradual dissolve across the number of frames specified by the
dissolve duration.
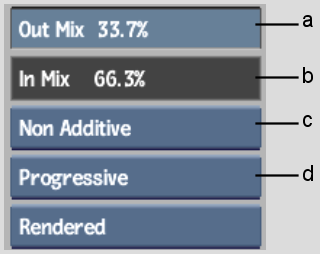
- The mix percentage values for one frame
specify the amount of the incoming and outgoing clip used in the
mix for that frame. For example, if you enter 90% in the Out Mix
field, 90% of the outgoing clip and 10% of the incoming clip are
used in that frame. The In value is calculated based on the Out
value (to make 100%).
To edit the mix percentage
in any frame, use one of the following methods:
- Add and move control points on the mix
percentage curve using the Add and Move options in the Edit Mode
box.
- Display the frame that you want to edit
and change the value in the Out Mix field.
NoteAuto Key must be
enabled.
NoteYou can only add
control points between the dissolve boundary keys (control points
outside the boundary keys will not be processed). The boundary keys
are located at the first and last frames in the dissolve. When you
enter a new duration, the boundary keys are automatically updated.
- Select processing in frames or fields
from the Render Type box.
- To load or save the mix curves, see
Saving, Loading, and Deleting Items.
- When you are satisfied with the results,
click Exit.