- Open the clip library containing the
unlinked clips for which you want to recapture media.
- Select the unlinked clips.
- Click Tools to display the Tools menu.
- From the Tools menu, choose Unlink/Relink.
- Click Recapture.
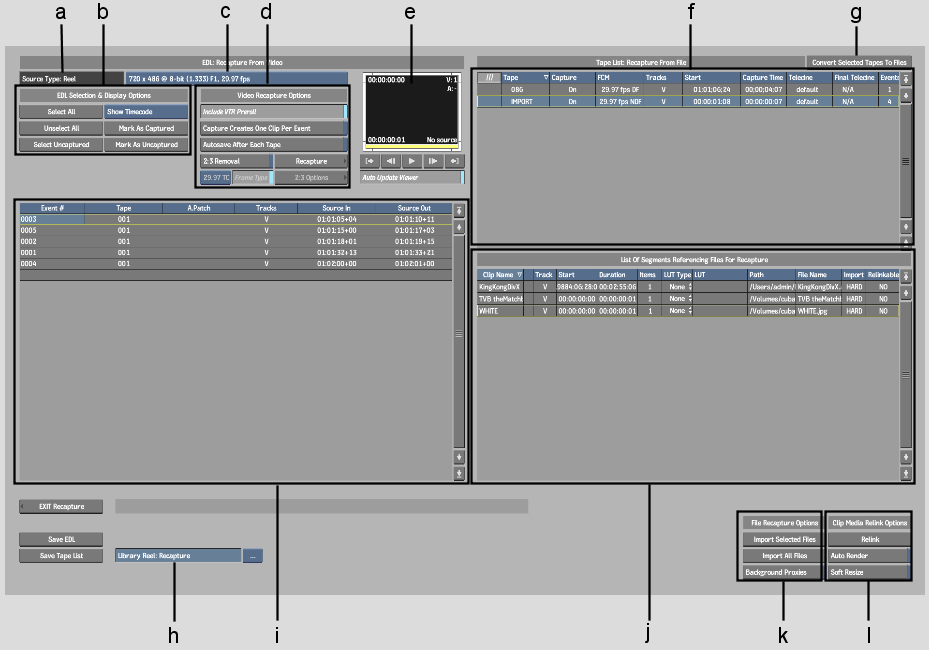
The Recapture screen
appears.
The Recapture screen
contains the following three list areas:
- The Tape List contains the tape names
for the media that you recapture from a VTR.
- The Sources List contains the media events.
- The Imported Clips List contains the
file-based media associated with the unlinked clip. The Source Type
label indicates the origin of the media. All this information is
read from the clip metadata.
- Optional: Change the library reel where
you want to place the captured material by selecting one from the
Library Reel box or create one by clicking in the Library Reel Name
field. By default, the captured clips will be placed in a reel called “Recapture”.
- Optional: From the Source Resolution
box, select the resolution of the device from which you are capturing
material.
If your timeline clip
uses sources of differing resolutions, the resolutions are listed
in the Source Resolution box. This box acts as a filter on the Tape
list and Event list. Only those tapes or events of the currently
displayed resolution are listed.
The tapes containing
the material of the specified resolution are displayed.
- If the list contains any tapes that you
do not want to recapture during this session, click in the Capture
field of the tape and drag to the left or right.
The value changes from
On to Off.
- Set any options as needed. See
About the Import EDL Menu.
- Optional: Slip the start timecode of
one or more tapes by dragging in the Start field of a tape in the
Tape list.
- Select the events that you want to recapture.
Do any of the following:
- To select a single event, click the event
number entry. Click the event number entry of another event to unselect
the first entry.
- To select a range of events, hold Shift, select an event, and click
the last event in the range that you want to select. You can also
click and drag to select a range of events.
- To add to a range of events, hold the Ctrl key or the pen button when
you select an event.
- To select all events, use the Select
All or Unselect All buttons.
- To select only the uncaptured events,
click Select Uncaptured.
NoteWhen no event is
selected, all events in the EDL are recaptured.
- To remove pulldown on capture, enable
2:3 Removal and set options as needed.
You can remove pulldown
on recapture regardless of whether pulldown was removed when the
original material was captured. See
Capturing Film-Based Media with 2:3 Pulldown Using EDLs.
- Optional: If you want to generate proxies
of the media in the background, enable Background Proxies.
- Click Recapture.
The Auto-Capture menu
appears.
- Set menu options as required and capture
the material. See
Auto-Capturing an EDL.
NoteIn the Auto-Capture
menu, do not change the aspect ratio, bit depth, or scan mode. The
default values in these fields currently match the metadata in the
selected unlinked clips and they must be matched in order to relink
the material with the unlinked clip after the capture.
- Click Exit Auto-Capture to return to
the Recapture menu.
All captured events have
a small x to the right of the event number.
- View the captured material in the Recapture
Viewer to make sure that the capture was successful.
- Enable Auto Render if you want to re-render
all timeline soft effects and transitions.
- Optional: If the material needs to be
soft-resized, enable Soft Resize.
This is useful, for example,
when importing a 720x486 clip into a 720x480 project. See
Resize.
- Click Relink.
The captured media is
relinked with the unlinked clips. If you enabled Auto Render, timeline
soft effects are re-rendered.
- Click Exit Recapture to return to the
clip library.
The relinked clip is
located in the reel specified in the Library Reel box.