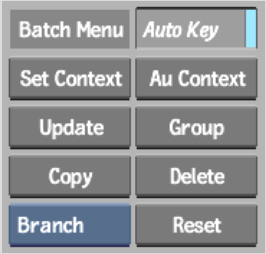
Use the Batch menu to set up a process tree, load clips, and set rendering options. The Batch menu is available when you enter Batch and at every Batch FX level. You can enter Batch directly, or select clips to work with inside Batch. For more information on bringing a segment into a Batch FX level, see Creating Batch FX.
The Batch menu appears with the last used schematic, if any, on the Desktop. Alternatively, to open Batch with an empty schematic, hold Alt while selecting a destination reel.
To access the Batch menu with clips:
The Batch menu is displayed and all the clips you selected from the Desktop are displayed in the Batch schematic.


Node bins and custom node panels


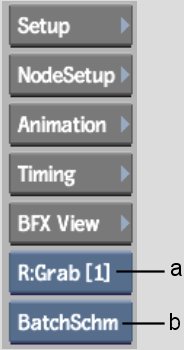
(a) Reference box (b) View box


Process Tree controls
The Batch controls are described as follows.
Setup buttonDisplays Batch setup options.
Node SetupDisplays the selected node's Setup menu.
Animation buttonDisplays the Universal Channel Editor. You can also access the large view of the Channel Editor by tapping the right swipe bar. See Accessing the Channel Editor.
TimingDisplays the relative position in time of all Batch clips. See Offsetting Clips with the Timing View.
BFX View Displays a schematic view of all Batch FX applied to a BFX segment.
Reference boxFor the currently selected node, displays one of the following in the reference portion, “R” side, of the split bar.
| Select: | To display: |
|---|---|
| Front | The front of the currently selected node. |
| Back | The back of the currently selected node. |
| Matte | The matte of the currently selected node. |
| Result | The result of the currently selected node. |
| Context1 | The result your changes to a node have on a node set as context1 further along in the process tree. See Viewing Nodes in Context. |
| Context2 | The result your changes to a node have on a node set as context 2 further along in the process tree. |
| Out Matte | The matte that will be output. |
| Reference | The reference frame when the split bar is enabled. |
| Grab | The reference frame(s) stored in the reference buffer when the split bar is enabled. |
| Source Clip | The source focus clip. |
| Record Clip | The record focus clip. |
To see the reference image, select Split in the View menu. The other side of the split bar is determined by the view you select from the View box. See Displaying the Reference Area.
View boxSets the view in the image window. Available views are determined by the active node. You can also use the following hot keys to display commonly used views.
| Select: | To display: |
|---|---|
| Front (F1) | The front of the currently selected node. |
| Back (F2) | The back of the currently selected node. |
| Matte (F3) | The matte of the currently selected node. |
| Result (F4) | The result of the currently selected node. |
| Channels (F5) | The Universal Channel Editor. |
| BatchSchm (Esc) | The Batch schematic. The hot key acts as a toggle between the Batch schematic and the current view. |
| Node Schematic (~) | The schematic for the selected node. (Only visible when an Action, Distort or Gmask node is selected.) |
| Out Matte | The matte that will be output. |
| Reference | The clip stored in the reference buffer. |
| Context1 (1) | The node for which context 1 is set. |
| Context2 (2) | The node for which context 2 is set. |
| C: Main Level Alt+Ctrl+1 | The Clip results at the main timeline level. This option appears when you enter Batch FX. |
| C: Level-up Alt+Ctrl+2 | The clip results one level higher than the current Batch FX level. This option appears when you enter a second level Batch FX. |
| Tracks | The in and out times, duration, and keyframe information of animation channel parameters. |
| Info | Animation channel parameter information in tabular format. |
| Source Clip (F7) | The source focus clip. |
| Record Clip (F8) | The record focus clip. |
Save button and boxSave a Batch setup by selecting one of the following.
| Select: | To save: |
|---|---|
| All | All nodes in the schematic. |
| Selected | Selected nodes. |
By default, Batch setups have the file extension .batch.
Load button and boxLoad a Batch setup by selecting one of the following.
| Select: | To: |
|---|---|
| Replace | Replace the current Batch setup in the schematic. |
| Append | Append the selected setup to the current Batch setup in the schematic. If the setup contains nodes that have the same name as the current Batch setup, the conflicting nodes in the current schematic are renamed. |
Loading a Batch setup also loads the clips used in the process trees. If Batch cannot find a clip, it displays the name of the clip in red.
You can load Batch setups that contain Flame and Inferno specific nodes. These nodes—called render-only nodes or non-editable nodes—cannot be modified in Flint; however, Batch processes the node operation in the final clip result.
Node binsContain all the nodes you require to build a process tree. The bars are divided into four categories: input and output nodes, formatting nodes, effects nodes, and processing nodes. See Batch: Node Reference.
Custom node panelsContain custom nodes that you have created. The left panel contains custom nodes available to the user, and the right panel contains custom nodes available to the project. See Creating Custom Nodes.
Process Tree controls Use these controls to position and adjust Batch nodes to keep track of processing directions. See Manipulating Nodes.