Motion blur and anti-aliasing can be set for either the front or matte clip of the media. Motion blur simulates the blur created by fast-moving objects by blurring the motion of the front or matte media.
Similar settings for anti-aliasing and motion blur can be found in the Action Setup menu. You have the option of using the same settings from the Setup menu for source nodes, or you can create specific source node settings.


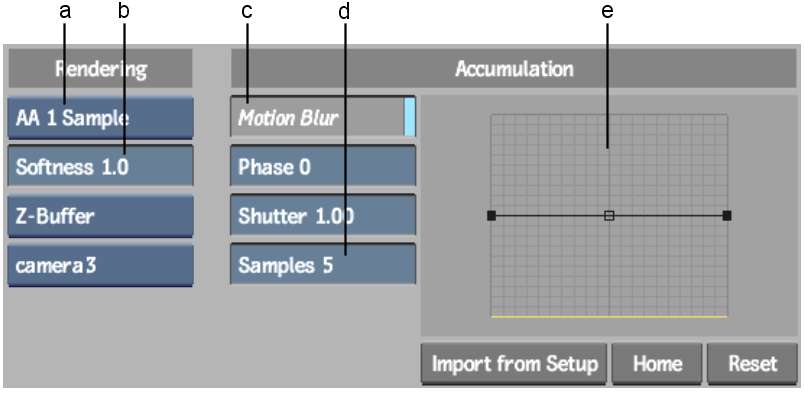
(a) Anti-Aliasing box (b) Anti-Aliasing Softness field (c) Motion Blur button (d) Samples field (e) Motion Blur Curve
The Source anti-aliasing and motion blur controls are described as follows.
Anti-Aliasing boxSelect an anti-aliasing sampling level. Values of 4 and 8 give good results.
Anti-Aliasing Softness fieldDisplays the degree of anti-aliasing.
Z-Buffer Mode boxSelect a Z-buffer option.
| Select: | To: |
|---|---|
| Z-Buffer | Arrange sources according to their distance from the camera eye. |
| Z-Buffer Off | Not consider the distance from the camera eye when arranging sources. |
| Shadow Mix | To render each shadow in the correct Z order with its corresponding source. |
Camera Selector boxIf you have multiple child cameras under a selected parent source node, select the camera to use. See Adding Cameras.
Motion Blur buttonEnable to apply a motion blur effect to the selected source. To create this effect, samples of previous and subsequent frames are taken and displayed over the current frame.
You set the number of samples, the transparency (weight) of the samples, and the number of frames over which the samples are taken.
Phase fieldDisplays the frame that motion blur is based on (before or after the current frame). A value of -100 places the motion blur before the current frame while a value 100 places the motion blur after.
Shutter fieldDisplays the duration of motion blur at each frame (essentially the number of frames that the shutter is open). Increasing this value does not increase processing time.
Samples fieldDisplays the quality level of motion blur and the depth of field produced by the number of samples taken at each frame. Increasing the number of samples improves the quality of the motion blur.
Increasing the number of samples causes the processing time to increase linearly. The number of motion blur samples is multiplied by the number of anti-aliasing samples. To reduce the total number of passes made for each frame, reduce the level of anti-aliasing when Motion Blur is enabled.
Motion Blur curveSets the weight distribution (or transparency) of the samples. Press spacebar and drag in the curve to pan.
Import from Setup buttonClick to use the anti-aliasing and motion blur values from the Setup menu.
Home buttonResets the position of the motion blur curve after panning.
Reset buttonResets the anti-aliasing and motion blur settings to their default values.