When the Geom menu is enabled,
you can create and colour grade up to 12 secondaries by using the
Function panel to:
- Select a geometry type.
- Modify geometries.
- Link secondary layers.
- Delete geometries.
After you have created
geometries, you can use the Grade menu to colour grade them.
To create geometries:
- Press the Geom button on the Navigation
panel.
The Rectangle, Circle,
Wipe (in Dual view), and Bezier (free-form geometry) options are
activated.
- Use the numeric keys on the Navigation
panel to select and enable a secondary layer. Press the number key
once to select the layer, and then press it a second time to enable
it. To enable layer 10, press the minus button (-). To enable layer
11, press 0. To enable layer 12, press the decimal button (.).
- Do one of the following:
- Press F1 to add a rectangle.
- Press F2 to add a circle.
- Press F3 to add a wipe.
- Press F4 to add a Bezier shape using
the pen or mouse.
- Use the jog ball as a geometry mover
and press the ALT and shot forward buttons to select the geometries
on the current active secondary layer.
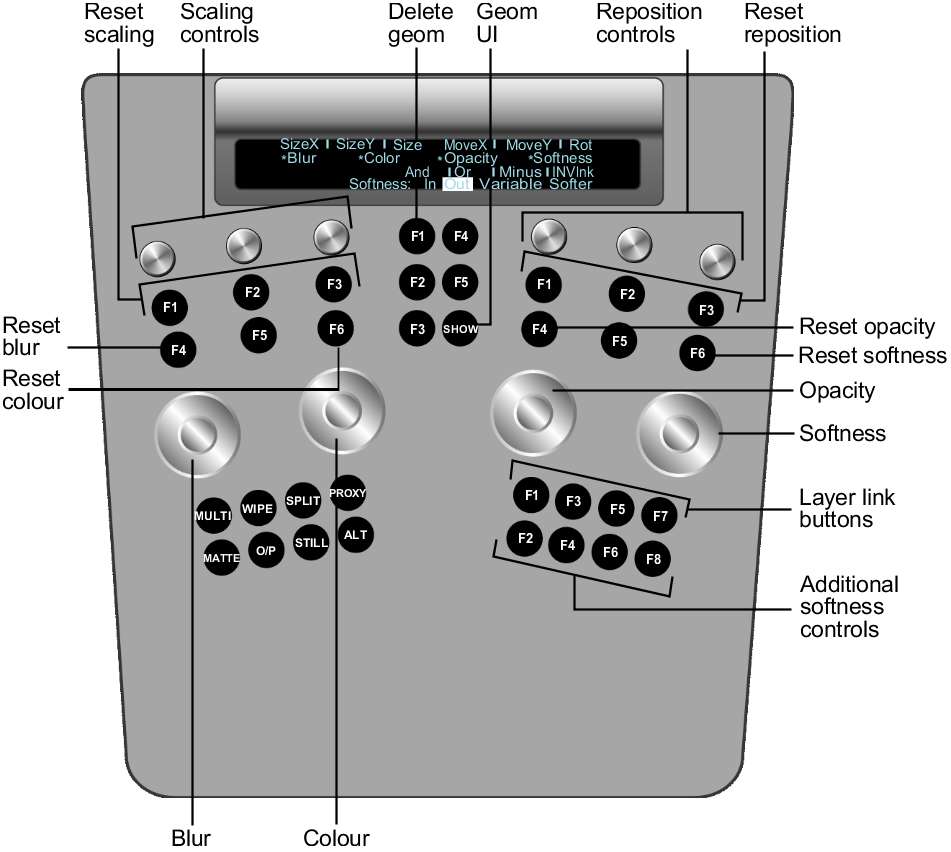
- On the Function panel, use the following
controls to adjust the geometry.
| Use: |
To: |
| Wheels |
Modify the geometry's blur, colour, opacity, and softness. Wheel 1=Blur Wheel 2=Colour Wheel 3=Opacity Wheel 4=Softness The direction for edge
softness is inwards or outwards depending on the direction that
you rotate the wheel. To reset a wheel, press the button above it.
|
| Knobs at top left |
Scale the geometry. Knob 1=Size X Knob 2=Size Y Knob 3=Master (scales
in locked proportions)
To reset a knob, press
the button below it.
|
| Knobs at top right |
Move the geometry. Knob 1=Move X Knob 2=Move Y Knob 3=Rotate To reset a knob, press
the button below it.
|
| First row of buttons at bottom right |
Link secondary layers. F1=Add F3=Intersect F5=Subtract F7=Invert link
|
| Second row of buttons at bottom right |
Further modify softness. F2=Apply softness inside
mask border
F4=Apply softness outside
mask border
F6=Apply variable softness F8=Change softness type
|
| F1 button in centre column |
Delete the currently active geometry. |
| SHOW button |
Toggle the geometry wireframe on or off. |
- To colour grade the geometry, select
either the Inside or Outside option button depending on whether
colour grading should occur inside or outside the geometry. See
Performing Colour Grading.