Show in Contents

Add to Favorites

Home: Smoke

Outputting a Single Clip

Outputting Clips To a VTR

Outputting Clips With a Letterbox Overlay

Outputting Multiple Clips
You can output more than one clip to a VTR in
a single pass. When you load multiple clips into the Output Clip
menu, you must define the clip output in and out points for each
clip (and any other output clip options) before starting the clip
output process.
When multiple clips in the same session are
selected for output, the application performs a validation check
to determine if certain parameters match the project settings and
whether or not the video device is capable of outputting these clips.
The following outcomes may occur:
- If
the clips have mixed timing settings, the timing of the first clip
selected is respected. Clips having different timing settings from
the first clip are ignored, and a notifying message appears.
- Clips
with field dominance mismatch are discarded or kept, depending on your
selection.
- Clips
exceeding the maximum bit depth are discarded from the selection. A
selection containing 8- and 10-bit clips can be output.
- If
all the clips are discarded from the selection after the validation
check, a notifying message appears allowing you to confirm.
NoteIf clips in your multiple-clip selection
have overlapping timecode, a message appears indicating that the
clips cannot be output. Use the Change TC/KC tool in the Tools menu
to remove these timecode conflicts. See
About the Change TC/KC/Rate Tools.
To
output multiple clips:
- Load
multiple clips into the Output Clip menu. See
Accessing the Output Clip Menu.
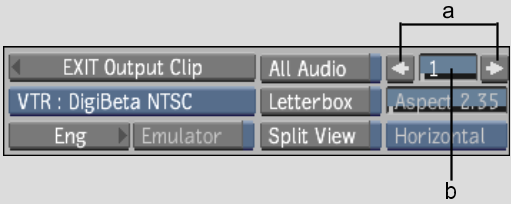
When you load multiple clips into the Output
Clip menu, additional controls appear.
- To
switch from clip to clip, do one of the following:
- Click
the left and right arrows. The Current Clip field indicates the
position of the clip relative to the output sequence.
- Drag
over the Current Clip field.
- Set
output options for each clip. See
Outputting a Single Clip.
- Once
output options have been set for each clip, make sure you are viewing
the first clip in the output sequence.
- Click
Process.
- After
the transfer is complete, verify that it was successful by playing
the transferred clip: cue to the in timecode and click the Play
button in the VTR Transport controls.
- When
finished, click EXIT Output Clip to return to the clip library or EditDesk.


