Show in Contents

Add to Favorites

Home: Smoke

Colour Correcting All or Part of an Image

Setting Up Your Work Environment

Inverting the Matte

Cropping the Colour Correction Area
When you
access the Colour Warper from the Colour Corrector, you can create
a crop box to limit the area where the colour correction is applied.
Using a crop box as you colour correct a clip
speeds up interactivity, which is especially useful when working
at high resolutions. You can also process the clip with a crop box.
Everything outside the crop box will be processed as black on the
matte.
To
use a crop box:
- In
the Colour Warper menu, click Setup.
- Do
one of the following:
- Hold
down the Ctrl key or hold
the pen button and drag the box across the image.
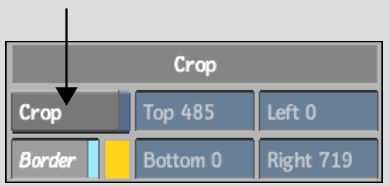
- Turn
on the Crop button and enter the dimensions for the crop box in
the Left, Right, Bottom, and Top fields.
The crop box appears in the image window. By
default, the crop box has the same dimensions as the clip. The display
inside and outside the crop box depends on how many clips are loaded.
| If you loaded: |
Inside the crop box: |
Outside the crop box: |
| A front, back, and matte clip |
Shows the front clip in the opaque area of the matte
and the back clip in the transparent area of the matte.
|
Shows the back clip. |
| A front and back clip |
Shows the front clip. |
Shows the back clip. |
| A front clip only |
Shows the colour-corrected clip. |
Shows the non-colour corrected clip. |
- To
adjust the size of the crop box, drag on the corner points of the
box, or modify the values in the Left, Right, Bottom, and Top fields
in the Setup menu.
- To
move the crop box in the image window, click a side of the box and
drag to a new location. Alternatively, press Ctrl and redraw the crop box.
TipIf
the Overlay user interface is enabled, the crop box will extend beneath
the Overlay user interface. To access the bottom edge, be sure to grab
from an area where there are no user interface elements.
- You
can now use any Colour Warper menu and colour correct the area of
the clip that is defined by the crop box. You will only see the results
of your changes within the crop box.
- If
you want to process the clip with the crop box, leave the Crop button
enabled when you process.
To
disable a crop box:
- From
any Colour Warper menu, disable Crop.
When you disable the Crop button in a Colour
Warper menu, the Crop button in the Setup menu is also disabled.
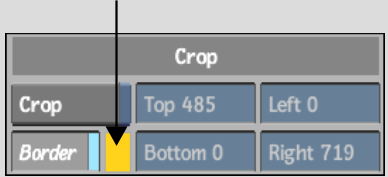
To
change the colour of the crop box:
- In
the Colour Warper Setup menu, click the colour pot beside Border.
The colour picker appears.
- Select
a colour with the colour picker.
- Click
in the Border colour pot to apply the new colour to the border.
To
hide the crop box:
- In
the Setup menu, disable Border.