Show in Contents

Add to Favorites

Home: Lustre

Logarithmic Mode: Modifying the Brightness

Logarithmic Mode: Modifying the Brightness

Adjusting Printer Lights for Primary Grading

Modifying Brightness in
the Entire Image
You can increase or decrease
colour brightness across the entire image. Use the Brightness slider to
modify the brightness of the red, green, and blue levels uniformly.
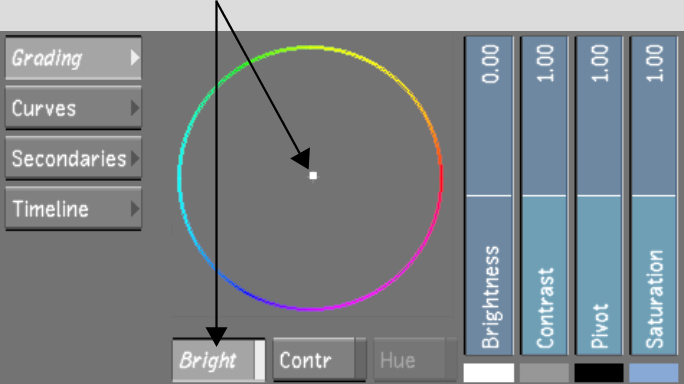
Use the Brightness Balance wheel to balance colours, remove or add
a colour cast, create a sense of time, or create ambience. When
you use the Brightness Balance wheel, you modify RGB levels proportionally
without changing the overall brightness. For example, if you drag
the Brightness Balance wheel toward blue, blue will appear to emit
more light while red and green will appear to emit less; the image
may therefore develop a blue cast.
NoteWhen you use a slider
or colour balance wheel to colour grade a shot, the colour range
is limited by the control (the edge of the colour wheel, for example).
Use either the Autodesk control surface or the Tangent CP100 control
surface to reach the full spectrum of colour.
To modify the brightness in the entire image:
- Indicate whether this is the initial
or final primary grade:
- To work on the initial primary colour
grade, click Input.
- To make final adjustments to the primary
colour grade, click Output.
- Modify the overall brightness:
- To balance the colours in the image,
create ambience, or develop a colour cast, enable Brightness and
then drag the Brightness Balance wheel towards the colour you want
to increase in the image. For example, to create a cooler image,
drag toward blue; to create a warmer image, drag toward red.
The colours are balanced in the image without
affecting the overall brightness. The printer light settings are
also updated to reflect your changes.
TipWhen you click on the printer lights, the
printer light values are replaced by values based on the center
point of the colour wheel.
- Make adjustments to the image using the
Brightness slider and Brightness Balance wheel until you are satisfied
with the results.
TipWhen working with any of the vertical sliders
in the Grading menu, refer to their numerical values in order to
make more precise adjustments. The default value for each of the
sliders reflects the mid-point in the range of available values.
For example, the Brightness slider has a range of -25 to 25, and
a default mid-point value of 0. The Contrast slider, on the other hand,
has a range of 0 to 2, making for a mid-point default value of 1.


