Chapter 9, Removing Dust
| About Dust Removal | Removing Dust Manually | ||
Chapter 9, Removing Dust |
|||
 Deciding on Manual or Automated Dust Removal
Before removing dust artefacts from your shots, there are several things you should do:
Identify the best repair type for your footage.
Determine if you should be using the manual or automated method.
Optimize the dust removal options for the characteristics of your shots.

To remove artefacts, you can use either the Motion Estimation or Single Frame repair type.
With Motion Estimation, Lustre looks for colour differences between the current frame, the previous frame, and the next frame within a specified area, and differentiates between motion in the shot and artefacts using motion estimation calculations based on a specified search area. Large search areas are needed for shots with fast motion since the colour differences between frames will span a larger area than would be required for shots with slower motion. If a colour difference is found between adjacent frames, and is not identified as motion in the shot, it is assumed to be dust. To remove an artefact, Lustre creates a mask for it using a calculation that uses the pixel values on the previous and next frames at the identical location as the artefact.
The Single Frame repair type removes artefacts by cloning pixels adjacent to the artefact on the current frame rather than using pixel values from the previous and next frames.
Generally speaking, the Motion Estimation repair type does a better job than Single Frame, and it should be used when possible. Try Single Frame if the characteristics of the shot or the artefacts prevent the Motion Estimation repair type from successfully identifying and removing artefacts. For example, you will need to use Single Repair if an artefact appears on more than one frame.
There are two methods you can use to remove artefacts--manual or automated. With the manual method, you visually identify artefacts frame by frame and specify the area where you want to apply a mask by drawing boxes around them as you go along. With the automated method, Lustre searches for artefacts and creates the boxes automatically, based on search criteria that you specify.
These methods of dust removal only apply to motion estimation.
The method you choose depends on the nature of your footage--how much dust is on it and the complexity of the motion in it. Automatic removal is faster, but you may experience problems with it if the footage has a lot of fast motion or highlights in the motion or elsewhere in the footage. In this kind of footage, the automatic method may mistakenly identify motion as dust, and the clean up job afterwards may be more effort than using manual removal. As a general rule, choose manual removal for footage with complex motion and little dust (most normal feature work), and automatic removal for footage with less motion and large amounts of dust.
For most shots, when you set dust removal parameters for one dust artefact, the settings will work well for other artefacts in the shot. Prior to removing dust either manually or automatically, set parameters in the Dust menu to the best settings for the amount of motion and the colour composition of your shot. When the settings are optimized, save them as default settings so they will be applied to all newly created mask boxes.
The optimization settings apply only to dust removal methods that are based on motion estimation.
In the Main menu, click Image.
Click Dust.
The Dust menu appears.
 "Show full-size image")
|
|
|
|
|
|
|
|
|
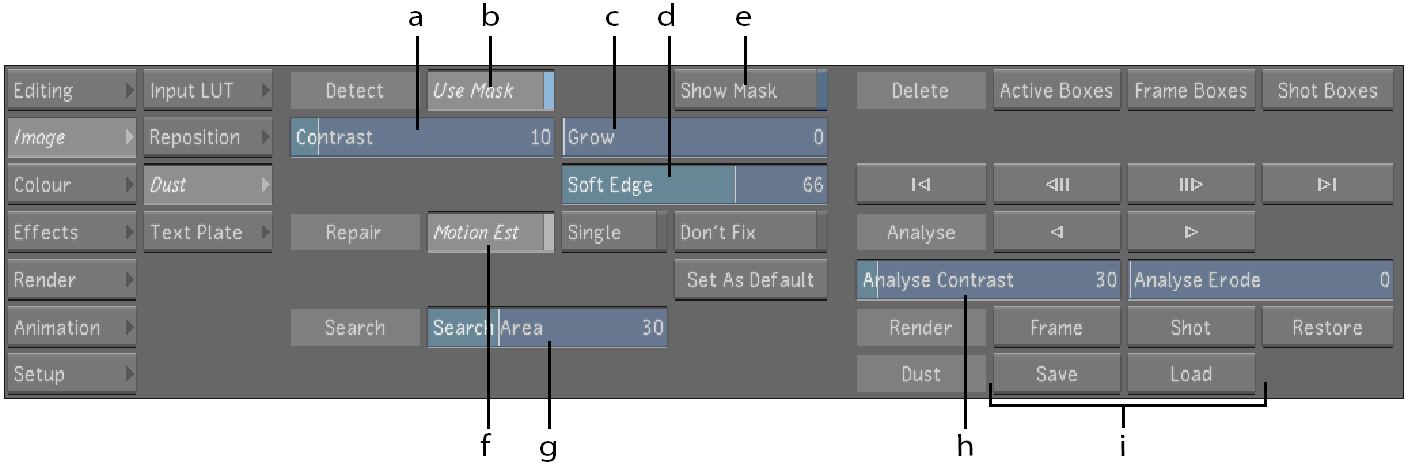
Enable Use Mask.
Lustre will create masks for any artefacts it finds inside dust removal boxes, based on the Contrast and Grow parameters.
Enable Motion Estimation.
This repair type uses a motion estimation calculation to identify motion in successive frames.
Set the Search Area.
This parameter controls the size of the area (in pixels) around each pixel in which the motion estimation calculation searches for motion. This enables Lustre to differentiate between motion in the shot and dust artefacts. Estimate the approximate search area required for the amount of motion-caused colour displacement between frames. Set a large area for shots with fast motion, and a small area for shots with slower motion.
Note: If the area set is too small for the speed of the motion, the calculation may mistakenly define colour value differences between frames caused by motion as dust artefacts. However, larger search areas take longer to analyse.
Adjust the Analyse Contrast slider to set the amount of contrast used to find dust during automatic analysis.
Low contrast values cause the algorithm to accept low colour value differences between corresponding pixels on the current, previous, and next frames. Therefore, low values result in more complete removal of the artefact. However, if the contrast is set lower than actually needed, adjacent pixels are modified more than actually required to remove the dust.
On the shot you are working on, find a frame containing an artefact that is typical of the artefacts on the footage. Use the Next Frame and Previous Frame buttons or Ctrl and Alt hot keys to move forward and backward through the shot.
Zoom in closely on a dust artefact by pressing the middle and right mouse buttons and dragging on the image. You should be close enough to see pixels.
Draw a box around the dust artefact by dragging the cursor diagonally across the artefact and then releasing the cursor. Surround the artefact closely, but make the box large enough to leave a radius of 5 to 10 pixels around the artefact. See Working with Boxes.
The artefact is repaired according to the current settings. It should be fainter or have disappeared completely.
Enable Show Mask.
Red pixels identify those areas affected by the removal process.
Adjust the Contrast value.
Low values result in more complete removal of the artefact. However, if the contrast is set lower than actually needed, adjacent pixels are modified more than actually required to remove the dust. Increase (or decrease) the Contrast value until right before the dust starts to reappear.
Adjust the Grow parameter and the Soft Edge parameter until the red pixels exactly cover the dust particle.
The Grow parameter controls the number of pixels around the pixels detected by Lustre. The Soft Edge parameter softens the stroke of the pixels specified by the Grow parameter in order to replicate a natural paint stroke.
Turn off Show Mask.
Click Set As Default.
The values you just set for all parameters are now default values that will be applied to any new box created either manually or automatically.
You have now set Dust Removal parameters to their optimum values for the shot and you are now ready to remove dust from the rest of the shot using either the manual or automatic method.