Chapter 15, Secondary Colour Grading
| Loading Garbage Mask Setups from Autodesk Applications | |||
Chapter 15, Secondary Colour Grading |
|||
 Adjusting Printer Lights for Secondary Grading
Colour Grading Inside and Outside Secondaries
Applying a Secondary Colour Grade to the Entire Image
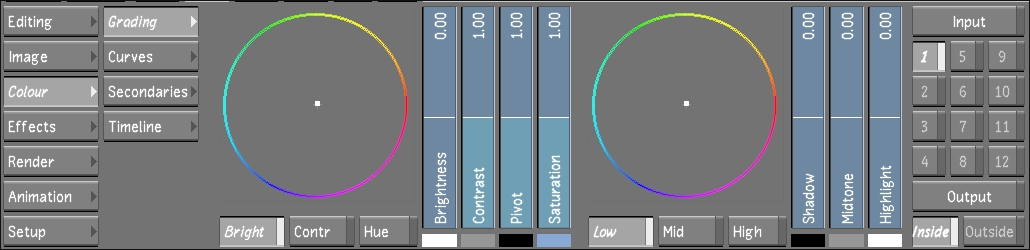
Use the colour grading controls in the Grading menu to perform secondary colour grading on your shots. Once the layer has been enabled in the Secondaries menu, switch to the Grading menu and perform secondary grading, either in Logarithmic or Linear mode, just as you would for a primary grade.
 "Show full-size image")
In the Secondaries menu, click a Secondary button to enable it.
 "Show full-size image")
Define the area to be selectively colour graded by creating a key, adding one or more geometries, or combining a key with one or more geometries.
If you are colour grading geometries, enable Geom. This ensures that the colour correction will be applied selectively, rather than to the whole image.
 "Show full-size image")
Click Grading to display the Grading menu.
Perform colour grading as you would for a primary grade. See Chapter 13, Primary Colour Grading.
Note: When you use a slider or colour balance wheel to colour grade a shot, the colour range is limited by the control (the edge of the colour wheel, for example). Use the Autodesk control surface or the Tangent CP100 control surface to reach the full spectrum of colour. For control surface mappings, see Appendix A, The Autodesk Control Surface, or Appendix B, The Tangent CP100 Control Surface.

You can shift the hue of the area defined by a secondary using the Hue Rotator.
In the Secondaries menu, click a Secondary button to enable it.
 "Show full-size image")
Define the area to be selectively colour graded by creating a key, adding one or more geometries, or combining a key with one or more geometries.
If you are colour grading geometries, enable Geom. This ensures that the colour correction will be applied selectively, rather than to the whole image.
 "Show full-size image")
Click Grading to display the Grading menu.
Click Hue and then drag the Hue Rotator to shift the hue. To shift the hue clockwise through the hue spectrum, drag right. To shift the hue counter-clockwise, drag left.
 "Show full-size image")
You can make printer light adjustments to secondaries just as you would to primary colour grades. See Adjusting Printer Lights for Primary Grading.
Secondaries can have unique colour grades applied both inside and outside a defined shape. The secondary's default state is the inside.
Colour grade the secondary.
From either the Grading or Secondaries menu, click Outside to switch out of Inside colour grading mode.

 "Show full-size image")
Right-click Outside to enable Outside colour grading mode.
Note: Enabling Inside or Outside allows you to colour grade the inside or outside area of the secondary. If you subsequently disable either button, its colour grade will be hidden in the Player.
If gradients are used to define the shape, the appropriate blend will be applied between the shapes.
You can speed up the secondary colour grading process by copying a shape, or a shape with its parameters, from one secondary to another. This functionality is useful when colour grading the same shape(s) across several secondaries.
Click Secondaries to display the Secondaries menu.
In the Player, select the shape's axis.
Hold down the Ctrl key while clicking a new secondary.
The new secondary is enabled and the shape appears in the same position as on the previous secondary.
Click Secondaries to display the Secondaries menu.
In the Player, select the shape's axis.
Click Selector and choose the parameters to be copied.
Shift-click the new secondary.
The new secondary is enabled and the shape with its parameters appears in the same position as on the previous secondary.
Once a secondary has been graded, you can test how the secondary grade would look like as a primary grade.
In the Secondaries menu, deactivate Geom and Keyer.
 "Show full-size image")
Note: To reapply the secondary colour grade, enable the Geom button again.
Secondaries are processed in numerical order. You can toggle secondaries on and off and view the results in the Player.
Do one of the following:
To turn a secondary on, click its layer number button. This allows you to manipulate shapes on the layer while keeping colour corrections hidden. To display colour corrections, right-click the layer number button to activate it.
The secondary is included in the processing pipeline. With the Geom button activated, you can use the colour grading controls in the Grading menu to perform secondary colour grading to the area defined by the key and geometry.
To turn a secondary off, right-click the layer number button again. The number on the secondary button goes from white to gray to indicate that it is no longer enabled.
The secondary is bypassed in the processing pipeline.