Chapter 16, Creating Lustre Sparks Effects
| Creating an Effect with a Lustre Sparks Plugin | Disabling and Re-enabling Lustre Sparks Plugins | ||
Chapter 16, Creating Lustre Sparks Effects |
|||
There are several Lustre Sparks plugins that are included with Lustre. These plugins, and their parameters, are described in the following sections.
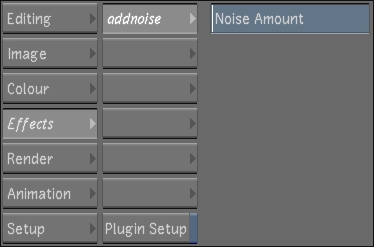
Add Noise-- Grain-type plugin that you can use for adding random noise to an image. Use the Noise Amount parameter to adjust the amount of noise added to the shot.
 "Show full-size image")
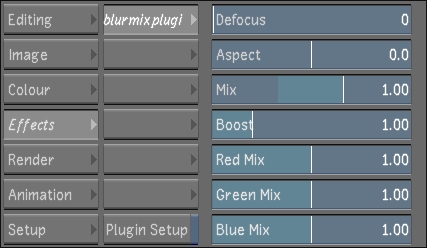
Blur Mix-- Blur-type plugin that performs a multiply mix between the original image with the blurred image. You can also use this plugin to sharpen or tint an image.
 "Show full-size image")
| Use: | To: |
| Defocus | Set the amount of blur. |
| Aspect | Adjust the orientation of the blur. A negative value produces a horizontal blur and a positive value produces a vertical blur. |
| Mix | Adjust the amount of mix between the original image and the unblurred image. By default, this value is set to 1. If you set the value to zero, no mix occurs and you see only the original image. Setting the mix to a negative value sharpens the image. |
| Boost | Multiply key values when using the plugin on a secondary key. This allows you to visually grow your key by increasing the range of the key value. |
| Red Mix | Adjust the red gain of the blurred image. |
| Green Mix | Adjust the green gain of the blurred image. |
| Blue Mix | Adjust the blue gain of the blurred image. |
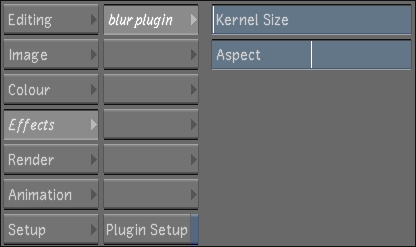
Blur--Simple blur plugin using a high-speed algorithm.
 "Show full-size image")
| Use: | To: |
| Kernel Size | Adjust the amount of blur. |
| Aspect | Adjust the orientation of the blur. A negative value produces a horizontal blur and a positive value produces a vertical blur. |
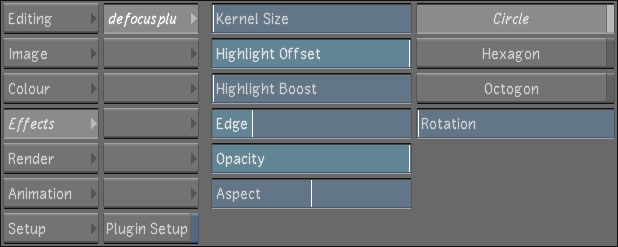
Defocus--Blur-type plugin that simulates a camera out-of-focus effect. Along with the blur parameters, this plugin includes variable iris types and additional highlight controls, as well as a control for softening the edge of a secondary.
 "Show full-size image")
| Use: | To: |
| Kernel Size | Set the amount of the camera defocus. |
| Highlight Offset | Offset the highlight range. |
| Highlight Boost | Increase the highlight range. |
| Edge | Adjust the edge softness of a matte when using this plugin with a secondary. |
| Opacity | Change the opacity of the image. By adding transparency, you see through to the original image. |
| Aspect | Adjust the orientation of the blur. A negative value produces a horizontal blur and a positive value produces a vertical blur. |
| Circle, Hexagon, Octagon | Specify the shape of the plugin matrix (or camera iris) used to calculate how the defocus is applied. |
| Rotation | Rotate the plugin matrix (or iris). |
Directional Blur--Simple directional blur along a specified direction.
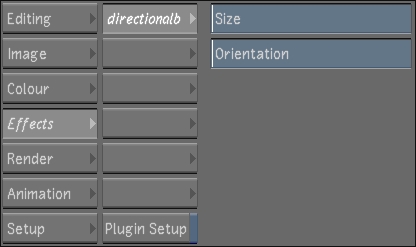
 "Show full-size image")
| Use: | To: |
| Size | Adjust the amount of blur. |
| Orientation | Change the direction of the blur. |
Field Zoom-- Pan, scan, scale, and rotate interlaced footage. The parameters in this plugin work in the same way as the tools in the Image |Reposition menu, except that they are applied to individual fields instead of the entire frame. This yields a smooth image from interlaced footage even after repositioning.
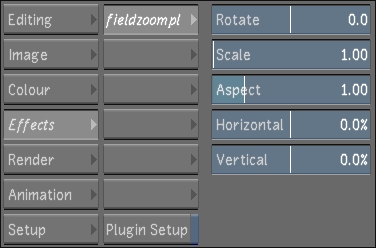
 "Show full-size image")
| Use: | To: |
| Rotate | Rotate the fields. |
| Scale | Resize the fields. |
| Aspect | Adjust the aspect ratio of the fields. |
| Horizontal | Adjust the horizontal position of the fields. |
| Vertical | Adjust the vertical position of the fields. |
Glow-- Blur-type plugin that can be used by itself or combined with a secondary key.
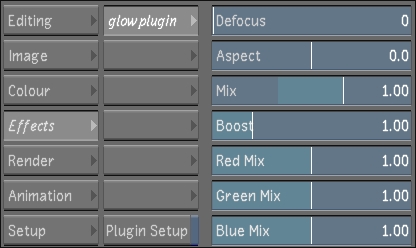
 "Show full-size image")
| Use: | To: |
| Defocus | Adjust the amount of blur. |
| Aspect | Adjust the orientation of the blur. A negative value produces a horizontal blur and a positive value produces a vertical blur. |
| Mix | Adjust the amount of mix between the original image and the blurred image. |
| Boost | Multiply key values when using the plugin on a secondary key. This allows you to visually grow your key by increasing the range of the key value. |
| Red Mix | Adjust the red gain of the blurred image. |
| Green Mix | Adjust the green gain of the blurred image. |
| Blue Mix | Adjust the blue gain of the blurred image. |
Gold--Blur-type effect that allows you to soften and tint an image. The defocused and coloured image is multiplicatively combined with the original image to create a coloured soft-filter look.
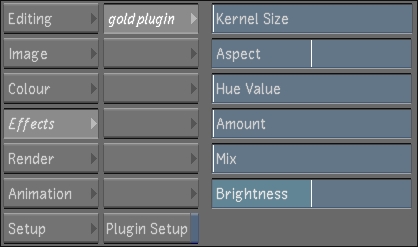
 "Show full-size image")
| Use: | To: |
| Kernel Size | Adjust the amount of blur. |
| Aspect | Adjust the orientation of the blur. A negative value produces a horizontal blur and a positive value produces a vertical blur. |
| Hue Value | Set the hue that is used to tint the image. |
| Amount | Adjust the amount of the selected hue. |
| Mix | Adjust the amount of mix between the original image and the blurred, tinted image. The other parameters have no effect until you set the Mix value. |
| Brightness | Adjust the brightness of the tinted image. |
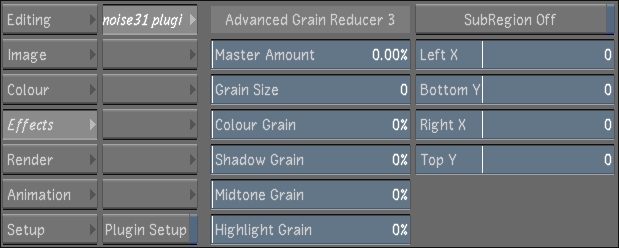
Noise Plugin 3.1-- This grain-type plugin is a third generation advanced noise reducer that uses a spatial filter with detail preservation control. It is useful for colour noise processing, and allows you to specify whether processing should occur in the shadows, midtones, or highlights. During playback, this plugin updates dynamically as you adjust the values, so you can see how the grain removal works in context of the shot. It is the fastest of the three noise plugins available in Lustre.
If the plugin processing slows down image playback, you can restrict grain reduction to a subregion of the frame.
 "Show full-size image")
| Use: | To: |
| Master Amount | Set how much the grain is reduced. The default value (or less) generally produces a good result for grain removal. |
| Grain Size | Set the size of grain that is reduced. |
| Colour Grain | Adjust grain reduction on colour grain only. |
| Shadow Grain | Adjust grain reduction in the shadows only. |
| Midtone Grain | Adjust grain reduction in the midtones only. |
| Highlight Grain | Adjust grain reduction in the highlights only. |
| SubRegion On | Restrict the grain setting to the subregion defined by the bounding box. Right-click in the subregion to drag it to another position. Adjust the size of the subregion by clicking a corner of the subregion bounding box and dragging the corner. |
| Left X, Bottom Y, Right X, Top Y | You can adjust the size of the subregion bounding box by adjusting these parameters. |
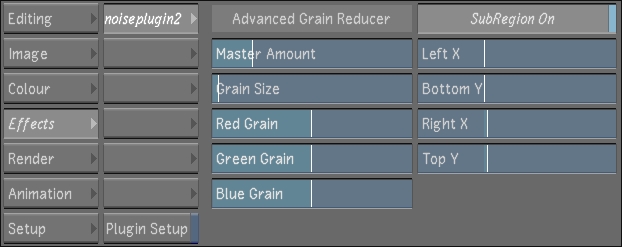
Noise Plugin 2--This grain-type plugin is a second generation advanced noise reducer that uses a spatial filter with detail preservation control. It is useful for grain, noise, or detail reduction. During playback, this plugin updates dynamically as you adjust the values, so you can see how the grain removal works in context of the shot.
If the plugin processing slows down image playback, you can restrict grain reduction to a subregion of the frame.
 "Show full-size image")
| Use: | To: |
| Master Amount | Set how much the grain is reduced. The default value (or less) generally produces a good result for grain removal. |
| Grain Size | Set the size of grain that is reduced. |
| Red Grain | Independently adjust grain removal on the red colour channel. |
| Green Grain | Independently adjust grain removal on the green colour channel. |
| Blue Grain | Independently adjust grain removal on the blue colour channel. |
| SubRegion On | Restrict the grain setting to the subregion defined by the bounding box. Right-click in the subregion to drag it to another position. Adjust the size of the subregion by clicking a corner of the subregion bounding box and dragging the corner. |
| Left X, Bottom X, Right X, Top X | You can adjust the size of the subregion bounding box by adjusting these parameters. |
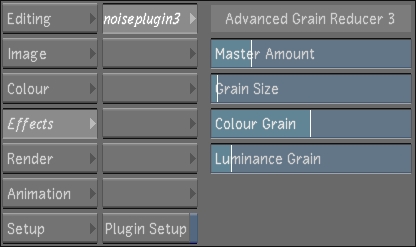
Noise Plugin 3--This grain-type plugin is a third generation advanced noise reducer that uses a spatial filter with detail preservation control. You can control luminance and colour noise processing separately.
 "Show full-size image")
| Use: | To: |
| Master Amount | Set how much the grain is reduced. The default value (or less) generally produces a good result for grain removal. |
| Grain Size | Set the size of grain that is reduced. |
| Colour Grain | Adjust grain reduction on colour grain only. |
| Luminance Grain | Adjust grain reduction on luminance grain only. |
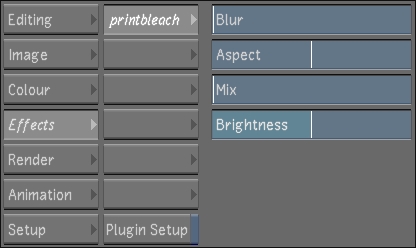
Print Bleach-- Blur-type plugin that creates an effect similar to the chemical print bleach process. This plugin increases contrast for the shadows while desaturating the image. When you use this plugin, you first set a mix value so that you mix the image onto itself, and then you blur and brighten the underlying layer.
 "Show full-size image")
| Use: | To: |
| Blur | Adjust the amount of blur. The blur parameter has no effect until you set the mix parameter. |
| Aspect | Adjust the orientation of the blur. A negative value produces a horizontal blur and a positive value produces a vertical blur. |
| Mix | Change the amount of the mix. By increasing the mix value, you increase the contrast and decrease the saturation of the image. |
| Brightness | Adjust the amount of brightness of the blurred image. The brightness parameter has no effect until you set the mix parameter. |
Silver--Blur-type effect that mixes a black-and-white (desaturated) image with the original image creating a soft-filtered look.
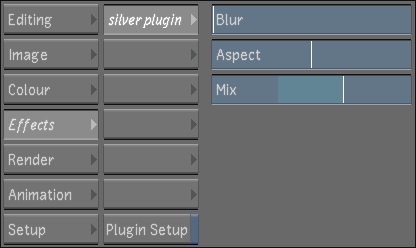
 "Show full-size image")
| Use: | To: |
| Blur | Adjust the amount of blur. The blur parameter has no effect until you set the mix parameter. |
| Aspect | Adjust the orientation of the blur. A negative value produces a horizontal blur and a positive value produces a vertical blur. |
| Mix | Adjust how much the black and white image is mixed with the original. Use a negative value to give your image a silver look. |