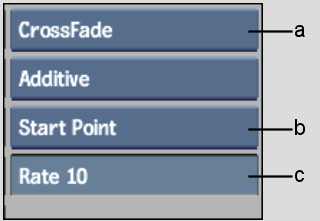
A crossfade is the same as a dissolve but gives you more control over the duration of the dissolve and the portions of the clips that are used for the crossfade.
Examples of creating a crossfade using the start, middle, and end alignments are shown as follows.


Action: Select the start, mid, or end point of the dissolve in the outgoing clip.


Action: Select the start, mid, or end point of the dissolve in the incoming clip.


Result: The dissolve using the start point. The dissolve duration was set to 4.


Result: The dissolve using the mid point. The dissolve duration was set to 4.


Result: The dissolve using the end point. The dissolve duration was set to 4.
To create a crossfade:
The crossfade options appear.


(a) Dissolve Type box (b) Dissolve Alignment box (c) Dissolve Duration field
An “E” (for Editor) appears on the Dissolve button after you select the second clip. To use the Dissolve Editor, click the Dissolve button again. See Creating Complex Dissolves with the Dissolve Editor.
If the “E” button is enabled, the Dissolve Editor appears. Otherwise, the crossfade is added to the destination reel.