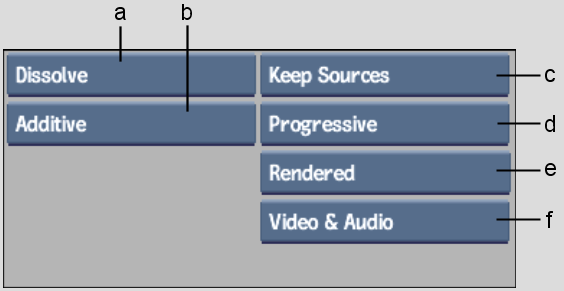
You access the Dissolve menu before creating the dissolve.
To access the Dissolve menu:
The Dissolve menu appears.


(a) Dissolve Type box (b) Dissolve Mode box (c) Keep/Delete Sources box (d) Render Type box (e) Render Mode box (f) Video/Audio option box
The Dissolve options are described as follows.
Dissolve Type boxSelect the type of dissolve you want to create. The Dissolve and Crossfade options both dissolve between two clips, but the Crossfade option gives you more control over the dissolve duration and selection criteria.
| Select: | To: |
|---|---|
| Dissolve | Create a dissolve between two clips. The dissolve duration is based on the frame you select in the incoming clip. See Dissolving between Two Clips. |
| CrossFade | Create a dissolve between two clips. You can choose the dissolve duration and the criteria used when selecting clips. See Crossfading between Two Clips. |
| Fade In | Create a dissolve that fades from a black source to a clip. See Creating a Fade-in or Fade-out. |
| Fade Out | Create a dissolve that fades from a clip to a black source. See Creating a Fade-in or Fade-out. |
| Mix | Mix the pixels between two clips based on a percentage you specify in the Mix menu. See Mixing Source Clips. |
Render Type boxSpecify how to render the dissolve—in frames (Progressive) or fields (Interlaced).
Dissolve Mode boxSpecify how the pixels of the source clips are combined to produce the corresponding pixels of the new clip.
| Select: | To: |
|---|---|
| Additive | Add the colour value of a pixel in the first source clip to the colour value of the corresponding pixel in the second source clip. This value is assigned to the pixel in the resulting dissolve. |
| Nonadditive | Evaluate corresponding pixels in the first and second source clips to determine which has the higher colour value. The pixel in the resulting dissolve is assigned the higher of the two values. |
| Inverse Nonadditive | Evaluate corresponding pixels in the first and second source clips to determine which has the lower colour value. The pixel in the resulting dissolve is assigned the lower of the two values. |
Dissolve Alignment boxThis box appears when you select CrossFade, Fade In, or Fade Out as the dissolve type. Select the alignment used when selecting the outgoing and incoming clips for the dissolve.
| Select: | To use: |
|---|---|
| Start Point | The starting frame of the transition in both the outgoing and incoming clip. |
| Mid Point | The middle frame of the transition in both the outgoing and incoming clip. |
| End Point | The end frame of the transition in both the outgoing and incoming clip. |
Dissolve Duration fieldThis field appears when you select CrossFade, Fade In, or Fade Out as the dissolve type. Specify the number of frames over which the dissolve occurs. For example, if the dissolve duration is set to 10, the dissolve takes place over 10 frames.
Render Mode boxSpecify whether or not dissolves are rendered.
| Select: | To: |
|---|---|
| Rendered | Render the dissolve. |
| Unrendered | Not render the dissolve. Dissolves remain unprocessed
until Force Render is selected. Select Unrendered if you want to
edit the dissolve in the timeline without having to wait for it
to be rendered. When you select Unrendered, a black frame with the message “Unrendered Frame” is substituted for a rendered frame when a dissolve is created or when it is modified in the timeline. If your system is capable of creating real-time dissolves and you are modifying a dissolve in Unrendered mode, the dissolve is shown in the image window when the clip is played. The dissolve is not shown on the timeline. |
Keep/Delete Sources boxSpecify whether you want to keep the source clips or remove them from the desktop after creating the dissolve.
Video and Audio boxIf a clip has audio tracks, you can add a dissolve to both video and audio tracks at the same time. If you select the Video and Audio options when adding a dissolve, crossfade, or fade-in/out, the dissolve or fade is added to both video and audio tracks. If you select the Video option, the dissolve or fade is only added to the video track.