Outputting a Single Clip


To output a clip to a VTR, load a clip into the Output Clip menu and then set the in and out points for clip output. If required, enable the options to offset the start frame for output and to apply a letterbox overlay. See Output Clip Menu Controls.

If the duration marked by the in and out points that you set for output is greater than the duration of the clip you are outputting, the last frame of the clip is repeated to fill the gap between the end of the clip and the out point of clip output. For example, if you set a clip output in point at 01:00:00:00 and a clip output out point at 01:01:00:00, the clip output process has a duration of one minute. If the clip you are outputting is 30 seconds long, the last 30 seconds of the output result on tape are filled with the last frame of the clip you are outputting.

To output a single clip to a VTR:

  1. Load the clip that you want to output into the Output Clip menu. See Accessing the Output Clip Menu.
  2. Make sure that the correct video track and audio channel buttons are enabled so that the corresponding video track and audio channels are output to tape.

    Show small imageShow large image

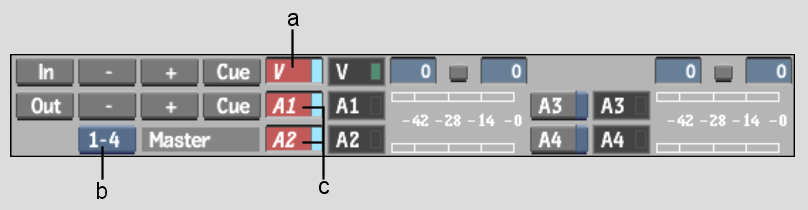
    (a) Video track enabled for output  (b) Toggle Audio Tracks button (c) Audio channels 1 and 2 enabled for output  

  3. Enable or disable All Audio in the Clip Output menu (to the right of the Exit Output Clip button).

    When Output All Audio is enabled, all audio channels (not just the ones corresponding to the audio channel buttons you enabled in the previous step) are sent to the audio converter.

    This means you can monitor all audio, even though you are only recording one or two tracks to the VTR. You can also route the other audio channels to a mixer or any other device capable of capturing an audio signal.

  4. Make sure the appropriate VTR is selected in the Device Name box. See Selecting a VTR Device For Output.

    The preview window displays the contents of the tape currently in the selected VTR.

  5. To preview the clip you are outputting against the content on the tape, enable Split View. See Monitoring Video During Clip Input and Output Operations.
  6. To preview the clip before outputting and see its properties, click Play to load the selected clip into the Player.
  7. To output the selected clip with a letterbox overlay, enable Letterbox and then select the colour and enter values for the letterbox aspect ratio and offset. See Outputting Clips With a Letterbox Overlay.
  8. To output the selected clip starting at any frame other than the first one, enter the start timecode in the Start Offset field.
  9. Set the in and out points for clip output. See Setting Input and Output In and Out Points.
  10. Click Process to output the clip to the VTR.
  11. After the transfer is complete, verify that it was successful by playing the transferred clip. To do so, cue to the in timecode and click the Play button in the VTR Transport controls.
  12. When you are done, click EXIT Output Clip to return to the EditDesk reels or clip library.