The destination settings appear in all resize procedures. These settings define the destination format into which the source sample is fit. The layout of these settings and the availability of some options depends on where you access the resize settings.


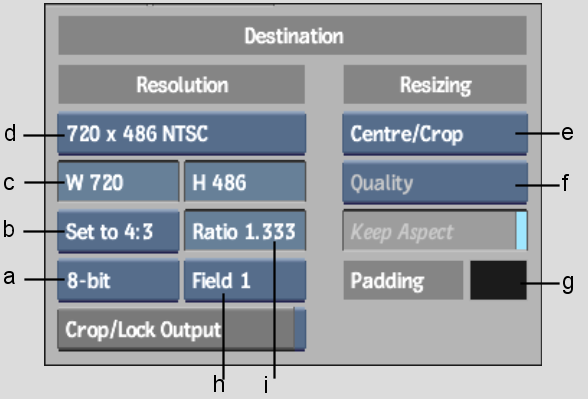
(a) Frame Depth box (b) Resolution Presets box (c) W/H fields (d) Frame Aspect Ratio Presets box (e) Fit Method box (f) Filter box (g) Padding colour pot (h) Scan Mode box (i) Ratio field
Crop/Lock Output button Enable to lock the destination resolution per-frame to match the crop box. Use this option to animate the resolution of a clip. This option is only available when you access resize settings from Clip nodes and the Resize node in Batch. See Animating Resize Settings.
Frame Depth box Provides five frame depth options: 8 bit, 10 bit, 12 bit u, 12 bit, or 16 bit fp.
Resolution Presets box Provides options for many standard resolutions, as well as a Custom option that you can use to specify non-standard resolutions.
W/H fields Display the frame width and height of the selected resolution preset. If you select Custom from the Resolution Presets box, use these fields to enter the frame width and height values you want to use.
Frame Aspect Ratio Presets box Provides standard frame aspect ratio options as well as a w:h option to set the clip to use square pixels. Also provides a Custom option so you can enter a custom frame aspect ratio in the Ratio field.
Fit Method box Provides four fit methods.
| Select: | To: |
|---|---|
| Centre/Crop | Fit the source image, centred, over the destination resolution frame. If the source is larger than the destination, it is cropped. If the source is smaller than the destination, it is surrounded by a black border. |
| Crop Edges | Fit one edge of the source into the destination resolution
frame without stretching or squashing the frame. Excess parts of
the source frame after resizing are cropped. If the source—after the one edge is resized—is wider than the destination, its overhanging left and right edges are cropped. If the source is taller than the destination, the upper and lower edges are cropped. |
| Fill | Fit the source, width and height, into the destination resolution frame. This process, if the source and destination resolutions do not have the same aspect ratio, can distort the image. |
| Letterbox | Fit the source to the destination resolution frame without
squashing or stretching it, and without cropping the source. If the source is wider than the destination, black bars fill the top and bottom of the destination frame. If the source is narrower than the destination, black bars fill the right and left sides of the frame. In all cases, the entire source frame is fit in the destination frame. |
Filter boxProvides five resizing filters. This box does not appear if you selected the Centre/Crop Fit method.
| Select: | To: |
|---|---|
| Coarse | Get the poorest results in the least amount of processing time. A segment with a soft Resize can be played back in real time when using the Coarse resizing filter. Other options may require rendering. |
| Medium | Get moderate results. Processing time is increased compared to Coarse. |
| Quality | Get very good results when resizing a clip to a lower resolution. Processing time is increased compared to Medium. |
| Bicubic | Get the best results when resizing a clip to a higher resolution. Processing time is increased compared to Medium, but decreased compared to Quality. |
| Lanczos | Get the best results when resizing a clip to a lower resolution. It uses the Lanczos algorithm, which is an iterative algorithm particularly useful for finding decompositions of very large sparse matrices. |
Keep Aspect buttonEnable to maintain non-square pixel formats. This button only appears if you selected the Crop Edges or Letterbox methods.
Padding colour pot Select a colour to use for padding out the frame when centre-cropping, cropping edges, or letterboxing. The default padding colour is black.
Scan Mode boxProvides four Scan Mode options.
| Select: | To resize: |
|---|---|
| Progressive | A frame-based clip to another frame-based clip. |
| Field 1 | A clip by drawing Field 1 followed by Field 2. |
| Field 2 | A clip by drawing Field 2 followed by Field 1. |
| Field Merge | A clip by fully merging both fields in each frame. |
For interlaced material, you can specify whether the resize needs to be done from both fields or just from one of the two. In the latter case, the result is going to be a progressive clip made from the same two fields.
Use Field Merge to remove the effects caused by field jitters.
Ratio fieldEnter a custom frame aspect ratio in this field, if necessary.


