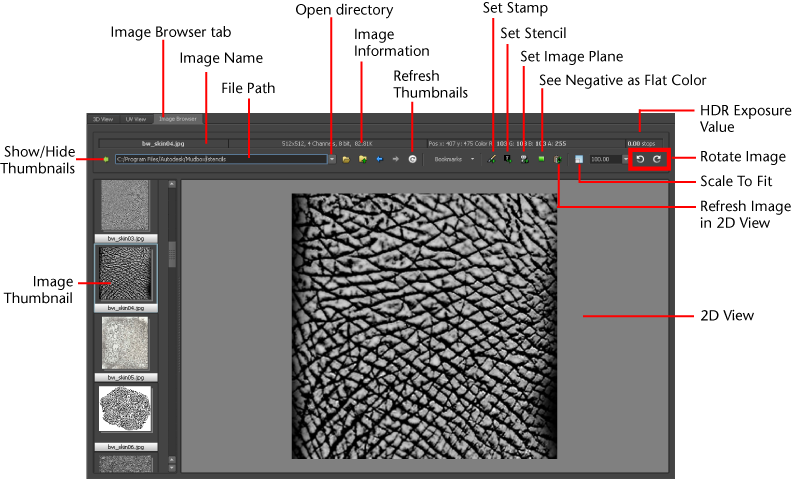
The Image Browser lets you select, view, and evaluate 2D images and textures located on your local hard drive or network.

A variety of image formats and bit depths are supported. In addition, you can use the Image Browser to:
The following image file formats are supported by the Image Browser:
| File format | Bit Depth | Number of channels |
|---|---|---|
| JPG | 8 | 3 |
| BMP | 8 | 1, 3, 4 |
| GIF | 8 | 1, 3, 4 |
| PNG | 8 | 1, 3, 4 |
| TGA | 8 | 1, 3, 4 |
| TIFF | 8, 16 integer, 32 floating point | 1, 3, 4 |
| OpenEXR | 8, 16 floating point, 32 floating point | 1, 3, 4 |
The Icon Bar contains buttons that control various aspects of the Image Browser. For a detailed description of what each button does, see Image Browser window.
| To: | Do the following: |
|---|---|
Display the Image Browser. |
Click the Image Browser tab located at the top left of the 3D View, directly below the menu bar. |
View an image using the Image Browser. |
In the Icon Bar, click the Open Directory icon, select a directory, and click OK. The contents of the directory display in the Thumbnail View. (Only valid image files and file directories display in the Thumbnail View.) Click an image in the Thumbnail View to display it in the 2D View |
Determine information about the image displayed in the 2D View. (for example, resolution, bit depth, and so on) |
The status boxes above the Icon Bar provide the following information about an image displayed in the 2D View: - Image name - File size on disk - X, Y image resolution (in pixels) - Number of color channels - Bit depth (8, 16, 32) |
Scale an image to fill the 2D View. |
Click the Scale to Fit icon. |
Scale an image in the 2D View by a pre-determined amount |
Click the downward pointing arrow on the Zoom Image Ratio icon and select a scale value. |
| Zoom in or out of an image in the 2D View. | Press the Ctrl key then press the + or - key repeatedly to zoom in or out incrementally. |
Pan around an image. |
Press the Alt key then drag in the 2D View. |
Refresh the display of an image in the 2D View after it has been modified or edited outside of Mudbox. |
Click the Refresh icon. |
Rotate the display of the image in 90 degree increments. |
Click the Rotate Left or Rotate Right icons. |
Load an image onto a stamp or stencil brush |
Select the image you want to load as a stamp or stencil. Click the Set Stamp or Set Stencil icons. NoteWhile setting a stamp
or stencil using the Image Browser applies the selected image
to the current tool, it does not save the image to the stamp or
stencil tray for future use. To do this you must additionally select Add
Stamp or Add Stencil from the related
tray menu (
|
Load an image into the 3D View as a reference image or image plane. |
Select the image you want to load as an image plane. Click the Set Image Plane icon. In the 3D View, click the Object List tab, and open the Perspective camera and click the Image Plane node to display its properties in the Properties window. For more information, see Import a reference image. |
View the pixels in a high dynamic range image (HDRI - 32 bit floating point image) within a specified range. |
Press the + or - keys to increase or decrease the exposure value for the HDR image. Press the 0 key to reset the exposure values to the default setting. |
| View only the pixels that contain negative floating point values in a high dynamic range image (HDRI - 32 bit floating point) | Click the See Negative As Flat Color icon to view pixels that contain negative floating point values in a green color. (This feature is also useful for evaluating 32 bit extracted displacement maps.) |
| View the next or previous image in the current directory. | Press the spacebar or backspace key to view the next or previous image. |