Show in Contents

Add to Favorites

Home: Autodesk Mudbox Online Help

Extract a normal or displacement map

Texture extraction

View normal maps on a model

Extract an ambient occlusion
map
For an overview of ambient
occlusion maps, see
Texture extraction overview.
- Select Maps
> Extract Texture Maps > New Operation.
The Extract
Texture Maps window appears. For a complete description
of extraction properties see
Extract Texture Maps properties.
- Select Ambient Occlusion Map in
the Maps to Generate section.
- Indicate the model(s) you want an ambient
occlusion map for by selecting its name in the Target
Model section.
NoteIf a model is not
selected then an ambient occlusion map is produced for all objects
in the 3D View. Keep in mind that
all visible objects in the 3D View are
taken into account when calculating an ambient occlusion map. That
is, if you don’t want an object to be included as part of the ambient occlusion
calculations, hide it before extracting a map.
- Set the desired subdivision level for
the target model(s) that you want the extraction to occur by selecting
it from the level drop-down list to the right of the target name.
Setting the subdivision
level on the target model to its highest subdivision level provides
the highest detailed ambient occlusion maps possible. It is possible
to extract an ambient occlusion map at lower subdivision levels, but
fine detail will be lost and the appearance of facets may result
because of the reduced resolution.
- In the Output Map window,
adjust any properties as required (described below) and then click Extract.
NoteThe model must have
UV texture coordinates to extract an ambient occlusion map. Otherwise,
the following message appears when you click
Extract:
The model mesh has no UVs. Mudbox needs UVs
to generate Ambient Occlusion Maps. Try selecting Recreate Level
UVs under the Mesh menu. For more information, see
UVs overview.
- Image Size -
Specifies the height and width (in pixels) of the ambient occlusion
map(s) output.
- Quality -
Determines the quality of the final ambient occlusion map based on
multiple shadow maps that get used for the calculation.
- Base File Name -
Specifies the name of the extracted map(s).
- Add as Paint Layer -
Automatically imports the generated ambient occlusion map as a new
paint layer within the Diffuse channel
of the assigned material. Turn this setting off if you don’t want
the ambient occlusion map assigned to a new paint layer.
TipThe first time you
extract an ambient occlusion map, set the Quality setting
to Fastest and Image
Size to a small resolution to quickly generate a test map.
Evaluate this initial test, adjust any settings as required, and
then set the Quality and Image
Size options to the final settings before generating
a final map.
The Advanced section
of the Extract Texture Maps window,
contains the following properties when Ambient Occlusion Map is
selected:
- Shadow Map Resolution -
Controls the size of the shadow maps for the occlusion map calculations.
- Shadow Darkness -
Controls the darkness of the shaded regions in the final ambient
occlusion map.
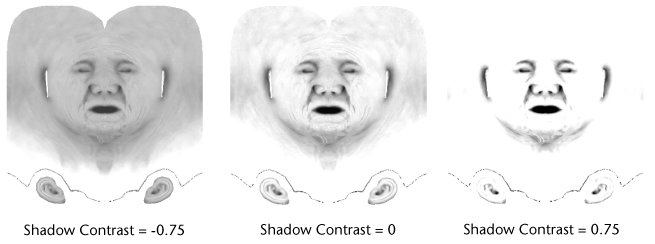
- Shadow Contrast -
Controls the contrast between shaded and non-shaded areas in the
ambient occlusion map.
- Filter -
Controls the filtering of the multiple shadow map calculations when
producing the final ambient occlusion map. To achieve sharp, finely detailed
shadows, set the Filter value to a low number
(0.0001). To produce a softer effect, set the Filter value
to a higher number.
A progress bar on the Status
Line indicates the progress of the extraction. Depending
on the Quality setting, this bar may
repeat the process several times as the feature calculates and composites
the necessary shadow maps.
The ambient occlusion
map is automatically applied to the model(s) as a diffuse paint
layer (provided the Add as Paint Layer property
is turned on) and positioned on top of any other existing paint
layers in the Diffuse channel.
If the model contains
UVs within multiple UV tile spaces, that is, outside the 0 to 1
range, the feature automatically creates separate ambient occlusion maps
that correlate to each UV tile and saves them to the user-specified
directory.
NoteIf your model contains
multiple UV tiles, each tile will appear in a different color after
the ambient occlusion map is applied to indicate that the textures
are currently unloaded. This is a graphics memory optimization feature.
For more information, see
Hide and show UV tiles on a model.
Edit an ambient occlusion
map
Once an ambient occlusion
map has been created and applied as a visible paint layer, you can
evaluate it and then make successive iterations by changing the
extraction settings then clicking extract, and previewing the updated version
again.
If you extract successive
ambient occlusion maps with the same file name it overwrites the
previous one and the paint layer is automatically updated in the 3D
View with the new map.
You can use the Paint tools
to modify or enhance the ambient occlusion map (add shading, erase
shading, and so on) because the map is applied a diffuse paint layer.