Show in Contents

Add to Favorites

Home: Autodesk Mudbox Online Help

Display a model without lights and shading

Presentation

Apply visual effects

Create and apply materials
To
make your model appear in different colors, have matte or reflective
characteristics, and so on, you must edit or apply its material
characteristics. A material is a collection of properties assigned
to a model that control how its surfaces react to light and appear in
the 3D View.
Examples of material
properties include: color, glossiness, and transparency. A material
can also be categorized by the mathematical algorithms that its
based on, for example: Blinn, Lit Sphere, and so on.
Every model in Mudbox
is assigned the Mudbox Material by default.
You can edit this material, assign other pre-made materials from
the Material Presets tray, or create your
own custom CgFX materials as well as apply texture maps.
Mudbox lets you paint
directly on a model using the paint tools to create texture maps.
A texture map is an image you add to an existing material to enhance
its appearance beyond what the material's basic properties provide.
You can import images as paint layers to use them as texture maps and
create the appearance of bumps, apply a logo image, apply a pattern
or a marbled color image for example.
Texture maps allow you
to add visual detail that would be otherwise difficult to achieve
by sculpting alone and achieve a more realistic appearance.
Mudbox provides the following
CgFX-based material types:
- Materials Presets -
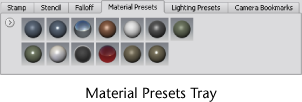
A number of pre-made materials are available from the Materials
Presets tray. Click an item in the tray to apply it to
your active model in the 3D View.
These can be useful if you’ve never worked with materials before.
- Mudbox Material -
This material can represent both Blinn and Lafortune shading
models and includes options for specifying image-based lighting.
This is the recommended base material, and is the default material
assigned to models in Mudbox.
This material should
be used if you plan to paint or assign textures to a model. It provides
texture channels for diffuse, specular, gloss, specular2, gloss2,
bump, and reflection.
NotePainting or assigning
textures to each of the material’s texture channels will increase
memory usage on your computer’s graphics card. Interactive performance
can be reduced as a result depending on the number, resolution,
and bit depth of each assigned texture. For more information, see
Graphics memory optimization.
- Simple Blinn -
This material represents a simplified Blinn shading material and
can be used on computers equipped with older, unsupported, or lower
performance graphics cards to provide sculpting and basic color
properties. It does not provide texture channel capabilities for
3D painting.
- Lit Sphere Material -
This material is a CgFX file but additionally includes a Lit Sphere
technique that defines the material.
- CgFX-based Material -
This material is an example CgFX file. Use it as a template to create
your own CgFX files and materials.
Create and assign a material
to a model
Do
one of the following:
- Select Create > Material.
- Right-click over the model and select Assign
Existing Material > <material_name>. Select
a material from the list of pre-existing materials that appears.
- Right-click the model and select Assign
New Material > <material_type>. This assigns
the selected material type to the model.
Edit a material’s properties
Do
one of the following:
- Right-click the model and select Edit Material from
the menu that appears. Edit the material's properties in the Properties window.
- Select the material in the Object
List, then edit its properties in the Properties window.
- Right-click the material in the Object List,
then select Properties from the menu that
appears. Edit the properties in the Properties window.
Delete a material
- Right-click
the material in the Object List, then select Delete
Material from the menu that appears.
NoteThe default material
cannot be deleted.
