In this lesson you were introduced to a few basic techniques related to the 3D Paint Tool. You learned how to:
There are several other capabilities in the Paint Operations section, such as the Clone option for Artisan brushes. With the Clone option, you can duplicate the color and pattern from an area of the texture and then paint that pattern elsewhere on the texture. For details on these options and other 3D Paint Tool techniques, refer to the Maya Help.
Location of 3D Paint Tool file textures
If you need to move or rename a file texture that Maya creates from your painting, look in the 3dPaintTextures directory under the current project directory. If you paint an existing file texture that you created previously, for example, with a paint program, Maya creates a copy and stores it in the 3dPaintTextures directory.
In this lesson you worked with a polygonal model that was specially prepared for painting in this lesson. To paint successfully on a polygonal or subdivision surface, you must set up the surface UVs beforehand. UVs are points positioned around the surface like vertices. They control how Maya stretches a texture around a surface. For polygons and subdivision surfaces, you must arrange the UVs so that textures—including the ones you paint with the 3D Paint Tool—look correct when applied to the surface material. (The UVs on NURBS surfaces are automatically arranged for you, so you do not have to change them.)
You view and edit UVs using the UV Texture Editor (Window menu). You can obtain an introduction to UVs and the UV Texture Editor by completing the UV Texture Mapping lesson in this book. You can also learn more about UVs in the Maya Help by referring to the sections on Polygonal and Subdivisions surfaces.

If you already have experience with editing UVs, remember these two requirements for 3D painting:
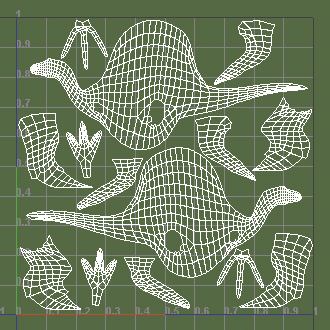
This illustration shows the UV Texture Editor with the UVs for the Dino model used in this lesson. These UVs meet the above two requirements. Notice that the UVs form several meshes; they do not need to be one solid mesh.
Painting in Screen Projection mode
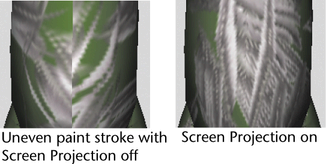
When you paint on a model, the brush follows the contours of the surface. This typically produces the most desirable results. However, this default behavior leads to uneven paint application in some situations. A common example is along the line where two surfaces join together. It can also occur if the UVs are not arranged correctly, as described previously.
The solution to these situations is to turn on Screen Projection in the 3D Paint Tool settings. Screen Projection applies paint as if you are projecting cinematic film onto a screen. Paint appears where the projection strikes the surface.
The following figure shows an example of this situation with a Paint Effects brush.
