You can crease or harden the edges on your polygon meshes. Hardening or creasing the edges sets how the mesh transitions between faces enhancing the realism of your model.
When you harden an edge on a polygon mesh, you change the direction of the normals associated with the shared edge, which in turn affects the shading along those edges. When you crease an edge of a mesh that has an associated subdiv proxy, the edges on the smoothed high resolution version are creased by physically modifying the polygon smoothing surrounding those edges.
In this lesson, you’ll try both methods on your helmet mesh.
To display hard and soft edges on a mesh
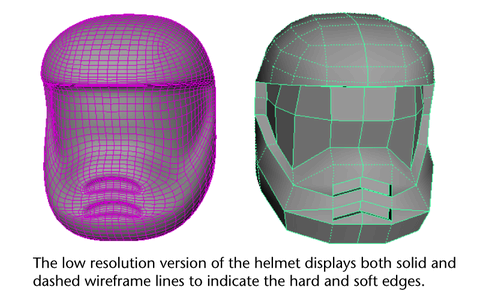
The wireframe mesh on the helmet updates to display both dashed and solid lines. The dashed lines indicate edges that are set to display as soft shaded. The solid lines indicate edges that are set to display as hard shaded. The reason some of the edges are hard and some are soft relates to the particular settings for some polygon tools.
To soften the edges on the mesh
All of the edges on the helmet mesh are set to be shaded in a softened fashion. The wireframe mesh updates to display as dashed lines indicating that all of the edges are set to be soft shaded. You may not notice any immediate effect on the smoothed high resolution version, but its important that you perform this step before you proceed to harden specific edges on this model.

To harden the edges surrounding the face shield
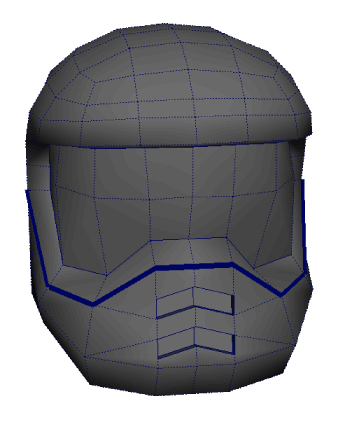
The selected edges are hardened on the low resolution mesh.

Notice that the same edges on the smoothed high resolution version of the helmet are unchanged. For edges to display sharp on the smoothed version, you must turn on the Keep Hard Edge attribute.
To turn on the Keep Hard Edge attribute
The sharper transition between the face shield and the rest of the helmet now appears on the smoothed high resolution version.


A thick line appears on the low resolution model to indicate that a crease has been applied.

Your model is now complete. Depending on your requirements you can delete the construction history on both the low resolution and high resolution versions.
Refine any regions on the helmet as required to gain more experience with the tools presented in this lesson.
If you need to work with either version of the model separately you can ungroup the two meshes by selecting the top node of their hierarchy in the Hypergraph window (Window > Hypergraph: Hierarchy) and selecting Edit > Ungroup.


