Render the scene using raytracing


To better understand the differences between caustics versus other lighting, you begin by rendering the scene using the mental ray for Maya renderer without using Caustics.

You start by preparing the scene and then rendering. In this section you:

Setting a panel layout for rendering

Producing a rendered image usually requires that you render test images to achieve the final result. This may involve adjusting many render quality, shading, and lighting settings. Opening and closing the various windows can become tedious.

Keeping the most frequently used windows and panels open allows you to work more efficiently.

In the following steps, you select a panel layout to work more efficiently with the various panels and windows.

To set a panel layout for rendering

  1. From the perspective view’s panel menu, select Panels > Saved Layouts > Hypershade/Render/Persp.

    The panel layouts update to display the Hypershade window, Render View window, and Perspective view simultaneously.

    When you render an image, it appears in the Render View window.

    Tip

    You can resize the panels in a preset layout by dragging the border between neighboring panels using your left mouse button.

Turning on shadows

In this lesson, you learn how the bottle’s shadow can be made to appear more realistic as a result of the caustics.

To turn on shadows for the spotlight

  1. In the Hypershade window, click the Lights tab.

    The Hypershade displays icons for the two lights in the scene.

  2. In the Hypershade window, double-click the icon for spotLightShape1.

    The Attribute Editor appears.

  3. In the Attribute Editor, click the spotLightShape1 tab to display the lighting attributes for the spotlight.
  4. In the Shadows section, open the Raytrace Shadow Attributes and turn on Use Ray Trace Shadows.

    When you render the scene, shadows are cast by the spotlight.

  5. Hide the Attribute Editor by clicking the Show/Hide Attribute Editor icon on the Status Line.

Using the mental ray for Maya renderer

To use the Caustics feature in Maya you must render using the mental ray for Maya renderer.

To turn on the mental ray for Maya renderer

  1. In the main menu, select Window > Rendering Editors > Render Settings (or click the Render Settings icon in the Render View window).
  2. In the Render Settings window, set Render Using setting to mental ray.
    TipIf mental ray does not appear under the list of renderers, you must load the mental ray plug-in via the Plug-in Manager. Select Window > Settings/Preferences > Plug-in Manager and select Loaded for the Mayatomr.mll plug-in.

Setting the image size for rendering

You set the size that an image will be rendered in the Render Settings window. For this lesson, you render the image at a size that allows you to evaluate the caustic effect.

To set the image size for rendering

  1. In the Render Settings window, select the Common tab and open the Image Size settings.
  2. Choose the 640 X 480 preset from the Presets drop-down list.

Setting render presets for raytracing

For the first rendering, you render the scene to see how the shadows appear without using caustics.

To set Render options for raytracing

  1. In the Render Settings window, select the Quality tab and set the Quality Presets setting to Production.

    The Production preset ensures that the refraction level settings (found in Raytracing Quality section) are at a level high enough to render objects with translucency (for example, the bottle). The Production preset also sets the anti-aliasing level for the image.

  2. Close the Render Settings Window.

Rendering the image

When you render an image, all of the objects, lighting, shading materials, and image quality settings are used to calculate the image, from the camera’s view.

To render an image using mental ray for Maya

  1. Click in the perspective window to indicate which view you want to render.
  2. In the Render View window, click the Render Current Frame icon.

    The bottle scene renders using the mental ray for Maya renderer and the image appears in the Render View window.

    Tip

    If the rendered image appears either too small or too large in the Render View window, select View > Frame Image from the Render View menu to fit the image to the Render View.

  3. Once the render is complete, click the Keep Image icon in the Render View window.

    Keeping the image allows you to compare it to any subsequent test renders. In this lesson you compare each successive rendered image to the previous one to observe how the changes you make to render settings affect the rendered image.
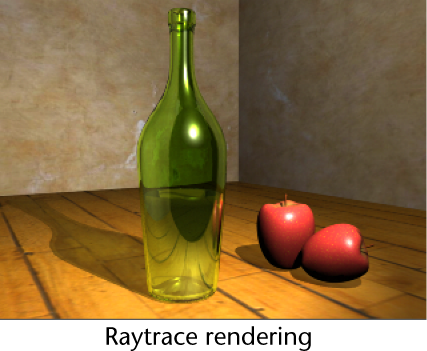
    The rendered image shows the following:

    • A translucent bottle with apples beside it casting shadows towards the rear of the scene. Notice how the shadows appear when raytrace rendered.
    • The distortion of the table surface in the translucent glass effect based on the refractions and reflections.
    • A dark region on the surface of the bottle. This results from the bottle reflecting the empty black area of the scene in front of it.

In the next section, you turn on the caustics rendering attributes and render the scene.

Creative Commons License Except where otherwise noted, this work is licensed under a Creative Commons Attribution-NonCommercial-ShareAlike 3.0 Unported License