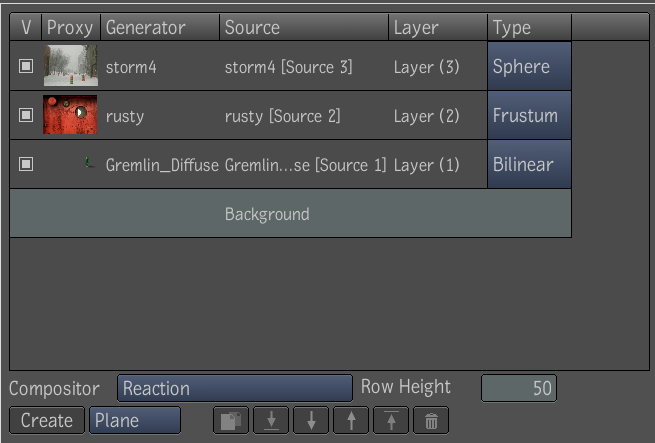
The Layer Editor gives you another view in which to perform compositing tasks with Reaction. It shows all layers for the currently selected Reaction node in your composition. Layers are displayed as rows in a table format and are stacked in the order in which you create the layers. You can choose to show or hide columns in the table, as well as show/ hide layers in your composition.

The Layer Editor contains columns that you can reorder by dragging a column heading. You can also right-click a column heading to display show/hide options. Any hidden columns are listed in the menu. The Layer Editor includes the following:
| Column/Button | Description |
|---|---|
| V (visible) | Turns the visibility of the layer on and off. It is on by default. |
| Proxy | Displays a proxy of the image connected to the layer's source input. |
| Generator | Displays the name of the image generator connected to the layer's source input, if applicable. |
| Source | Displays the source name. You can use the F2 hotkey to edit the source name. If you create a source without a layer, the text is red. |
| Layer | Displays the Layer name. You can use the F2 hotkey to edit the layer name. |
| Layer Type | Click to select the surface geometry type for the current layer: Bicubic, Bilinear, Box, Frustum, Plane or Sphere. The default is Bicubic—see Working with Geometric Surfaces. |
 |
Lets you move the selected layer up, down or to the bottom or top of the stack. |
 |
Duplicates a layer. This is particularly useful when you want to use the same image generator or media for multiple layers. When there is a source in the Layer Editor that does not have a layer assigned to it, the text is displayed in red—see Duplicating Layers. |
 |
Deletes the selected layer. |
| Compositor | In a composition with multiple reaction compositors, selects which reaction compositor to work with. |
| Row Height | Lets you modify the row height in pixels for all rows in the Layer Editor. |
You can quickly build and edit multi-layer compositions using the Layer Editor. As in the Schematic view, you can use the Reaction drop gate to quickly build your initial composition, and can drop tools directly onto layers.
The Layer Editor's context menu also lets you access the Pick List, select the layer's component nodes, such as materials, and other tool nodes associated with the selected layer. When you select a Reaction node or tool, the appropriate panel in the Tool UI is displayed, so you can modify properties interactively. For more information, see Creating Sources and Layers.
To add tools to a layer in your composition:
The tool is added before the source input for the layer, and its Tool UI is displayed.
 Except where otherwise noted, this work is licensed under a Creative Commons Attribution-NonCommercial-ShareAlike 3.0 Unported License