A 1D LUT is generated from one measure of gamma (white, gray, and black) or a series of measures for each color channel. You typically work with a pair of 1D LUTs: the first converts logarithmic data to linear data, and the second converts the linear data back to logarithmic data to print to film.
1D LUTs can be used as import and export LUTs, and as monitor LUTs. Import and export LUTs are mainly used to convert between the logarithmic data contained in film scans and the linear data used within the application. Monitor LUTs ensure the image displayed on the monitor resembles the final output without the actual image data being modified.
You can apply a 1D LUT when importing a film clip, and then convert the image data back to logarithmic data when exporting the final output. For example, you can use a 1D LUT on import to convert 10-bit to 8-bit, 16-bit, 32-bit, or linear images for manipulation. Typically, you would then apply the inverse LUT on export to restore the logarithmic data, ensuring that the modified film print exactly matches the original shot.
You can use 1D LUTs created in other applications as long as they are in the recognized format. All 1D LUT files must have the .lut extension. You should save all 1D LUTs in the project's LUT folder for ease of use, and so they can be archived with the setups of the project.
The 1D LUT file begins with a declaration of the number of tables and the number of entries per table:
LUT: <number of tables> <number of entries per table>
The number of tables in the file depends on the channel resolution required. For a LUT in which all three RGB channels are converted using the same values, just one table is required. To convert the three channels using different values, use three tables. For three channels plus alpha, use four tables. The number of entries in each table corresponds to the bit depth of the source file: 256 entries for 8-bit resolution, 1024 for 10-bit and 4096 for 12-bit. For example, a LUT operating on three 8-bit channels independently would have the following declaration:
Each line following the header contains a single entry indicating the value to which the source is converted. For example, a table converting 10-bit logarithmic values to 8-bit linear would contain 1024 entries, corresponding to the 0–1023 intensity range of pixels in the source file. Each of these entries would be in the range 0–255, corresponding to the intensity range in the destination.
Blank lines and comment lines (starting with a number sign [#]) are ignored. Comment lines are useful for indicating the end of one table and the beginning of another, or for describing how the script or program works.
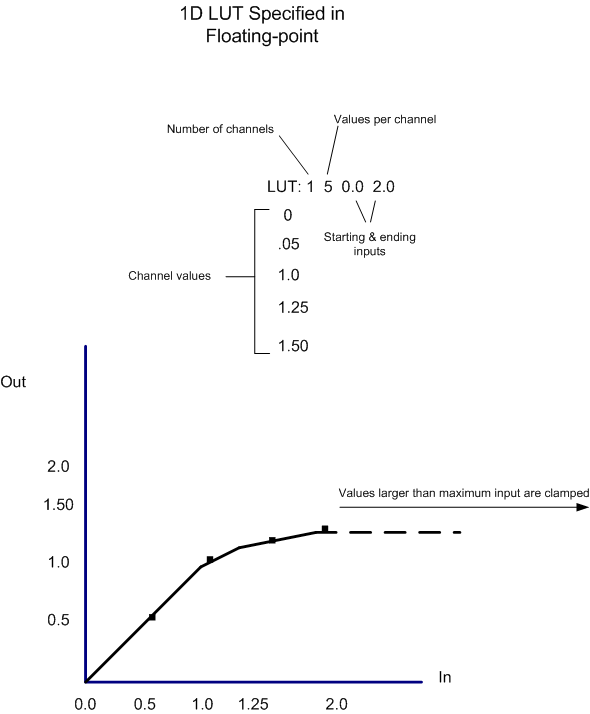
Floating point LUTs are supported and are reversely compatible in most cases. You can specify your own floating-point 1D LUT using an ASCII editor as long as it is in the correct format and is named correctly.
The following illustration represents a 1D floating-point LUT that consists of one channel of five values that fall between the range of 0.0 and 2.0.

LUTs are typically stored in a folder within the application or on a network, you should store LUTs created externally in the same folder for ease of use.
To apply a 1D LUT to an image:

You can modify a 1D LUT by changing values in its ASCII file without having to reset the 1D LUT field.
 Except where otherwise noted, this work is licensed under a Creative Commons Attribution-NonCommercial-ShareAlike 3.0 Unported License