The Warp 2D UI consists of three tabs: Shape Drawing, Output, and Options.

Shape drawing closely mimics that of Garbage Mask and Remove Dust tools. The types of objects that can be created are:
Like the Garbage Mask, there is a list box with the named shapes and individually editable parameters. The Warp UI also has all the components of the Garbage Mask for transforming shapes, setting drawing options for rectangles and ellipses and for loading and saving user settings—see Garbage Mask Controls.
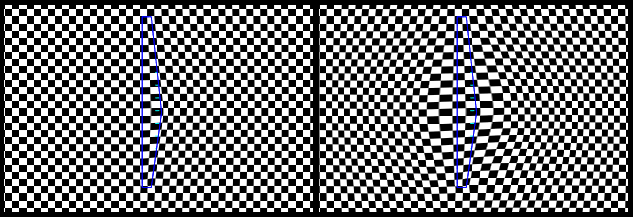
Each shape has a parameter which controls the smoothing across its boundaries, named Smoothing. For open shapes, this can have one of two values: None or Bidirectional. The setting None means that each side of the shape is smoothed independently and there can be discontinuities in the warp across the shape. The setting of Bidirectional means that smoothing is applied across the shape and there will be no discontinuity in this region. If the shape is closed, then in addition to these two values, there are two other possible values: Inside and Outside. A value of Outside means that the inside of the shape is smoothed independently of the outside, but the outside is smoothed to match the inside. A value of Inside is the opposite of this.

Smoothing = None
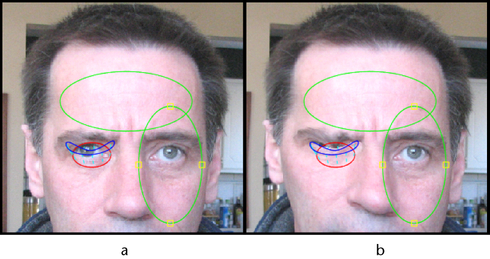
Each shape also has a Boolean parameter, Fence. When this is enabled, this shape acts like a pair of source and destination shapes which are constrained to be equal. This holds the image under the shape in place. When the Fence parameter is enabled, the destination shape and link points disappear. Fence shapes are treated differently from regular shapes. Fence shapes have their own visibility, and the link lines and link editing manipulations do not apply because the correspondence is defined to be the identity along the curve. However, each shape has a toggle to determine if it is a Fence or not, so you can always change a fence shape back to a regular pair of shapes.
When you create Fence shapes, you will usually want to set the Smoothing attribute of the Fence shape to None, to ensure that there is no motion crossing the border of the fence.
Each shape has an Interpolation parameter which is only relevant if the Timing mode is set to Shape (described in the Output tab section). Each shape also has a Mute switch to disable its effect on the warp, and a Lock switch that locks the points, shape, edges, and tangents of the shape.
You can change the name of a shape under the Name heading in the shape list. With the cursor in the text field, press F2, type in a new name and press Enter. You can also assign a name to a shape once you have selected what type of shape you want to draw. Under the Create Shape label, select the default shape name and type in a new one then press Enter or click outside the text field.

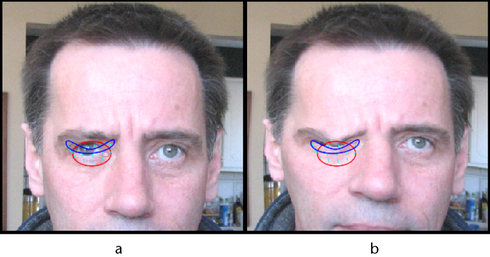
(a) Source and Destination shapes (b) Warp result

(a) Fences added to limit warp to the right eye (b) Warp result
The Warp 2D tool will have two outputs:
While editing, you can use the standard hotkeys (5 and 6) to switch between the input image and the second output, in order to view the source and destination spaces.
Shapes are displayed in the viewer with a color that depends on its type, e.g., source, destination, fence, links, or interpolated shapes.
| Shape | Color |
|---|---|
| Source | Red |
| Destination | Blue |
| Fence | Green |
| Links | Cyan |
| Interpolated | Magenta |
You can distinguish between and edit source and/or destination shapes by toggling on/off the visibility of each of the following classes of shapes:


Other controls on the Shape Drawing tab include:
| Use: | To: |
|---|---|
| Name | Give the selected shape a name. Select the default name in the text field and type in a new name then either press Enter or click outside the text field to apply the name. |
| Interpolation | Control how much warp is applied to the image—see Output Tab. |
| Fence | Enable/disable the shape as a fence. |
| Smoothing | Apply smoothing across the shape's boundaries. |
You can also adjust control points of the shape using the same controls the Garbage Mask uses—see Editing Masks. You can also copy and paste a selected source or destination shape either in the same Warp 2D tool or from another.
To copy and paste a source or destination shape:
