To generate a preview sequence you can create a sequence of any available format, depending on your platform, for example,
AVI, QuickTime, single image files, using the Render function. By doing this you can examine the estimated camera path quality.
If you have configured the render process, select 3D Scene > Render.
If you have not configured the render process:
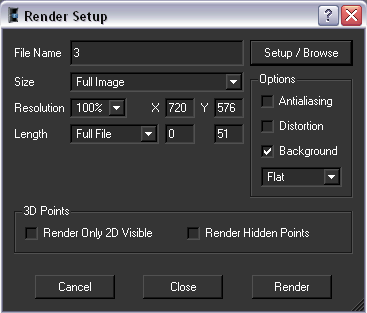
- Select 3D Scene > Render Setup. The Render Setup window opens.
- The File Name field automatically points to the last directory used for rendering. If you click Render without entering a filename, a window pops up asking you to enter one. If this is the case, choose a destination directory
and enter a File Name.
- From the drop-down Size list, choose the size you want for the rendered image. Full image renders the whole image. Crop to viewport only renders the portion of the image visible in the current viewport at the moment you open the Render Setup window. Each time you open it the area to render is updated.
- From the Resolution drop-down list, choose the resolution percentage. Choose the option User to define a custom size.
- To determine the section of the sequence to render, select an option in the Length drop-down list.
- Full Length renders the whole sequence.
- Time range renders the sequence within the time range at the moment of the render.
- User renders the sequence frames entered in the adjacent fields.
- Work Area renders the sequence within the selected Work Area.
- Check the Antialiasing box if you want the object edges to have a clearer appearance. This is important if you want to check for very small, sub-pixel
vibrations of the object, but slow down the process.
- If you have distortion in the original image, check the Distortion box. This applies the non-linear distortion to the object while leaving the background image intact.
Tip
If you do not check this box in a shot where you computed a non-zero distortion, the objects appear to slide slightly with
respect to the background image motion. This is normal, as they are rendered without taking into account the geometric parameters
of the camera.
- Select a render opacity for the 3D objects from the drop-down list:
- Flat - Solid objects
- Wireframe objects
- Texture - Solid objects textured with the background from the corresponding imported objects.
- Click the Render Only 2D Visible checkbox to render only the 3D points in a frame if the corresponding 2D track is defined for this frame.
- Click the Render Hidden Points checkbox to render hidden tracks. Hidden tracks are not rendered by default.
- Click Setup if you want to customize the output format (compression factor).
- If you want to save and run the rendering process immediately click the Render button. If you want to save your setup but not run the rendering process click the Close button.