Skins a surface along a series of profile curves.
This modifies the parameterization of the lofted surface (see Parameterization of NURBS curves and surfaces).
Uniform knot spacing makes the profile curves run parallel to the V direction. The parameter values of the resulting surface in the U direction are equally spaced. The first profile curve corresponds to the isoparm on the surface at U[0], the second to U[1], and so on.
Chord Length spacing causes the parameter values on the resulting surface in the U direction to be based on the distance between the start points of the profile curves.
If the parameterization of the curves differs, the lofted surface might have more spans than any of the profile curves. If you create the curves as Edit Point curves with Chord Length, the surface will be more complex and harder to work with.
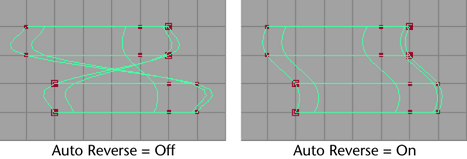
If Auto Reverse is off, the curves are used as they are, which may result in a twisted surface. If on, the curves are automatically reversed.
In the following example, the two top curves and the two bottom curves are going in different directions.

If Auto Reverse is off, the result is a twisted lofted surface. If on, the curves are automatically reversed.

If Auto Reverse is off, you can use the Show Manipulator Tool to reverse the curve direction of the original profile curves as needed. Simply click the manipulator handle to reverse the curve direction.

The Close option sets whether the created surface is periodic in one dimension (U or V). Close is off by default. See Periodic, closed, and open geometry.
If you turned Auto Reverse off when you lofted the surface, a Reverse Curve option is displayed for each curve, primitive, or surface isoparm you used to create the lofted surface. Select the Show Manipulator Tool to display the reverse manipulators. Click the options to reverse the direction of the input curves, or click the manipulators.
In the following illustration, the first curve used to create the lofted surface is selected for reversal.
