Select to export your render layers, passes and cameras to Composite. This option exports your elements using the same filename and settings as your previous export. If you have not performed an export previously, the default filename is scenename.precomp, and all render layers, passes and cameras in your scene are exported.
Render > Export Pre-Compositing > 
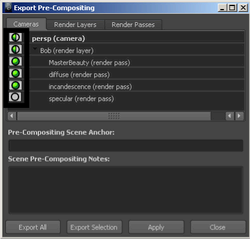
Select this option to open the Export Pre-Compositing editor. Using this window, you can:
The Export Pre-compositing editor is divided into three tabs: Cameras, Render Layers, and Render Passes. Select the appropriate tab depending on the elements that you want to export.
Use the ![]() icon
to expand the render layer, render camera, or render pass hierarchy.
icon
to expand the render layer, render camera, or render pass hierarchy.
A ![]() icon
indicates that all elements are being exported. A
icon
indicates that all elements are being exported. A ![]() icon
indicates that only partial elements are being exported.
icon
indicates that only partial elements are being exported.
In the following example,
only the diffuse and incandescence passes are exported. Therefore,
the ![]() icon
beside Bob (render layer) indicates that only partial elements are
being exported.
icon
beside Bob (render layer) indicates that only partial elements are
being exported.

Click the Export All or Export Selection button to export your render layers, passes and cameras to Composite. The Export PRECOMP file window opens that allows you to enter a filename for your exported file.
Use the Pre-Compositing Scene Anchor to connect the Maya scene to a Composite master composition (scene composition). All elements in your scene are associated with a scene anchor. Unlike the scene name, which can change, for example, from version one to version two, the scene anchor does not change. All elements that belong to the same composite, for example, cameras, render passes, render layers, and so forth, should have the same scene anchor.
After selecting Export All or Export Selection from the Export Pre-Compositing window, Composite tries to find the scene composition with the specified anchor name. If such a composite does not exist, a new one is built. If the composite exists, then it is updated (depending on the import options in Composite; there are different update/creation/recreate modes).