


Learning Resources > Tutorials > Getting Started with Maya > Animation > Lesson 4: Nonlinear animation
with Trax >
Extending the length of
motion capture data
You often need more animation of a motion sequence than is provided in the motion capture data. For example, you may need to have a walk cycle that is substantially longer than what was provided in the original file. You can use the Trax Editor to edit the motion capture data and create clips that can be cycled to make longer animation sequences. When you cycle a clip, the clip is extended in length with duplicate animation from the original clip over a defined interval of time.
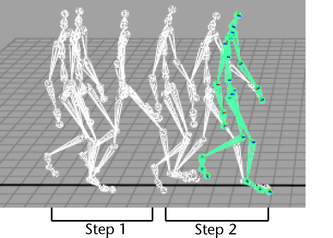
If you want to cycle a clip, you must first determine areas within the animation sequence where the clip repeats seamlessly. For example, if you want to create a walk cycle from the motion capture data, you need to determine the time (frame) where the right foot is planted on the ground, and then move forward in the Time Slider, frame by frame, until you find the next frame where the right foot is planted on the ground in exactly the same (or very similar) manner, and then create a clip. The resulting clip will contain two steps of the walking motion. The clip can then be cycled to produce a motion that repeats. How seamlessly it cycles depends on the original motion capture data.
In the steps that follow you create a walk cycle from the motion capture data by:
To create a clip that can be cycled
The skeleton updates in the scene to a walking pose where the right foot is planted on the ground.
At frame 45, the skeleton is posed in a similar manner as it appeared at frame 6. If you use this range of frames (6 to 45), you can create a clip that can be cycled.
 .
.
Two clips appear in the Outliner named WalkCycle and WalkCycleSource.

The clip named WalkCycle appears in a new track. Loading the Character displays any tracks associated with the character; in this case the WalkCycle clip.

The skeleton takes two steps and stops.

In the steps that follow, you cycle the clip to extend the animation so the skeleton repeats the two step motion and travels farther in the scene.
To cycle the motion for the walk clip
When you shift-drag over the Frame Out area, the mouse cursor changes to a circular pointing arrow to indicate you are cycling the clip.

The region is highlighted to indicate you can edit the values in the region. The number will likely not be exactly 2.0. This means that the cycle will not repeat exactly twice.
Setting the offset attributes for the clip to Relative ensures that each cycle begins at the position where the last sequence left off. This ensures that the skeleton doesn’t jump back to its start point after each cycle.
The skeleton takes six steps and then stops.
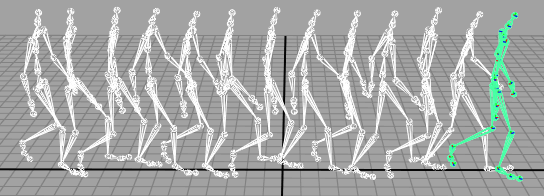
When the clip is cycled twice, the two-step walking motion occurs three times in total.